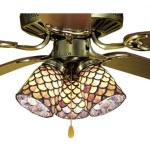
How To Replace a Hunter Ceiling Fan Light Kit
Replacing a Hunter ceiling fan light kit can refresh a room's aesthetic and improve lighting. This process generally involves removing the old light kit and installing a new one compatible with the existing fan. While the specific steps can vary slightly depending on the fan and light kit model, the following guide outlines the general procedure.
Safety Precautions
Safety should always be the top priority when working with electrical fixtures. Before beginning any work, ensure the power supply to the ceiling fan is completely shut off. This can be done by turning off the circuit breaker at the main electrical panel.
Gather Necessary Tools and Materials
Having the right tools and materials on hand streamlines the replacement process. Typically, the following items are required:
- Screwdriver (Phillips and flathead)
- Wire strippers/cutters
- Electrical tape
- Ladder
- New light kit compatible with the Hunter ceiling fan model
- Light bulbs (compatible with the new light kit)
Remove the Old Light Kit
Begin by removing the existing light kit. This usually involves unscrewing the decorative finial or cap that holds the glass shade in place. After removing the shade(s), disconnect the wires connecting the light kit to the ceiling fan's wiring. Carefully label these wires before disconnecting to ensure correct reconnection with the new light kit.
Identify the Wiring
Most Hunter ceiling fans utilize standard wiring color codes. Typically, black represents the hot wire, white represents the neutral wire, and green (or sometimes bare copper) represents the ground wire. The new light kit's wiring should follow the same color coding. However, always consult the wiring diagrams provided with both the ceiling fan and the new light kit to confirm the correct connections.
Connect the New Light Kit Wiring
With the old light kit removed and the wiring identified, connect the wires of the new light kit to the corresponding wires of the ceiling fan. Secure the connections using wire nuts, ensuring they are tightly fastened. Gently tuck the connected wires into the ceiling fan housing.
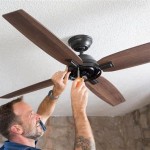
Mount the New Light Kit
After the wiring is complete, mount the new light kit to the ceiling fan. The specific mounting method will vary depending on the light kit design, but it typically involves screwing the light kit base to the fan's mounting bracket. Ensure the mounting screws are securely tightened.
Install Light Bulbs and Shades
With the light kit securely mounted, install the light bulbs (compatible with the new light kit's specifications). Next, attach the glass shades or other decorative elements according to the manufacturer's instructions. Secure the shades with the appropriate finials or fasteners.
Test the New Light Kit
Once everything is installed, restore power to the ceiling fan by turning the circuit breaker back on. Test the new light kit by turning the fan's light switch on. Verify that the lights function correctly. If the lights do not work, double-check all wiring connections and ensure the bulbs are properly installed.
Troubleshooting Tips
If the new light kit does not function correctly after installation, consider the following troubleshooting steps:
- Verify that the power is restored to the circuit.
- Double-check all wiring connections to ensure they are secure and correctly matched.
- Ensure the bulbs are properly installed and functioning.
- Consult the troubleshooting section of the light kit's instruction manual for specific issues related to the model.
- If the problem persists, consult a qualified electrician.
Light Kit Compatibility
Choosing a compatible light kit is crucial for proper function and safety. Refer to the Hunter ceiling fan's model number to determine the compatible light kits. This information can usually be found on a label located on the fan's motor housing. Consult the Hunter website or contact their customer service for assistance in identifying compatible light kits if needed.
Choosing the Right Light Kit
When selecting a new light kit, consider factors such as style, finish, and the number of lights. Choose a style that complements the existing décor and provides the desired level of illumination. Also, ensure the light kit's finish matches or complements the ceiling fan's finish for a cohesive look.
Disposing of the Old Light Kit
Dispose of the old light kit responsibly. Check local regulations for proper disposal of electronic components. Some recycling centers may accept old light fixtures.

How To Replace A Ceiling Fan Light Kit Smafan Com

How To Remove A Ceiling Fan Hunter

How To Remove A Ceiling Fan Hunter

How To Install A Ceiling Fan Light Kit

Changing Ceiling Fan Light Kit Doityourself Com Community Forums

Ceiling Fan Light Repair Home Tutor

Installation Instructions For Hunter Ceiling Fan

Hunter Ceiling Fan Replacement Parts Fans Lighting

How To Install A Ceiling Fan Hunter

Hunter Ceiling Fan Replacement Parts Fans Lighting
Related Posts