How To Replace a Ceiling Fan Remote Control
Replacing a ceiling fan remote control can be a straightforward process, often requiring no advanced electrical skills. Whether the old remote has stopped functioning or users desire an upgrade with new features, this guide provides a step-by-step approach to replacing the remote control unit.
1. Determine the Ceiling Fan's Compatibility
The first step is to determine the compatibility between the existing ceiling fan and the replacement remote. The user manual for the ceiling fan should provide information regarding compatible remote models. If the manual is not available, the manufacturer's website often provides documentation for older models. Another option is to examine the existing receiver unit inside the fan's housing. This unit often has model numbers and compatibility information printed on it. Matching these identifiers with the new remote control ensures proper functioning.
2. Gather the Necessary Tools and Materials
Before starting the replacement process, gathering the necessary tools and materials streamlines the task. Typically, a ladder, a screwdriver (Phillips head is most common), and the new remote control and its accompanying receiver unit are required. Some installations may require wire strippers, wire nuts, and electrical tape. Always ensure the electricity to the fan is shut off at the breaker box before commencing any work.
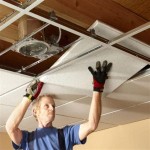
3. Accessing the Ceiling Fan's Receiver Unit
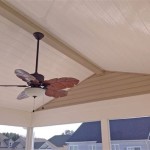
The fan’s receiver unit is usually located within the ceiling fan housing, above the blades. After safely turning off the power, carefully remove the canopy covering the housing. The method for removing the canopy varies depending on the fan model, but generally involves loosening screws or releasing clips. Once the canopy is removed, the receiver unit should be visible, often attached to the mounting bracket with wires connecting it to the fan's motor and light kit.
4. Removing the Old Receiver Unit
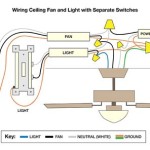
With the receiver unit exposed, the next step is to carefully disconnect the wiring from the old receiver. Before disconnecting any wires, take a picture or draw a diagram of the wiring configuration for reference when installing the new receiver. Carefully unscrew the wire nuts connecting the wires to the receiver. If the wires are connected with wire connectors other than wire nuts, follow appropriate procedures for disconnection. Then, detach the old receiver from the mounting bracket, usually by removing screws.
5. Installing the New Receiver Unit
Position the new receiver unit onto the mounting bracket, securing it with the appropriate screws provided. Consult the installation instructions that came with the new remote control kit for specific wiring instructions. Using the previously taken picture or diagram, connect the fan's wiring to the corresponding terminals on the new receiver unit. Secure all connections using appropriately sized wire nuts. Ensure all wire connections are secure and that no bare wires are exposed.
6. Testing the New Remote Control
Once the wiring is complete and the receiver unit is securely attached, replace the canopy, ensuring it is properly seated and secured. Restore power to the ceiling fan at the breaker box. Test the functionality of the new remote control by operating the fan’s speed, light, and any other included features. Verify that all functions operate as intended. If the fan does not respond to the remote, double-check the wiring connections and consult the troubleshooting section of the new remote control's manual.
7. Programming the New Remote Control (if necessary)
Some remote control models require a pairing or programming process with the receiver unit. This process is usually detailed in the instructions provided with the new remote. The procedure can vary widely between manufacturers and models. Typical steps involve setting dip switches on both the receiver and remote to match, or pressing a specific sequence of buttons on the remote. Follow the provided instructions carefully to ensure proper pairing.
Replacing a ceiling fan remote control can be a manageable task with the proper preparation and execution. Following these steps and consulting the manufacturer’s instructions will help ensure a successful installation and restored functionality.

Universal Ceiling Fan Remote Replacement Ifixit Repair Guide

How To Change A Ceiling Fan Remote Control

How To Convert A Ceiling Fan Remote Control

Universal Ceiling Fan Remote Replacement Ifixit Repair Guide

How To Remove Replace A Hampton Bay Universal Ceiling Fan Remote

Ceiling Fan Remote Control Information Do You Need A

Ceiling Fans With Remote To Or Not

Ceiling Fan Remote Control Replacement

Ceiling Fan Remote Control Replacement 3 Sd Light On Off Dimmer Switch 53t Kujce9103 Uc7030t Transmitter For 28r Receiver Compatible With Hunter In 2024

Ceiling Fan Remote Control Replacement For Hampton Bay Hunter Uc7078t Chq7078t Chq8bt7078t L3h2003fanhd Hd Hd6 Rr7078tr With Reverse Com
Related Posts