Replace a Drop Down Ceiling: A Comprehensive Guide
A drop down ceiling, also known as a suspended ceiling or a T-bar ceiling, is a secondary ceiling suspended below the main structural ceiling. It is commonly used in commercial buildings, basements, and sometimes in residential spaces to conceal wiring, piping, and ductwork. Over time, these ceilings can become damaged, outdated, or simply no longer suit the aesthetic preferences of the space. Replacing a drop down ceiling is a manageable project for many homeowners and business owners with basic carpentry skills and the appropriate tools. This article provides a thorough guide on how to replace a drop down ceiling, ensuring a successful installation and improved space appearance.
Planning and Preparation
Before commencing the replacement of a drop down ceiling, careful planning and preparation are essential. This stage involves assessing the existing ceiling, selecting the new materials, gathering the necessary tools, and ensuring safety precautions are in place.
1. Assessing the Existing Ceiling: Begin by inspecting the existing drop down ceiling. Note the dimensions of the room to determine the quantity of materials required. Identify any potential obstacles, such as lighting fixtures, HVAC vents, or sprinkler systems, and plan how to address them during the replacement process. Examine the condition of the existing grid system, including the main runners, cross tees, and wall angles. If the grid is in good condition and meets the requirements of the new ceiling tiles, it may be possible to reuse it, which can save time and money. However, if the grid is damaged, rusted, or does not align with the desired layout of the new ceiling, it should be replaced as well.
2. Selecting New Materials: The choice of materials for a new drop down ceiling depends on various factors, including budget, aesthetic preferences, and functional requirements. Ceiling tiles are available in a wide range of materials, textures, and sizes. Common materials include mineral fiber, fiberglass, and vinyl-faced gypsum. Consider the acoustic properties of the tiles, especially in spaces where noise reduction is important. Also, ensure the tiles meet any fire safety codes or regulations applicable to the building. If the grid system is being replaced, select new main runners, cross tees, and wall angles that are compatible with the chosen ceiling tiles. Purchase any necessary accessories, such as hold-down clips, hanger wire, and grid connectors.
3. Gathering Tools and Equipment: Having the right tools and equipment is crucial for a smooth and efficient replacement process. Essential tools include: * Measuring tape: For accurate measurements of the room and grid system. * Level: To ensure the grid is installed straight and level. * Laser level (optional): For more precise leveling. * Utility knife: For cutting ceiling tiles and grid components. * Tin snips: For cutting metal grid components. * Drill with screwdriver bits: For installing hanger wire and securing grid components. * Pliers: For bending and securing hanger wire. * Safety glasses: To protect eyes from debris. * Gloves: To protect hands during the installation process. * Ladder or scaffolding: To reach the ceiling. * Stud finder: To locate ceiling joists for secure hanger wire attachment. * Pencil: For marking measurements and cut lines.
4. Safety Precautions: Prioritize safety throughout the replacement process. Wear safety glasses and gloves to protect against debris and sharp edges. Use a sturdy ladder or scaffolding and ensure it is properly positioned and stable. If working with electrical fixtures, turn off the power at the breaker box before starting any work. When cutting ceiling tiles or grid components, use caution and follow the manufacturer's instructions. If asbestos-containing materials are suspected in the existing ceiling, do not disturb them. Hire a qualified professional to assess and remove the materials safely.
Removing the Existing Drop Down Ceiling
The removal of the existing drop down ceiling must be done carefully to avoid damage to the structural ceiling or any concealed utilities. The following steps outline the removal process.
1. Removing Ceiling Tiles: Begin by removing the existing ceiling tiles. Carefully lift each tile upward, tilting it slightly to clear the grid, and then lower it to the floor. Stack the tiles neatly in a designated area to avoid obstructing the workspace. If the tiles are damaged or contain hazardous materials, dispose of them according to local regulations.
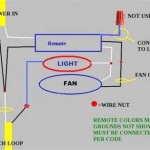
2. Disconnecting Light Fixtures and Other Utilities: Before removing any grid components, disconnect any light fixtures, HVAC vents, or other utilities that are attached to the ceiling. Turn off the power at the breaker box before disconnecting electrical fixtures. Carefully detach the fixtures from the grid and lower them to the floor. Cap any exposed wires with wire connectors to prevent electrical shock. If removing HVAC vents, seal the duct openings with tape or plastic to prevent dust and debris from entering the ductwork. If sprinkler systems are present, exercise extreme caution and avoid damaging the sprinkler heads or piping. If necessary, consult with a professional plumber or sprinkler technician.
3. Removing Grid Components: Once the ceiling tiles and utilities have been removed, proceed with removing the grid components. Start by removing the cross tees, which are the shorter pieces that connect to the main runners. Lift each cross tee upward and rotate it to detach it from the main runner. Next, remove the main runners, which are the longer pieces that run the length of the room. Disconnect the main runners from the wall angles and lower them to the floor. Finally, remove the wall angles, which are the strips that are attached to the walls around the perimeter of the room. Use a screwdriver or pry bar to detach the wall angles from the walls. If the wall angles are attached with nails or screws, remove them carefully to avoid damaging the walls.
4. Removing Hanger Wire (If Replacing Grid): If the grid system is being replaced, remove the hanger wire that supports the main runners. Use pliers to bend and detach the hanger wire from the ceiling joists. If the hanger wire is attached with screws or nails, remove them carefully. Dispose of the old grid components and hanger wire properly.
Installing the New Drop Down Ceiling
The installation of the new drop down ceiling requires precision and attention to detail. The following steps outline the installation process.
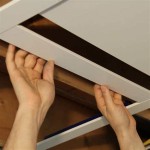
1. Installing Wall Angles: Begin by installing the wall angles around the perimeter of the room. Use a level to ensure the wall angles are installed straight and level. Mark the desired height of the ceiling on the walls and use a stud finder to locate the wall studs. Attach the wall angles to the wall studs using screws or nails. If the walls are made of concrete or masonry, use appropriate anchors to secure the wall angles.
2. Installing Hanger Wire: Next, install the hanger wire to support the main runners. Use a stud finder to locate the ceiling joists. Attach the hanger wire to the ceiling joists using screws or nails. Space the hanger wire according to the manufacturer's instructions, typically every 4 feet. Ensure the hanger wire is securely attached and can support the weight of the grid system and ceiling tiles.
3. Installing Main Runners: Install the main runners parallel to each other, spaced according to the dimensions of the chosen ceiling tiles. Suspend the main runners from the hanger wire, ensuring they are level and aligned with the wall angles. Use a level to check the height of the main runners and adjust the hanger wire as needed. Connect the main runners to each other using grid connectors, if required.
4. Installing Cross Tees: Install the cross tees perpendicular to the main runners, spaced according to the dimensions of the ceiling tiles. Connect the cross tees to the main runners using the built-in clips or connectors. Ensure the cross tees are level and aligned with the wall angles and main runners.
5. Installing Ceiling Tiles: Once the grid system is complete, begin installing the ceiling tiles. Carefully lift each tile upward, tilting it slightly to clear the grid, and then lower it into place. Ensure the tiles are properly seated in the grid and aligned with each other. Use hold-down clips, if necessary, to secure the tiles in place. Cut tiles to fit around light fixtures, HVAC vents, and other obstructions using a utility knife or tin snips. Work carefully and precisely to create a clean and professional finish.
Completing the Installation
After installing the ceiling tiles, the final step involves reconnecting utilities and cleaning the work area.
1. Reconnecting Light Fixtures and Other Utilities: Reconnect any light fixtures, HVAC vents, or other utilities that were disconnected during the removal process. Follow the manufacturer's instructions for installing the fixtures and ensuring they are properly secured. Turn the power back on at the breaker box and test the light fixtures to ensure they are working correctly. Reattach HVAC vents and ensure they are properly sealed.
2. Cleaning the Work Area: Once the installation is complete, clean the work area thoroughly. Remove any debris, scraps of material, and tools. Sweep or vacuum the floor to remove any dust or dirt. Dispose of any waste materials properly. Inspect the finished ceiling to ensure all tiles are properly seated and aligned. Make any necessary adjustments or repairs to ensure a professional and aesthetically pleasing result.

Easy Way To Update A Drop Ceiling Sprucing Up Mamahood

A Drop Ceiling That Looks Better Than Drywall How To Install In Basement Diy

Tearing Down The Drop Ceiling In Our Living Room Demo Day Part 1

Operation Bathroom Remodel Removing A False Ceiling Swoon Worthy

How To Remove A Drop Ceiling It Like S Hot The Space Between

12 Drop Ceiling Installation Tips From A Pro Family Handyman

How To Install Drop Ceiling Tiles For A Bathroom Diy Danielle

How To Remove A Drop Ceiling It Like S Hot The Space Between

Finishing Basement 11 Diy Accessible Ceiling Drop Idea Easy Fast Looks Great

A Drop Ceiling That Looks Better Than Drywall How To Install In Basement Diy
Related Posts