How To Remove Water Stains From Textured Ceiling
Water stains on a textured ceiling are a common household problem, often signaling a leak from the roof or plumbing above. These unsightly blemishes can detract from the overall appearance of a room and, more critically, indicate underlying structural or moisture issues that necessitate prompt attention. Successfully removing water stains from a textured ceiling requires a careful approach, combining preparation, the correct tools, and appropriate techniques to avoid further damage or uneven patching.
Identifying the source of the water stain is the imperative first step. Before any cleaning or repair attempts are made, the active leak must be located and resolved. Ignoring this crucial step will only lead to the recurrence of the stain, rendering any remediation efforts futile. Look for telltale signs of leaks, such as dripping water, damp spots, or bulging areas on the ceiling. Common culprits include leaking pipes, roof damage, or condensation issues. Once the source is identified, professional assistance, such as a plumber or roofer, may be required to rectify the problem effectively. Only after the leak is completely fixed should efforts be directed towards removing the existing water stain.
The approach to removing water stains from textured ceilings differs depending on the severity of the stain and the type of texture applied. Minor, recent stains may be addressed with simple cleaning methods, while older, more extensive stains often require patching and repainting to achieve a seamless finish. This process involves carefully matching the existing texture and paint color to ensure the repaired area blends seamlessly with the surrounding ceiling.
Necessary Materials and Tools
Before embarking on the removal process, it is important to gather the necessary materials and tools. These will vary slightly depending on the method chosen, but the following list provides a comprehensive overview of commonly required items:
- Safety Glasses: Protecting the eyes from falling debris and cleaning solutions is paramount.
- Dust Mask or Respirator: Prevents inhalation of dust, mold spores, and paint particles.
- Drop Cloths or Plastic Sheeting: Covering the floor and furniture to protect them from drips and debris is essential.
- Step Ladder: Providing safe and stable access to the ceiling is necessary.
- Cleaning Solution (Mild Dish Soap and Water): Used for cleaning minor stains.
- Bleach Solution (Diluted Bleach and Water): For disinfecting and removing mold. Handle with care and ensure adequate ventilation.
- Soft Sponge or Cloth: For gently applying cleaning solutions.
- Spray Bottle: For applying cleaning solutions in a controlled manner.
- Primer (Stain-Blocking Primer): To prevent the stain from bleeding through the new paint.
- Ceiling Paint (Matching Color and Sheen): To seamlessly blend the repaired area with the existing ceiling.
- Paintbrush or Roller: For applying primer and paint.
- Texturing Compound (Matching Existing Texture): For repairing damaged texture. Options include aerosol texture spray, pre-mixed texture compounds, or dry mix textures that require mixing with water.
- Putty Knife or Trowel: For applying and smoothing texturing compound.
- Texture Matching Tools (Optional): Specialized tools can help replicate specific texture patterns.
- Sandpaper (Fine Grit): For lightly smoothing rough edges after texturing.
- Utility Knife: For trimming loose or damaged texture.
Careful selection of these materials is crucial to achieving a professional-looking repair. Consider the specific type of textured ceiling and the severity of the stain when deciding on the appropriate cleaning solutions, texturing compound, and paint.
Removing Minor Water Stains with Cleaning Solutions
For recent and minor water stains, simple cleaning techniques may suffice. This method is most effective when the stain is relatively shallow and hasn't deeply penetrated the textured surface.
Step 1: Preparation. Begin by protecting the surrounding area. Lay down drop cloths or plastic sheeting to cover the floor and any nearby furniture. Wear safety glasses and a dust mask to protect your eyes and respiratory system.
Step 2: Cleaning Solution. Prepare a mild cleaning solution using warm water and a few drops of mild dish soap. Avoid using harsh chemicals or abrasive cleaners, as these can damage the textured surface.
Step 3: Application. Dampen a soft sponge or cloth with the cleaning solution. Gently blot the water stain, working from the outside edges towards the center. Avoid rubbing vigorously, as this can spread the stain and damage the texture.
Step 4: Drying. Allow the area to air dry completely. This may take several hours. Avoid using a hairdryer or other heat source, as this can cause the stain to set.
Step 5: Inspection. Once the area is dry, inspect it for any remaining stain. If the stain persists, repeat the cleaning process or consider using a diluted bleach solution. However, exercise extreme caution when using bleach, ensuring adequate ventilation and protecting your skin and eyes.
Step 6: Bleach Solution (Optional). If the stain remains after the initial cleaning, create a diluted bleach solution by mixing one part bleach with ten parts water. Apply the solution to the stained area using a spray bottle. Let it sit for a few minutes, then blot it dry with a clean cloth. Ensure adequate ventilation when using bleach and avoid prolonged exposure.
If the stain lightens but is still visible, consider applying a stain-blocking primer before painting. This will prevent the stain from bleeding through the new paint layer.
Repairing Extensive Water Stains and Texture Damage
For older, more severe water stains or ceilings with significant texture damage, a more comprehensive repair approach is necessary. This involves removing the damaged texture, applying a stain-blocking primer, re-texturing the area, and painting to match the existing ceiling.
Step 1: Preparation. Begin by protecting the surrounding area with drop cloths or plastic sheeting. Wear safety glasses and a dust mask to protect your eyes and respiratory system.
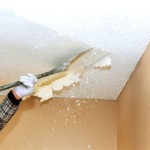
Step 2: Removing Damaged Texture. Use a utility knife to carefully score around the perimeter of the damaged area. This will help to prevent the texture from peeling away from the surrounding ceiling. Gently scrape away the loose or damaged texture using a putty knife or scraper. Be careful not to damage the underlying drywall.
Step 3: Cleaning the Area. Once the damaged texture has been removed, clean the area with a damp sponge to remove any dust or debris. Allow the area to dry completely.
Step 4: Applying Stain-Blocking Primer. Apply a stain-blocking primer to the entire repaired area. This will prevent the water stain from bleeding through the new paint. Allow the primer to dry completely according to the manufacturer's instructions. Consider applying two coats of primer for stubborn stains.
Step 5: Applying Texturing Compound. Choose a texturing compound that closely matches the existing texture of your ceiling. Apply the compound to the primed area using a putty knife or trowel. Use the appropriate technique to replicate the existing texture. This may involve stippling, swirling, or spraying the compound.
Step 6: Matching the Texture. Matching the existing texture is a critical step in achieving a seamless repair. There are various techniques and tools available to replicate different texture patterns. For spray textures, practice on a piece of cardboard before applying it to the ceiling. For hand-applied textures, experiment with different tools and techniques until you achieve a close match.
Step 7: Drying and Sanding. Allow the texturing compound to dry completely according to the manufacturer’s instructions. This may take several hours or even overnight. Once the compound is dry, lightly sand any rough edges or imperfections using fine-grit sandpaper. Be careful not to sand too aggressively, as this can damage the texture.
Step 8: Painting. Once the texturing is complete and dry, paint the repaired area with ceiling paint that matches the existing color and sheen. Apply one or two coats of paint, allowing each coat to dry completely before applying the next.
Step 9: Blending. To further blend the repaired area with the surrounding ceiling, consider feathering the edges of the paint. This involves lightly blending the new paint into the existing paint, creating a gradual transition.
Successful removal of water stains from textured ceilings hinges on addressing the source of the leak, selecting appropriate materials, and executing careful techniques. While minor stains may be remedied with simple cleaning solutions, more extensive damage necessitates a comprehensive repair involving texture removal, priming, re-texturing, and painting. Patience and attention to detail are crucial for achieving a seamless and professional-looking result.

Popcorn Ceiling How To Remove An Ugly Stain Drywall Repairman Water Damage Repair

How To Fix Water Stains On Ceiling Leaks Super Easy Steps Abbotts At Home

What Should I Do About Water Stains On A Popcorn Williams Painting

Super Easy Way To Remove Water Stains From Ceilings Without Paint 1 Step Abbotts At Home

We Have An Old Water Stain On Our Ceiling How Do I Cover It Hometalk

Patch A Water Stained Ceiling Or Textured Diy Family Handyman

How To Fix Water Damage On Popcorn Ceilings

How To Fix Water Damage On Popcorn Ceilings

Patch A Water Stained Ceiling Or Textured Diy Family Handyman

How To Repair A Water Damaged Popcorn Ceiling
Related Posts