How to Remove Ceiling Fan Blades with Clips
Ceiling fans are a common feature in many homes, providing both cooling and air circulation. However, there may come a time when you need to remove the blades, perhaps for cleaning, painting, or replacement. If your fan blades are held in place with clips, knowing the proper procedure is crucial to avoid damage and ensure safe removal. This article will guide you through the steps of removing ceiling fan blades with clips, providing clear instructions and safety tips.
1. Gather Your Tools and Supplies
Before you begin, gather the necessary tools to ensure a smooth and efficient process. Here's a list of what you'll need:
- A sturdy ladder that reaches the ceiling fan safely
- A Phillips head screwdriver
- Work gloves (optional, but recommended for protection)
- A drop cloth or towel to catch any falling screws or debris
It's important to note that some ceiling fans use different types of blade attachment mechanisms. If you're unsure about your fan model, consult the owner's manual or contact the manufacturer for specific instructions.
2. Disengage the Fan Power
Safety is paramount when working with electrical appliances. Before you start taking apart the fan, always ensure the power is completely disconnected. Follow these steps:
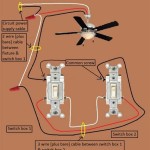
- Locate the circuit breaker controlling the ceiling fan. It's typically found in your electrical panel.
- Turn off the circuit breaker corresponding to the fan. It may be helpful to label the breaker or take a photo for reference.
- Double-check that the power is off by flipping the fan's light switch. The light should not turn on, confirming no power is flowing to the fan.
These steps prevent electrical shock and potential injury while working on the ceiling fan.
3. Locate and Release the Blade Clips
Once the power is off, you can start removing the blades. Here's how to do it:
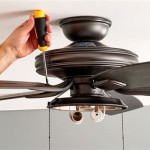
- Position yourself safely on the ladder and look at the underside of each fan blade. You should find two or more metal clips holding the blade in place. These clips might be located near the center of the blade or closer to the end.
- Use your fingers to gently pry the clips open. They may be spring-loaded or have a small tab that needs to be pushed or pulled.
- Once the clips are loose, carefully lift and remove the blade from the fan motor. You may need to wiggle it slightly to release it from the clips.
- Repeat this process for each blade on the fan.
Be careful not to force the blades or the clips, as this could cause damage. If you encounter resistance, check for any obstructions or hidden clips you might have missed.
4. Store or Dispose of Removed Blades
After successfully removing the blades, store them in a safe and secure place. If you are replacing them with new blades, dispose of the old ones responsibly. Some local recycling centers accept metal blades, while others might require specialized disposal. Consult your local waste management guidelines for appropriate disposal methods.
Remember to keep the blades in a dry and clean area to prevent damage or rusting.
5. Reattaching the Blades (Optional)
If you're replacing the blades or simply reinstalling them, you'll need to attach them back to the fan. Follow these steps:
- Position the new or old blades back onto the fan motor, aligning the holes in the blades with the mounting screws on the motor.
- Gently press the blades down onto the motor until you hear a click or feel the clips engage around the blades.
- Ensure that all blades are securely attached and flush with the fan motor before moving on.
Once all the blades are reattached, you can restore the electrical power to the ceiling fan by turning the circuit breaker back on. Test the fan by running it for a short period to ensure proper operation.

How To Replace Ceiling Fan Blades The Home Depot

How To Replace Ceiling Fan Blades The Home Depot

How To Remove A Ceiling Fan Hunter

How To Remove Ceiling Fan Blades Clean Maintenance

How To Take Down Or Remove A Ceiling Fan 2 Best Ways

How To Remove A Ceiling Fan The Home Depot

How To Remove A Ceiling Fan The Home Depot

How To Remove Fan Blades With A Gear Puller

People Are Cleaning The Dust And Grime From Ceiling Fans With Pillow Cases Daily Mail

Ceiling Fan Makeover 100 Room Challenge The Palette Muse
Related Posts