How To Remove Ceiling Diffuser
Ceiling diffusers are essential components of an HVAC system, responsible for distributing conditioned air evenly throughout a space. However, there may come a time when you need to remove a ceiling diffuser for cleaning, maintenance, or replacement. Here's a comprehensive guide on how to safely and effectively remove a ceiling diffuser:
Step 1: Safety Precautions
Before beginning, ensure your safety by turning off the power to the HVAC unit at the electrical panel. Wear appropriate safety gear, including gloves and eye protection, to prevent injuries from sharp edges or debris.
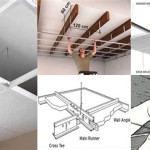
Step 2: Locate the Diffuser Retaining Ring
Most ceiling diffusers have a retaining ring that holds them in place. Look for a thin metal ring around the diffuser's perimeter, which may be visible or concealed by a trim plate.
Step 3: Remove the Retaining Ring
There are two common ways to remove the retaining ring:
- Spring-Loaded Rings: Gently pry the ring away from the diffuser using a flat-head screwdriver or a butter knife. Insert the tool between the ring and the ceiling and apply gentle pressure to release the spring tension.
- Screw-On Rings: Use a screwdriver to loosen and remove the screws securing the ring. Be careful not to overtighten the screws when reinstalling to avoid damaging the diffuser.
Step 4: Detach the Diffuser
Once the retaining ring is removed, carefully pull the diffuser straight down from the ceiling. There may be slight resistance, so use gentle but firm force. Avoid twisting or bending the diffuser to prevent damage.
Step 5: Inspect the Ductwork
With the diffuser removed, you'll have access to the ductwork. Inspect the ductwork for any blockages, debris, or damage. If necessary, clean or repair the ductwork before reinstalling the diffuser.
Step 6: Reinstall the Diffuser
To reinstall the diffuser, simply reverse the removal process. Align the diffuser with the opening in the ceiling and gently push it into place. Secure the retaining ring by pressing it into place or tightening the screws, ensuring it's firmly attached.
Step 7: Restore Power
Once the diffuser is reinstalled, restore power to the HVAC unit at the electrical panel. Check if the diffuser is functioning properly by adjusting the airflow and observing the air distribution.
Tips for Removing Ceiling Diffusers
- If you encounter difficulty removing the diffuser, seek professional assistance to prevent damage.
- Clean the diffuser and retaining ring thoroughly before reinstalling to improve airflow and prevent dust accumulation.
- Periodically inspect and clean ceiling diffusers as part of regular HVAC maintenance to ensure optimal performance.

Remove And Clean Round Air Vents

Item 4871 Ceiling Dust Deflector Clear

How To Replace Your Ac Vent Covers Clf Services

Truaire Smoothglide Ceiling Diffuser Damper Installation Retrofit Vent Cover Heating Cooling Hvac

Decorative Ceiling Light Diffuser Fluorolite Plastics 17 X 15 1 4

How To Fix Ducted Heating Ceiling Vent Bunnings Work Community

6 Circular Round Plastic Hvac Supply Grille Air Diffuser

Home Electrical Repairs How To Replace The Lens For Light Fixtures

Ceiling Diffuser Mounting Methods Rickard Air Diffusion

How To Remove The Vent Diffuser My Grand Rv Design Forum
Related Posts