How To Remove Ceiling Air Vent Covers: A Comprehensive Guide
Ceiling air vent covers, also known as registers or diffusers, are essential components of residential and commercial HVAC (Heating, Ventilation, and Air Conditioning) systems. They regulate airflow, distributing conditioned air throughout a space. Periodically, removing these covers becomes necessary for various reasons, including cleaning, maintenance, painting, or replacing damaged units. This article provides a comprehensive guide on how to safely and effectively remove ceiling air vent covers, covering different types and potential challenges.
Understanding the construction and attachment methods of various vent covers is crucial before attempting removal. Improper techniques can lead to damage to the cover, the ceiling, or even the ductwork. Prior preparation, combined with careful execution, significantly increases the chances of a successful and damage-free removal process.
Identifying the Type of Ceiling Air Vent Cover
The initial step involves accurately identifying the type of air vent cover installed. Different types employ different attachment mechanisms, requiring specific removal approaches. Common types include:
1. Screw-Attached Covers: These are perhaps the most common type, secured to the ceiling with screws. The screws typically run through the face of the vent cover and into the ductwork or a mounting frame behind the ceiling.
2. Spring-Clip Covers: These covers utilize spring-loaded clips or tabs that hold them in place. They are often found in newer homes or remodeled spaces, offering a relatively tool-free removal process.
3. Magnetic Covers: These covers are secured using magnets embedded in the vent cover and a corresponding metal frame attached to the ductwork. Removal usually involves a gentle pulling action.
4. Drop-In or Friction-Fit Covers: These covers are simply placed into the opening and held by friction. They are less common, but can be found in older buildings.
5. Decorative Covers: These covers can be attached via multiple methods including screws, clips, or magnets depending on their design. They often require a close inspection to determine the proper removal method.
Carefully examining the vent cover, looking for visible screws, clips, or any other fastening mechanism, is critical to determining the type and appropriate removal procedure.
Gathering Necessary Tools and Materials
Having the right tools on hand significantly simplifies the removal process and reduces the risk of damage. The specific tools required will depend on the type of vent cover and the condition of the fasteners. A standard toolkit should include the following items:
1. Screwdrivers: A set of screwdrivers, including both Phillips head and flathead, is essential for removing screw-attached covers. Ensure the screwdrivers are of appropriate sizes to avoid stripping the screw heads.
2. Putty Knife or Flathead Screwdriver (Thin): A thin putty knife or flathead screwdriver can be useful for gently prying spring-clip covers or separating friction-fit covers from the ceiling.
3. Gloves: Wearing gloves protects hands from dust, debris, and sharp edges on the vent cover.
4. Safety Glasses: Safety glasses protect eyes from falling dirt and debris accumulated in the ductwork or on the vent cover.
5. Step Ladder or Stool: A stable step ladder or stool provides safe and comfortable access to the ceiling-mounted vent cover.
6. Cleaning Supplies: Prepare cleaning supplies, such as a vacuum cleaner with a brush attachment, a damp cloth, and a mild detergent, for cleaning the vent cover after removal.
7. Container or Bag: Have a container or bag ready to hold screws and other small parts to prevent them from being lost.
8. Painter’s Tape (Optional): If painting or other work is being done, painter's tape can be used to mask off the ceiling around the vent opening, protecting it from accidental scratches or paint spills.
Having all the necessary tools and materials readily available streamlines the removal process, preventing unnecessary delays and potential problems.
Step-by-Step Removal Procedures for Different Vent Cover Types
Once the type of vent cover has been identified and the necessary tools have been gathered, the actual removal process can begin. The following sections detail the removal procedures for each common type of ceiling air vent cover:
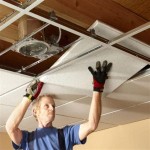
1. Removing Screw-Attached Covers:
a. Position the step ladder or stool safely beneath the vent cover.
b. Wearing gloves and safety glasses, use the appropriate screwdriver to loosen and remove all screws securing the cover to the ceiling or ductwork. Turning the screwdriver counterclockwise typically loosens screws.
c. As the last screw is removed, carefully support the vent cover with one hand to prevent it from falling.
d. Gently lower the vent cover and place it on a protected surface.
e. Store the screws in a safe location to prevent loss.
2. Removing Spring-Clip Covers:
a. Position the step ladder or stool safely beneath the vent cover.
b. Wearing gloves and safety glasses, locate the spring clips or tabs holding the cover in place. These are usually located on the sides or corners of the cover.
c. Gently push the vent cover upwards or inwards to release the spring clips. A thin putty knife or flathead screwdriver can be used to assist with releasing the clips, but using excessive force should be avoided.
d. Once all the clips are disengaged, carefully lower the vent cover and place it on a protected surface.
3. Removing Magnetic Covers:
a. Position the step ladder or stool safely beneath the vent cover.
b. Wearing gloves and safety glasses, gently grasp the vent cover.
c. Apply a firm, even pulling force to detach the cover from the magnetic frame. Avoid jerking the cover, as this could damage the frame or the ceiling.
d. Once the cover is detached, carefully lower it and place it on a protected surface.
4. Removing Drop-In or Friction-Fit Covers:
a. Position the step ladder or stool safely beneath the vent cover.
b. Wearing gloves and safety glasses, gently grasp the vent cover.
c. Carefully wiggle the cover back and forth or side to side while applying a gentle downward pulling force.
d. If the cover is stuck, a thin putty knife or flathead screwdriver can be used to gently pry it loose from the ceiling.
e. Once the cover is detached, carefully lower it and place it on a protected surface.
5. Removing Decorative Covers:
a. Carefully examine the decorative cover to identify the method of attachment: screws, clips, magnets, or a combination.
b. Based on the identified method, follow the appropriate steps as outlined above for screw-attached, spring-clip, or magnetic covers.
c. Exercise extra caution when removing decorative covers to avoid damaging any delicate features or ornamentation.
By carefully following these step-by-step procedures, one can safely and effectively remove most types of ceiling air vent covers. If encountering unusually stubborn fasteners or uncertain about the removal method, consulting a qualified HVAC technician is recommend.
Cleaning and Inspection After Removal
After removing the ceiling air vent cover, taking the opportunity to clean the cover and inspect the duct opening is beneficial. This can improve air quality and identify potential problems within the HVAC system.
1. Cleaning the Vent Cover: Use a vacuum cleaner with a brush attachment to remove dust and debris from the vent cover. For heavily soiled covers, washing them with warm water and a mild detergent is acceptable. Ensure the cover is completely dry before reinstalling it.
2. Inspecting the Duct Opening: Shine a flashlight into the duct opening and inspect for any signs of dust, debris, mold, or damage. If necessary, vacuum the inside of the duct opening to remove loose debris. If mold growth is suspected, consult a professional for remediation.
3. Checking for Air Leaks: Inspect the area around the duct opening for any air leaks. Seal any noticeable gaps or cracks with duct tape or caulk to improve energy efficiency.
Thorough cleaning and inspection contribute to a healthier indoor environment and potentially reduce energy costs by optimizing airflow.
Addressing Common Challenges During Removal
While the removal process is typically straightforward, certain challenges may arise. These can include:
1. Stripped Screws: If the screw heads are stripped, making it difficult to remove them with a screwdriver, several techniques can be employed. One method involves using a rubber band or steel wool between the screwdriver and the screw head to improve grip. Another option is to carefully use a screw extractor tool.
2. Overpainted Covers: Covers that have been painted over multiple times can be difficult to remove, as the paint can effectively glue them to the ceiling. Scoring the paint around the edges of the cover with a utility knife can help break the seal. Applying gentle heat from a hairdryer can also soften the paint and make removal easier.
3. Rusted or Corroded Fasteners: Rusted or corroded screws or clips can be extremely difficult to remove without breaking them. Applying a penetrating oil lubricant to the fasteners and allowing it to soak for several minutes can help loosen them. If the fasteners are severely corroded, they may need to be carefully drilled out.
4. Difficult-to-Reach Locations: Vent covers located in high ceilings or awkward locations can be difficult to access safely. Using a sturdy ladder with appropriate safety precautions and having a helper to provide support is essential.
Encountering these challenges may require patience and resourcefulness. If struggling to overcome these obstacles, seeking assistance from a qualified professional is advisable.

How To Replace Your Ac Vent Covers Clf Services

How To Remove Ducted Air Conditioning Vents Quickair

Replacing A Heat Vent Register

Quick Ceiling Vent Fix

Ac Vent Cover Removal Keystone Rv Forums

The Drywall Around My Ceiling Air Vent Is All Broken Up What Can I Fill Space With So A New Cover Be Ed In Quora

Replacing A Central Air Conditioner Return Vent Cover All About The House

Marc Poulos Painting Before A Room Remove Ceiling Vents

How To Remove Air Vent Cover The Rv Forum Community

Easy Way To Seal Off Old Ceiling Vents That Don T Close Tightly Hunker
Related Posts