How to Remove a Ceiling AC Vent: A Comprehensive Guide
Removing a ceiling air conditioning (AC) vent is a task that may be required for various reasons, including cleaning, painting, repairing ducts, or replacing the vent itself. While seemingly straightforward, it's essential to approach this process with care to avoid damaging the vent, the ceiling, or the ductwork. This article provides a detailed guide on how to safely and effectively remove a ceiling AC vent.
Before commencing any work, safety precautions are paramount. Turn off the HVAC system at the thermostat or breaker to prevent debris from being drawn into the ductwork or causing a sudden blast of air. Gather the necessary tools and materials, which commonly include a stepladder, screwdriver (usually flathead or Phillips head, depending on the vent type), gloves, a dust mask, and potentially a vacuum cleaner or brush for dust removal. Having a container or bag nearby to store screws and small parts is also recommended.
Identifying the Vent Type and Fastening Mechanism
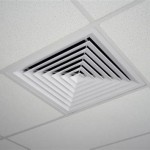
The first step involves accurately identifying the type of ceiling AC vent installed and understanding its fastening mechanism. Different vent types utilize different methods for attachment, and attempting to remove them forcefully without understanding the mechanism can lead to damage. Common types include vents secured with screws, vents held in place by spring clips or tension, and vents that simply snap into place.
Vents Secured with Screws: These are perhaps the most common type, particularly in older installations. Small screws, often painted to match the vent color, are visible around the perimeter of the vent, attaching it directly to the ceiling or a mounting frame within the duct opening. To identify this type, carefully inspect the edges of the vent for screw heads.
Vents Held by Spring Clips/Tension: These vents rely on spring-loaded clips or simple tension to keep them snug against the ceiling. The clips are typically located inside the vent, pressing outwards against the duct opening. These vents often appear seamless with minimal visible hardware.
Snap-In Vents: Snap-in vents utilize small plastic tabs or similar features that engage with the edge of the duct opening. These vents are designed for easy installation and removal, often requiring only a gentle push or pull to disengage the tabs.
Careful observation of the vent's construction and attachment points is crucial for successful removal without causing unnecessary damage.
Removing Vents Secured with Screws
If the vent is secured with screws, the removal process is generally straightforward. Begin by carefully examining the screws. Determine whether they require a flathead or Phillips head screwdriver. Using the correct screwdriver is essential to prevent stripping the screw heads, which can make removal significantly more difficult.
Insert the screwdriver into the screw head and slowly turn counterclockwise to loosen and remove each screw. Apply gentle pressure to maintain contact and prevent the screwdriver from slipping. As each screw is removed, place it in a designated container to avoid losing them.
Once all screws are removed, gently grasp the vent and pull it straight down. If the vent is stuck or resists movement, visually re-inspect the edges to ensure no screws have been missed. Avoid excessive force, as this can damage the ceiling or the vent itself. If the vent remains stuck, a thin blade or putty knife can be carefully inserted along the edges to break any paint seals or accumulated dust.
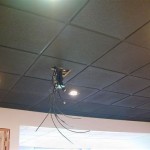
With the vent removed, use a brush or vacuum cleaner to remove any dust or debris that may have accumulated in the duct opening. This is a good opportunity to visually inspect the ductwork for any signs of damage or leaks.
Removing Vents Held by Spring Clips/Tension
Removing vents held by spring clips or tension requires a different approach. These vents typically require a gentle but firm push or pull to overcome the tension of the clips. Locate the edges of the vent and identify the points where the clips are likely located.
One common method involves using a flathead screwdriver wrapped in a cloth to protect the ceiling. Gently insert the screwdriver between the vent edge and the ceiling, near one of the suspected clip locations. Carefully pry the vent downwards, applying even pressure. The goal is to disengage the clip without damaging the ceiling.
Repeat this process around the perimeter of the vent, working methodically to disengage each clip. Avoid pulling on one area of the vent excessively, as this can bend or break the clips. If the vent is particularly stubborn, try gently pushing upwards on the vent from the inside while prying downwards from the outside. This can help to relieve some of the tension on the clips.
Once all the clips are disengaged, the vent should come free. As with screw-secured vents, clean any accumulated dust or debris from the duct opening after removal.
Another method, if comfortable, involves using both hands to grip the vent firmly and gently pulling it straight down. Apply even pressure across the vent to avoid bending or distorting it. This method works best if the clips are not overly tight or if the vent is relatively lightweight.
In some cases, specialized vent removal tools are available that can assist in disengaging the clips without damaging the vent or ceiling. These tools typically have a thin, flexible blade that can be inserted between the vent and ceiling to release the clips.
Dealing with Stuck Vents and Potential Problems
Despite following the correct procedures, situations may arise where a vent is unusually difficult to remove. This can be due to several factors, including paint buildup, rusted screws, or tightly secured clips. Careful troubleshooting is essential to avoid causing damage.
Paint Buildup: Multiple layers of paint can effectively seal the vent to the ceiling, making removal challenging. Use a sharp utility knife or a thin putty knife to carefully score the paint along the edges of the vent. This will help to break the seal and allow for easier removal. Be very cautious when using sharp tools near the ceiling to avoid damaging the surface.
Rusted Screws: Rusted or corroded screws can be difficult to remove, even with the correct screwdriver. Try applying a penetrating oil or lubricant to the screw heads and allowing it to soak for several minutes. This can help to loosen the rust and make the screws easier to turn. If the screw heads are severely damaged, a screw extractor may be necessary. Screw extractors are specialized tools designed to grip and remove stripped or damaged screws.
Tight Clips: Some vents have particularly strong or tight clips that make removal challenging. In these cases, patience and persistence are key. Continue to work around the perimeter of the vent, gently prying and pushing until each clip is disengaged. Avoid using excessive force, as this can break the clips or damage the vent. As mentioned previously, specialized vent removal tools can be helpful in these situations.
Damaged Ceiling: If the ceiling is damaged during the removal process, it is important to address the damage promptly. Small holes or scratches can be filled with spackle or patching compound. Larger areas of damage may require more extensive repairs. Consider consulting a professional contractor if you are unsure how to repair the damage properly.
Missing or Damaged Fasteners: When reinstalling the vent, ensure that all the necessary screws, clips, or other fasteners are present and in good condition. Replace any missing or damaged fasteners to ensure that the vent is securely attached to the ceiling. Using the correct type and size of fasteners is also important to prevent damage to the vent or the ductwork.
Unexpected Obstructions: In rare cases, there may be unexpected obstructions behind the vent, such as wiring or ductwork components. If you encounter an obstruction, stop immediately and investigate the cause. Avoid forcing the vent further, as this could damage the obstruction or the vent. Consult a professional if you are unsure how to proceed.
Proper preparation, careful execution, and a methodical approach are essential for successfully removing a ceiling AC vent without causing damage. Identifying the vent type, using the correct tools, and taking appropriate safety precautions will help ensure a smooth and efficient removal process.

How To Remove Ducted Air Conditioning Vents Quickair

How To Replace Your Ac Vent Covers Clf Services

Replacing A Heat Vent Register

Ac Vent Cover Removal Keystone Rv Forums

How To Open And Close Ceiling Air Vents

Moving Our Hvac Vent Dremel Saw Giveaway Centsational Style

Ceiling Vent Replacement For Air Conditioning Hq Joondalup Perth Wa

The Drywall Around My Ceiling Air Vent Is All Broken Up What Can I Fill Space With So A New Cover Be Ed In Quora

3 Ways To Fix Water Stains On Your Ceiling Air Conditioning Vents Baylor Heating Inc

How To Remove Mold In Ac Ducts Forbes Home
Related Posts