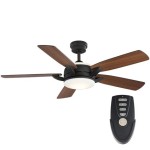
How To Remove a Light Kit From a Hunter Ceiling Fan
Removing a light kit from a Hunter ceiling fan is a common task undertaken for various reasons, including updating the fan's aesthetic, replacing a faulty light kit, or performing maintenance on the fan itself. While the specific steps may slightly vary depending on the Hunter ceiling fan model, the general procedure remains largely consistent. This article provides a comprehensive guide on how to safely and effectively remove a light kit from a Hunter ceiling fan.
Prior to beginning the removal process, it is crucial to prioritize safety. Working with electrical components always carries inherent risks, thus adherence to safety precautions is non-negotiable. Neglecting to follow these precautions could lead to electric shock or damage to the fan and electrical system.
The subsequent sections detail the necessary tools, the step-by-step removal procedure, and important considerations for troubleshooting and reinstallation. By following these instructions carefully, one can safely and successfully remove the light kit from a Hunter ceiling fan.
Safety First: Disconnecting the Power Supply
The most critical step before commencing any work on a ceiling fan is to completely disconnect the power supply. Failure to do so poses a significant risk of electric shock. Do not assume turning off the light switch is sufficient; this only interrupts the circuit to the light fixture, not the entire fan.
Locate the circuit breaker in the electrical panel that controls the ceiling fan. Typically, this panel is found in a utility room, basement, or garage. Consult the panel directory to identify the correct breaker. Once located, switch the breaker to the "OFF" position. To ensure absolute safety, it is recommended to test the fan's light and motor after switching off the breaker to confirm that power is indeed disconnected. A non-contact voltage tester can be used to further verify that no electricity is flowing to the fan's wiring.
If unsure about identifying the correct breaker or uncomfortable working with electrical circuits, it is strongly advised to consult a qualified electrician. This is a matter of safety and should not be taken lightly.
Gathering the Necessary Tools
Having the right tools readily available will streamline the removal process and minimize potential frustrations. The following tools are typically required:
*Screwdrivers:
A Phillips head screwdriver and a flathead screwdriver are generally required. The specific size may vary depending on the screws used in the light kit assembly, so having a variety of sizes is beneficial. *Wire Strippers/Cutters:
These are essential for safely disconnecting the electrical wiring connected to the light kit. Ensure the wire strippers are in good working condition and appropriate for the gauge of wire used in the fan. *Pliers:
Pliers can be useful for gripping and manipulating small parts, especially wire connectors. *Voltage Tester (Non-Contact):
As previously mentioned, a voltage tester is crucial for verifying that the power is completely disconnected before touching any wiring. *Ladder or Step Stool:
A stable ladder or step stool is necessary to safely reach the ceiling fan. Ensure the ladder is placed on a level surface and that it is tall enough to allow comfortable access to the fan. *Safety Glasses:
Protecting the eyes from falling debris is paramount. Wear safety glasses throughout the entire procedure. *Gloves:
Wearing gloves can provide a better grip and protect your hands from dirt and sharp edges. *Small Container or Bags:
Having a container or bags to hold the screws and other small parts will prevent them from getting lost. Labeling the bags can also be helpful for reassembly. *Painter's Tape (Optional):
Painter's tape can be used to temporarily secure wires in place after disconnecting them, preventing them from falling back into the fan housing.Preparing all the necessary tools beforehand will significantly improve the efficiency and safety of the light kit removal process.
Step-by-Step Removal Procedure
With the power disconnected and the necessary tools gathered, the actual removal of the light kit can commence. The following steps outline the general procedure:
1.
Remove the Light Bulbs or Globes:
Begin by carefully removing any light bulbs or globes from the light kit. Allow the bulbs to cool completely before handling them to avoid burns. Place the bulbs and globes in a safe location where they will not be damaged.2.
Identify and Loosen the Light Kit Mounting Screws:
The light kit is typically attached to the fan housing by several screws. These screws are usually located around the perimeter of the light kit or on the underside of the fan. Carefully inspect the light kit to identify the location of these screws. Use the appropriate screwdriver to loosen and remove them. As the screws are removed, carefully support the light kit to prevent it from falling. Place the screws in the container or bag for safekeeping.3.
Lower the Light Kit Carefully:
Once all the mounting screws are removed, gently lower the light kit. The light kit will still be connected to the fan by electrical wiring. Support the light kit with one hand while proceeding to the next step.4.
Disconnect the Electrical Wiring:
Carefully examine the wiring connections between the light kit and the fan. Typically, these connections are made using wire connectors, often referred to as wire nuts. These connectors twist onto the ends of the wires to create a secure electrical connection. To disconnect the wires, gently twist the wire connectors counterclockwise to loosen them. Once loose, carefully pull the wires apart. It is crucial to only pull on the wire connectors and not the wires themselves to avoid damaging the wires. If the wires are difficult to separate, use pliers to gently grip the wire connector and twist it loose.5.
Label the Wires (Optional but Recommended):
Before completely disconnecting the wires, it is highly recommended to label them. This will make reinstallation much easier. Use small pieces of painter's tape to label each wire with its corresponding connection point (e.g., "Black to Black," "White to White," "Ground to Ground"). Alternatively, take a photograph of the wiring connections before disconnecting them.6.
Completely Disconnect the Light Kit:
After labeling (or photographing) the wires, completely disconnect the electrical wiring. The light kit should now be completely detached from the fan housing. Carefully set the light kit aside in a safe location.7.
Secure the Wires (Optional):
To prevent the disconnected wires from falling back into the fan housing, use painter's tape to temporarily secure them to the fan bracket or housing. This will make subsequent work on the fan easier.Following these steps carefully will ensure the safe and effective removal of the light kit from the Hunter ceiling fan.
Troubleshooting Common Issues
While the removal process is generally straightforward, some common issues may arise. Addressing these issues effectively can prevent frustration and ensure a successful outcome.
Stripped Screws:
Sometimes, the mounting screws may be stripped, making them difficult to remove. If this occurs, try using a rubber band or steel wool between the screwdriver and the screw head to provide extra grip. Alternatively, a screw extractor tool can be used to remove the stripped screw.Stuck Wire Connectors:
Wire connectors can sometimes become stuck due to corrosion or over-tightening. If this happens, use pliers to gently grip the connector and twist it back and forth to loosen it. Avoid pulling forcefully on the wires, as this could damage them.Unidentified Wires:
If the wires are not color-coded or if the original wiring is unclear, consult the Hunter ceiling fan's instruction manual or a qualified electrician. Attempting to guess the wiring connections can be dangerous and could damage the fan or electrical system.Light Kit Won't Lower:
If the light kit seems stuck and won't lower after removing the screws, double-check that all screws have been completely removed. Also, inspect the light kit for any hidden retaining clips or brackets that may be holding it in place.Addressing these common issues with patience and the appropriate tools will ensure a smooth and successful light kit removal process.

How To Remove A Light Kit From Your Hunter Ceiling Fan 5x Series Model Fans

How To Remove A Light Kit From Your Hunter Ceiling Fan 5x Series Model Fans

How To Remove A Ceiling Fan Hunter

How To Remove A Light Kit From Your Hunter Ceiling Fan 5x Series Model Fans

How To Replace A Ceiling Fan Light Kit Smafan Com

Installation Instructions For Hunter Ceiling Fan

Changing Ceiling Fan Light Kit Doityourself Com Community Forums

Ceiling Fan Light Repair Home Tutor

How To Remove A Light Kit From Ceiling Fan Hunker

How To Remove Dome Globe Glass Light Replacement On Hampton Bay Ceiling Fan Windward Ii
Related Posts