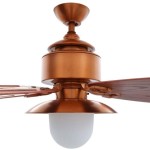
How to Remove Hampton Bay Flush Mount Ceiling Fan Blades
Removing the blades from a Hampton Bay flush mount ceiling fan can seem daunting, but with the right approach, it's a manageable task. This guide provides step-by-step instructions to help safely and efficiently remove the blades from your Hampton Bay flush mount ceiling fan.
Safety Precautions
Before beginning any work on your ceiling fan, prioritizing safety is crucial. Taking the necessary precautions will help prevent accidents and ensure a smooth removal process.
*
Turn off the power:
Switch off the power to the ceiling fan at the circuit breaker. This is the most critical step to prevent electrical shock. *Use a stable ladder:
Ensure the ladder is sturdy and appropriately positioned directly beneath the fan. Avoid overreaching. *Have a helper:
An extra set of hands can be invaluable, especially when handling larger or heavier blades. A helper can provide stability and assist with holding the blades during removal.Gather Necessary Tools
Having the correct tools readily available will streamline the process and avoid unnecessary delays. Gathering the following tools beforehand will ensure a more efficient removal.
*
Screwdriver:
Most Hampton Bay fans use standard Phillips head screws. However, having a flathead screwdriver on hand is also recommended in case of variations. *Stepladder:
A secure stepladder is essential for reaching the fan safely. *Blade removal tool (optional):
While not always necessary, a blade removal tool can simplify the process, especially for stubborn screws. *Small container or bag:
Use this to keep screws and other small parts organized during removal. This prevents losing crucial components during the process.Locate the Blade Screws
Hampton Bay flush mount ceiling fans typically secure their blades with screws located near the blade's base, where it connects to the fan motor housing. Locating these screws is the first step in the removal process.
*
Examine the blade assembly:
Carefully inspect the area where each blade attaches to the motor housing. The screws are usually visible, but sometimes a decorative cap may cover them. *Remove any decorative caps:
If present, gently pry off these caps using a flathead screwdriver. Take care not to damage the finish of the fan.Remove the Blade Screws
With the screws exposed, you can proceed with removing them. Using the correct technique will prevent stripping the screws or damaging the fan.
*
Use the appropriate screwdriver:
Select the correct size and type of screwdriver (usually a Phillips head) that fits snugly into the screw head. *Turn counterclockwise:
Rotate the screwdriver counterclockwise to loosen and remove the screws. Apply steady pressure to avoid slippage. *Store the screws safely:
Place the removed screws in the container or bag to prevent misplacement.Detach the Blade from the Motor Housing
Once the screws are removed, the blade should detach from the motor housing. However, sometimes the blade may require a little persuasion. Exercise caution during this step to avoid damaging the fan.
*
Gently wiggle the blade:
If the blade doesn't come off easily, gently wiggle it back and forth while pulling downwards. This can help loosen any remaining connections. *Use a blade removal tool (optional):
If the blade remains stuck, a blade removal tool can provide the necessary leverage to detach it safely. Follow the instructions provided with the tool.Repeat for Remaining Blades
After successfully removing one blade, repeat the process for the remaining blades. Maintaining a consistent approach ensures all blades are removed safely and efficiently.
*
Follow the same steps:
Locate the screws, remove them carefully, and detach each blade from the motor housing. *Keep track of screws:
Continue storing the screws in a safe place to ensure they are available for reassembly.Cleaning and Storage
With the blades removed, it's an opportune time to clean them. Proper cleaning and storage will maintain their appearance and prolong their lifespan.
*
Wipe down the blades:
Use a damp cloth to remove dust and grime. Avoid using abrasive cleaners that could damage the finish. *Store the blades safely:
Store the blades in a dry, safe location to prevent damage or warping. This is particularly important if you plan to reinstall them later.Reinstalling the Blades (Optional)
If you plan to reinstall the blades later, ensure you have all the necessary screws and components. Reinstallation is essentially the reverse of the removal process.
*
Align the blades correctly:
Match the blade's mounting holes with the corresponding holes on the motor housing. *Secure the screws:
Reinsert the screws and tighten them securely, but avoid overtightening, which could damage the blades or the motor housing.
How To Take Down A Ceiling Fan Hampton Bay

How To Remove A Ceiling Fan The Home Depot

How To Remove A Ceiling Fan The Home Depot

How To Remove A Ceiling Fan The Home Depot

How To Remove A Ceiling Fan The Home Depot

How To Remove A Ceiling Fan Temecula Handyman

How To Replace A Ceiling Fan Diy Step By Guide

How To Remove A Ceiling Fan The Home Depot

How To Take Down Or Remove A Ceiling Fan 2 Best Ways

How To Remove A Ceiling Fan The Home Depot
Related Posts