How to Remove a Ceiling Fan Light Kit
Removing a ceiling fan light kit can be a daunting task, but it doesn't have to be. With the right tools and instructions, you can safely remove the light kit and replace it with a new one or simply remove it altogether. Here are the essential steps to follow for the safe removal of a ceiling fan light kit:
Safety First:
Before you begin, ensure you have the appropriate safety gear. This includes safety glasses, gloves, and a sturdy ladder. Turn off the power to the ceiling fan at the circuit breaker or fuse box to prevent electrical shock.
Gather Necessary Tools:
For this task, you'll need the following tools: a screwdriver (Phillips and flathead), needle-nose pliers, electrical tape, and possibly a voltage tester.
Removing the Light Kit:
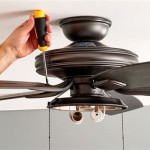
1. Locate the screws that secure the light kit to the ceiling fan. They are typically located around the perimeter of the light kit.
2. Use the screwdriver to remove the screws. Be careful not to drop any screws into the fan blades.
3. Once the screws are removed, carefully pull the light kit straight down to detach it from the ceiling fan. You may need to wiggle it gently to loosen it.
4. Disconnect the electrical wires from the light kit. There are typically two or three wires connected to the light kit: a black wire (hot), a white wire (neutral), and possibly a green or bare copper wire (ground).
5. Use the needle-nose pliers to twist the wire nuts counterclockwise and remove them. Separate the wires and wrap them with electrical tape for safety.
6. Once the wires are disconnected, you have successfully removed the ceiling fan light kit. You can now proceed to install a new light kit or leave the fan without one.
Reinstalling the Light Kit (Optional):
If you are replacing the light kit, follow these steps to reinstall it:
1. Connect the electrical wires by twisting the wire nuts clockwise onto the wire ends. Ensure the black wire connects to the black wire, the white wire to the white wire, and the green or bare copper wire to the green or bare copper wire (if applicable).
2. Carefully lift the new light kit into place and align it with the mounting bracket on the ceiling fan.
3. Secure the light kit to the ceiling fan using the screws provided. Tighten the screws securely, but do not overtighten them.
Tips:
• If you are not comfortable working with electricity, it is best to hire a qualified electrician to remove the light kit for you.
• If the screws are rusted or difficult to remove, apply a penetrating oil to loosen them.
• Be cautious when handling the glass globe or shade of the light kit as they can be fragile.
• Dispose of the old light kit properly according to local regulations.

How To Replace A Ceiling Fan Light Kit Smafan Com

How To Remove A Ceiling Fan Homeserve Usa

How To Remove A Light Kit From Your Hunter Ceiling Fan 5x Series Model Fans
Ceiling Fan Light Fixture Replacement Ifixit Repair Guide

How To Remove A Ceiling Fan Temecula Handyman

How To Remove A Ceiling Fan The Home Depot

How To Remove A Ceiling Fan Hunter

How To Remove A Ceiling Fan The Home Depot

Ceiling Fan Light Kit Installation How To

Changing Ceiling Fan Light Kit Doityourself Com Community Forums
Related Posts

