How to Put Beadboard Over Popcorn Ceiling
Transforming a room with a popcorn ceiling can be a daunting task, but covering it with beadboard offers a stylish and effective solution. Beadboard provides a clean, timeless aesthetic that enhances any space. This guide will equip you with the necessary steps to successfully install beadboard over a popcorn ceiling, offering a fresh and modern look to your room.
Preparing the Ceiling
Before embarking on the installation, it is crucial to prepare the ceiling thoroughly. This involves removing the popcorn ceiling and ensuring a smooth, level surface. The process may vary based on the type of popcorn ceiling, adhesion, and personal preference.
To remove the popcorn ceiling, you can choose between scraping, sanding, or using a chemical remover.
Scraping involves using a putty knife or a specialized popcorn ceiling scraper to manually remove the texture. While it is the most labor-intensive option, it offers the most control and results in a smoother finish. Sanding is a less messy option but requires a dedicated sander and dust mask to handle the dust generated. Chemical removers are quick and convenient but can be hazardous if not handled properly. Consult product labels and safety instructions before use.
After removing the popcorn ceiling, take care of any remaining imperfections. Patch holes, cracks, and uneven surfaces using spackle or drywall compound. Allow the spackle to dry completely before sanding it smooth. Cleaning the ceiling with a damp cloth removes any debris and ensures a clean surface for beadboard installation.
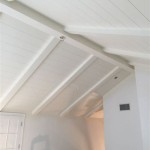
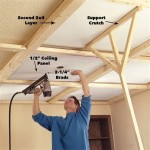
Installing the Beadboard
The installation process involves attaching beadboard panels to the ceiling using adhesive or nails.
For adhesive installation, apply a bead of construction adhesive along the perimeter of the beadboard panel and at intervals along the center. Press the panel firmly against the ceiling, ensuring it is level and flush with the surrounding surface. Allow the adhesive to cure completely before installing the next panel.
For nail installation, use a nail gun or hammer and finishing nails to secure the beadboard panels. Start by securing the panels along the perimeter of the ceiling. Ensure the nails are driven straight and flush with the beadboard surface.
When installing the panels, consider the direction of the grain. For a consistent look, align the grain pattern of adjacent panels. Maintain a consistent spacing between the panels, using spacers or shims for uniformity. Carefully trim panels to fit around obstacles like light fixtures, vents, and corners. Use a utility knife, jigsaw, or circular saw to make precise cuts.
Finishing Touches
After completing the installation, adding finishing touches will enhance the overall appearance of the beadboard. Caulk any gaps or seams between the panels, creating a seamless and professional look. Use paintable caulk and apply it neatly along the edges of the beadboard.
Finally, paint the beadboard to match your desired aesthetic. Choose a paint suitable for beadboard and apply multiple coats for optimal coverage and durability. Allow each coat to dry completely before applying the next. While painting, ensure the paint covers the nail heads or adhesive seams, creating a smooth and polished finish.

The Best Way To Cover Popcorn Ceilings With Beadboard Shoe Makes New

How To Cover Popcorn Ceiling With Beadboard Planks Diy Tutorial

How To Cover Popcorn Ceiling With Beadboard Planks Diy Tutorial

Diy Beadboard Ceiling Tutorial Easy And Inexpensive Custom Treatment

How To Cover Popcorn Ceilings With Beadboard

How Much Does It Cost To Install A Beadboard Ceiling 2024 Data Angi

How To Cover Popcorn Ceilings With Beadboard

Diy Bead Board Ceiling To Hide An Ugly Popcorn Lehman Lane Beadboard

How To Cover Popcorn Ceiling 8 Creative Ways Making Maanita

How To Cover Popcorn Ceilings With Beadboard Charleston Crafted Popcornceilings Ceili Ceiling Covering
Related Posts