How To Put A Ceiling Fan On A Slanted Ceiling
Installing a ceiling fan on a slanted ceiling presents a unique challenge compared to a standard, flat ceiling installation. The angle necessitates special considerations to ensure the fan operates safely and efficiently. This instructional guide details the process, highlighting the necessary steps and components to successfully install a ceiling fan on a slanted ceiling.
The primary difference between a flat and slanted ceiling installation lies in the need for a downrod specifically designed for angled mounting. This downrod allows the fan motor to hang plumb, or perfectly vertical, preventing wobbling and optimizing airflow. Without the correct downrod and mounting hardware, the fan could experience premature wear and tear, generate excessive noise, or even detach from the ceiling.
Before proceeding, safety is paramount. Always disconnect the power at the circuit breaker before working with electrical wiring. Verify the power is off using a non-contact voltage tester. If unsure about any aspect of the electrical work, consult a qualified electrician. This guide assumes the existing wiring is suitable for a ceiling fan and complies with local electrical codes.
Key Point 1: Assessing the Ceiling and Selecting the Right Components
The first step is a thorough assessment of the ceiling and the attic space above it (if accessible). Determine the ceiling's slope or angle. This is crucial for selecting the appropriate downrod and angled mounting bracket. A standard protractor or angle finder can accurately measure the slope. Note the angle in degrees for reference when selecting the fan components.
Confirm the electrical box is rated for ceiling fan support. Standard electrical boxes are not designed to bear the weight and vibration of a ceiling fan. The box must be specifically rated for ceiling fans and securely attached to a structural member, such as a ceiling joist. If the existing box is not rated for ceiling fan support, it must be replaced with a suitable one. This may involve additional work and potentially require professional assistance.
Choosing the correct downrod is essential. Downrods designed for slanted ceilings are typically longer than standard downrods and feature a ball-and-socket joint at the top. This joint allows the fan to hang vertically even when the downrod is attached to a sloped mounting bracket. Downrod length depends on the ceiling height and the desired distance between the fan blades and the floor. Generally, a minimum of seven feet of clearance between the blades and the floor is recommended.
Select an angled mounting bracket compatible with both the electrical box and the chosen downrod. These brackets are designed to compensate for the ceiling's slope, providing a level surface for the downrod to connect. Ensure the bracket is rated for the weight of the ceiling fan. Check the manufacturer's specifications for the maximum allowable ceiling slope for a specific bracket. Exceeding this limit can compromise the installation's safety and stability.
Verify that all necessary hardware is included with the fan and downrod kit, including screws, washers, wire connectors, and any specialized hardware for the angled mounting bracket. It's always a good idea to have a few extra screws and wire connectors on hand in case of loss or damage.
Key Point 2: Preparing the Mounting Location and Wiring
With the correct components selected, the next step involves preparing the mounting location. As mentioned earlier, if the existing electrical box is not rated for ceiling fan support, replace it with a fan-rated box securely attached to a ceiling joist. This may involve cutting an access hole in the ceiling to reach the joist. If necessary, reinforce the joist to ensure it can adequately support the weight of the fan.
Install the angled mounting bracket onto the electrical box. Follow the manufacturer's instructions carefully. Ensure the bracket is securely attached and properly aligned to compensate for the ceiling's slope. Use a level to verify that the bracket is level in both directions before tightening the screws.
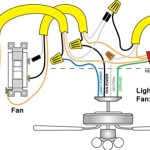
Prepare the electrical wiring. Strip the ends of the wires from the ceiling and the fan motor, exposing approximately ½ inch of bare wire. Consult the fan's wiring diagram to identify the correct wires for power (black), neutral (white), and ground (green or bare copper). If the ceiling has multiple switches controlling the fan, carefully identify which wire corresponds to each function (fan motor, light kit). Label the wires with electrical tape or wire markers to avoid confusion during the connection process.
Attach the downrod to the fan motor according to the manufacturer's instructions. This typically involves inserting the downrod into the fan motor housing and securing it with screws or pins. Many downrods have wiring already pre-installed; carefully feed these wires through the downrod and out the top end. Make sure the wires are not pinched or damaged during this process.
Temporarily hang the fan motor from the mounting bracket using a hook or safety cable (if provided). This will free up both hands for connecting the electrical wiring.
Key Point 3: Connecting the Wiring and Securing the Fan
With the fan motor temporarily suspended, connect the electrical wiring according to the fan's wiring diagram. Use wire connectors to securely join the wires from the ceiling to the corresponding wires from the fan motor. Twist the wires together tightly and then screw on the wire connector. Ensure the wire connector is firmly seated and covers all exposed wire.
Connect the ground wire (green or bare copper) from the ceiling to the ground wire from the fan motor and the mounting bracket. This is crucial for safety, providing a path for electrical current in case of a short circuit. Securely tighten the ground wire connection.
Carefully tuck the connected wires into the electrical box, ensuring they are not pinched or stressed. This will help prevent damage to the wiring and ensure a safe and reliable connection.
Raise the fan motor and downrod assembly into the mounting bracket. Align the downrod with the opening in the bracket and carefully slide it into place. Secure the downrod to the bracket using the provided screws or pins. Ensure the screws are tightened securely to prevent the fan from wobbling.
Install the fan blades, light kit (if applicable), and any other decorative components according to the manufacturer's instructions. Ensure all screws are tightened securely to prevent vibration and noise.
Restore power to the circuit breaker and test the fan's operation. Verify that the fan motor and light kit (if applicable) function correctly. Check for any wobbling or unusual noises. If wobbling occurs, balance the fan using the balancing kit provided with the fan. Follow the instructions included with the balancing kit to identify and correct the source of the imbalance.
After completing the installation and testing, thoroughly inspect the fan and mounting hardware. Ensure all screws are tightened, all wires are securely connected, and there are no loose parts. Addressing potential issues proactively will ensure the fan operates safely and reliably for years to come.

How To Install A Ceiling Fan On Sloped Lemon Thistle

Install Ceiling Fan On Sloped Simple Modern Handmade Home

How To Install A Ceiling Fan On Sloped Lemon Thistle

Electrical Mount Ceiling Fan At The Peak Of A Sloped Home Improvement Stack Exchange

How To Choose A Ceiling Fan For Vaulted Ceilings Lightology

Ensuring Proper Ceiling Fan Installation With Vaulted Ceilings

How To Install A Ceiling Fan On Vaulted Quora

Kichler Ceiling Fan Fast Facts Sloped

Mounting Ceiling Fan On Sloped Home Improvement Stack Exchange

Fans On An Angle Installing Ceiling Angled Or Raked
Related Posts