How To Paint A Ceiling Fan Black And White
Transforming a ceiling fan with a fresh coat of paint can dramatically update a room's aesthetic. A classic black and white color scheme offers a versatile and stylish option, suitable for various interior design styles. This article provides a comprehensive guide on how to paint a ceiling fan black and white, ensuring a professional-looking finish.
Preparation is Key
Proper preparation is crucial for a successful painting project. It ensures the paint adheres correctly and creates a smooth, even surface. Skipping this step can lead to a less durable and aesthetically unpleasing result.
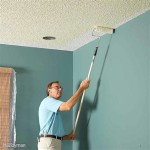
- Turn off the power: Before starting any work, disconnect the power supply to the ceiling fan at the breaker box. This is a fundamental safety precaution to prevent electrical shocks.
- Protect the surrounding area: Cover the floor and any furniture beneath the fan with drop cloths or plastic sheeting. Secure the covering with painter's tape to prevent it from shifting during the painting process.
- Remove the fan blades: Carefully remove the fan blades from the motor housing. Label each blade and its corresponding location on the motor housing to ensure correct reassembly. Store the screws in a safe place.
- Clean the fan components: Thoroughly clean all fan components, including the motor housing, blades, and any other removable parts, with a mild detergent and water solution. This removes dust, grease, and grime that can interfere with paint adhesion.
- Sand the surfaces: Lightly sand all surfaces to be painted with fine-grit sandpaper. This creates a slightly rough surface, promoting better paint adhesion. Wipe away any sanding dust with a tack cloth.
- Apply painter's tape: If desired, apply painter's tape to any areas that should not be painted, such as the motor housing connections or decorative elements. This provides clean lines and prevents unwanted paint from reaching these areas.
Priming the Fan Components
Applying a primer is essential for achieving a professional-looking finish. It provides a uniform base for the paint to adhere to, ensuring consistent color and coverage.
- Choose the right primer: Select a primer suitable for the material of the ceiling fan. For metal fans, a metal primer is recommended. If the fan is made of another material, choose a corresponding primer.
- Apply the primer evenly: Apply a thin, even coat of primer to all surfaces to be painted. Avoid applying the primer too thickly, as this can lead to drips and an uneven finish.
- Allow the primer to dry completely: Follow the manufacturer's instructions for drying time. It's crucial to allow the primer to dry fully before applying the topcoat.
Painting the Fan Blades
Painting the fan blades requires a systematic approach to ensure an even and consistent finish on both sides.
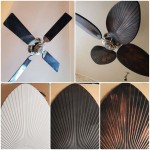
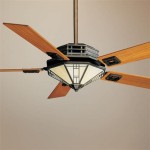
- Choose the right paint: Select a high-quality acrylic enamel paint formulated for interior use. Ensure the paint is suitable for the material of the fan blades. Choose black paint for one side of the blades and white paint for the other side for a contrasting design.
- Paint one side of the blades: Paint one side of each fan blade with the chosen color (e.g., black). Use long, even strokes to minimize brush marks. Allow the paint to dry completely.
- Paint the other side of the blades: Once the first side is completely dry, flip the blades over and paint the other side with the contrasting color (e.g., white). Again, use long, even strokes and allow the paint to dry completely.
- Apply additional coats (if necessary): If the coverage is not sufficient after one coat, apply additional thin coats, allowing each coat to dry thoroughly between applications.
Painting the Motor Housing
Painting the motor housing requires careful attention to detail to avoid paint buildup in unwanted areas.
- Choose the desired color: Select either black or white paint for the motor housing, depending on the desired aesthetic.
- Apply the paint carefully: Apply thin, even coats of paint to the motor housing, avoiding any areas that should not be painted, such as electrical connections. Use a small brush for intricate areas.
- Allow the paint to dry completely: Allow the paint to dry thoroughly between coats, following the manufacturer's instructions.
Reassembling the Ceiling Fan
Once all components are completely dry, the ceiling fan can be reassembled.
- Reattach the fan blades: Carefully reattach the fan blades to the motor housing, ensuring they are securely fastened and in their original positions. Refer to the labels made during the disassembly process.
- Restore power: Once the fan is fully reassembled, restore power to the circuit at the breaker box.
- Test the fan: Test the fan to ensure it operates correctly.
Maintaining the Painted Finish
Proper maintenance ensures the longevity of the painted finish.
- Regular dusting: Regularly dust the fan blades and motor housing with a soft cloth or duster to prevent the buildup of dust and grime.
- Occasional cleaning: Periodically clean the fan with a mild detergent and water solution to remove more stubborn dirt and maintain the finish's shine.

Pin By Kelly Bowen On Diy Projects I Ve Tried Painting Ceiling Fans Fan Redo

Refinished Ceiling Fan

Callie S Crafts Ceiling Fan Makeover Unique Fans

Another Ceiling Fan Makeover And How Not To Paint A Bedroom Painting Fans

Gonna Do This In Meghans New Bedroom Painted Fan Blades Ceiling

Great Ideas 20 Furniture Transformations Ceiling Fan Makeover Brass

My Take On Modge Podge Ceiling Fan Redo Thank You For The Idea I Like To Layer Scrapbook Pa Makeover Painting Fans

Painting Ceiling Fan Crafty In Malta

22 Creative Recycling And Interior Decorating Ideas For Ceiling Fans Fan Makeover Painting

Striped Ceiling Fan Blades Project Page
Related Posts