How To Mount a Ceiling Fan on a Sloped Ceiling
Mounting a ceiling fan on a sloped ceiling differs significantly from installing one on a flat surface. The angle presents challenges in ensuring the fan hangs correctly, operates safely, and provides optimal airflow. This article provides a detailed guide on how to successfully mount a ceiling fan on a sloped ceiling, covering necessary tools, safety precautions, and step-by-step instructions.
Before commencing any electrical work, it is imperative to prioritize safety. Disconnect the power to the circuit at the breaker box. Verify the power is off using a non-contact voltage tester before touching any wires. Failing to do so can result in severe electrical shock or even death. Remember to inform others in the household that you are working on the electrical system and that the breaker should not be switched back on.
Gather all necessary tools and materials before starting the installation. This will streamline the process and prevent unnecessary interruptions. The required materials include a ceiling fan specifically designed for sloped ceilings or a compatible adapter, a mounting bracket designed for angled installations, a wire stripper, wire connectors, electrical tape, a screwdriver set (Phillips and flathead), a drill with appropriate drill bits, a ladder, a stud finder, a measuring tape, a level, and safety glasses.
Key Point 1: Determining Ceiling Slope and Choosing the Right Mount
The first critical step is determining the degree of the ceiling slope. This angle will influence the type of mounting bracket and downrod required for the installation. Most ceiling fan manufacturers specify the maximum slope angle for their fans. Exceeding this angle without proper adjustments can lead to instability and improper fan operation. Use a protractor or angle finder to accurately measure the slope. Place one arm of the protractor flush against the ceiling and the other arm perpendicular to the floor to determine the angle.
Once the slope is determined, select an appropriate mounting bracket. Several types are available for sloped ceilings, including angled mounting brackets and ball-and-socket mounting systems. Angled mounting brackets are designed to compensate for the slope, providing a level surface for the fan to hang from. Ball-and-socket systems allow the fan to pivot, ensuring it hangs vertically even on a sloped surface. Refer to the ceiling fan's instruction manual for recommendations on compatible mounting brackets.
In addition to the mounting bracket, the downrod length is crucial. A longer downrod will be necessary to ensure adequate clearance between the fan blades and the ceiling. This is essential for optimal airflow and prevents the fan from hitting the ceiling. The ideal downrod length depends on the ceiling height and the slope. Consult the ceiling fan manufacturer's guidelines or use online calculators to determine the appropriate downrod length. A general rule of thumb is to maintain at least 7 feet of clearance between the floor and the fan blades.
If the existing electrical box is not rated for ceiling fan support, it must be replaced with a fan-rated box. Standard electrical boxes are not designed to handle the weight and vibration of a ceiling fan and can pose a safety hazard. A fan-rated box is specifically designed to support the weight and movement of a ceiling fan. These boxes are typically reinforced and securely attached to the ceiling joists.
To locate the ceiling joists, use a stud finder. Mark the location of the joists using a pencil. Ensure the fan-rated box is securely attached to a joist using appropriate screws or lag bolts. Follow the manufacturer's instructions for installing the fan-rated box. Securely attaching the box to a joist is crucial for the stability and safety of the entire installation.
Key Point 2: Installing the Mounting Bracket and Wiring
With the fan-rated box securely installed, the next step is to install the mounting bracket. Align the mounting bracket with the electrical box and attach it using the screws provided. Ensure the bracket is securely fastened and level. Some brackets may have adjustable features to accommodate the ceiling slope. Use a level to verify the bracket is properly aligned.
Before connecting the wires, carefully review the ceiling fan's wiring diagram. This diagram will show the correct connections for the power wires, neutral wire, and ground wire. Typically, the black wire is the power wire, the white wire is the neutral wire, and the green or bare copper wire is the ground wire. Match the wires from the ceiling fan to the corresponding wires in the electrical box.
Use wire strippers to expose approximately ¾ inch of bare wire on each wire. Twist the matching wires together clockwise and secure them with wire connectors. Ensure the wire connectors are tightly screwed on to prevent loose connections. Wrap electrical tape around the wire connectors for added insulation and security. A secure and well-insulated connection is vital for preventing electrical shorts and ensuring safe operation.
The ground wire is particularly important for safety. Connect the ground wire from the ceiling fan to the ground wire in the electrical box (usually a green or bare copper wire). Secure the connection with a wire connector and wrap it with electrical tape. The ground wire provides a path for electricity to safely flow to the ground in the event of a short circuit, preventing electrical shock.
Carefully tuck the wires into the electrical box, ensuring they are not pinched or damaged. Avoid overcrowding the box, as this can lead to overheating and potential electrical hazards. Arrange the wires neatly to provide sufficient space for the fan's canopy to fit flush against the ceiling.
Key Point 3: Assembling and Hanging the Fan
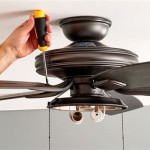
Once the wiring is complete, assemble the ceiling fan according to the manufacturer's instructions. This typically involves attaching the fan blades to the motor housing and connecting any light fixtures or other accessories. Follow the instructions carefully to ensure all components are properly installed and secured.
Attach the downrod to the motor housing. Most ceiling fans have a ball-and-socket joint at the top of the downrod that allows it to pivot. Insert the downrod through the mounting bracket and secure it in place. Ensure the downrod is properly seated in the bracket and that the locking mechanism is engaged. This will prevent the fan from falling.
Carefully lift the fan into position and hang it from the mounting bracket. The bracket typically has hooks or clips that secure the fan temporarily while you make the final connections. Ensure the fan is stable and securely supported before releasing your grip.
Connect any remaining wires, such as those for the light fixture or remote control receiver. Follow the wiring diagram and use wire connectors to secure the connections. Again, ensure all connections are properly insulated with electrical tape.
Carefully slide the canopy up to cover the mounting bracket and electrical box. Secure the canopy with the screws provided. Ensure the canopy fits flush against the ceiling and that there are no gaps. A properly installed canopy will conceal the wiring and provide a finished look.
Finally, install the light bulbs and any other decorative elements. Double-check all connections and ensure all screws are tightened. Restore power to the circuit breaker and test the fan. Verify that the fan operates correctly at all speeds and that the light fixture functions properly. If there are any issues, immediately disconnect the power and re-check the wiring and connections.
If the fan wobbles, attempt to balance the blades using the balancing kit provided by the manufacturer. Follow the instructions in the kit to attach the balancing weights to the appropriate blades. This will help to reduce vibration and improve the fan's performance. If the wobbling persists, consult a qualified electrician or ceiling fan installer.
Regular maintenance is essential for ensuring the longevity and safe operation of the ceiling fan. Periodically check the screws and connections to ensure they are tight. Clean the fan blades regularly to remove dust and debris, which can affect airflow and performance. Inspect the wiring for any signs of damage or wear. If any issues are detected, address them promptly to prevent potential problems.
Mounting a ceiling fan on a sloped ceiling requires careful planning, attention to detail, and adherence to safety precautions. By following these instructions and taking the necessary steps, it is possible to successfully install a ceiling fan that provides optimal airflow and enhances the comfort of the room. Always prioritize safety and consult a qualified professional if you are unsure about any aspect of the installation process.

How To Install A Ceiling Fan On Sloped Lemon Thistle

How To Install A Ceiling Fan On Sloped Lemon Thistle

How To Choose A Ceiling Fan For Vaulted Ceilings Lightology

Vaulted Sloped Ceiling Adapter For Modern Fan Company Fans Stardust

Ensuring Proper Ceiling Fan Installation With Vaulted Ceilings

How To Choose A Ceiling Fan For Vaulted Ceilings Lightology

Fans On An Angle Installing Ceiling Angled Or Raked

Hunter Fans How To Install Your Ceiling Fan Cpo S

Vaulted Sloped Ceiling Adapter For Modern Fan Company Fans Stardust

Ceiling Fans For Angled Ceilings
Related Posts