How To Mount A Ceiling Fan On A Slanted Wall
Installing a ceiling fan on a slanted or vaulted ceiling presents unique challenges compared to a standard flat ceiling installation. This guide provides a detailed explanation of the process, highlighting the necessary adjustments and precautions.
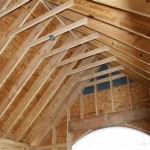
Assessment and Preparation: Begin by assessing the ceiling's angle. This measurement is crucial for selecting the correct downrod length and ensuring proper fan clearance. Measure the angle using a protractor or angle finder. Next, determine the ceiling height to ensure adequate clearance between the fan blades and the floor. A minimum of seven feet of clearance is generally recommended. Locate the ceiling joist where the fan will be mounted. A stud finder can be used to identify the joist's location accurately. Verify the joist can support the weight of the ceiling fan, consulting the fan's manufacturer specifications.
Gathering Necessary Materials and Tools: Assembling the required tools and materials beforehand streamlines the installation process. The following items are typically required: ceiling fan, downrod (appropriate length for the ceiling angle), mounting bracket, electrical box rated for fan support, wiring connectors, wire strippers, voltage tester, screwdriver, drill, appropriate drill bits (including a pilot bit for wood screws), measuring tape, pencil, safety glasses, and ladder.
Electrical Box Installation for Sloped Ceilings: If an existing electrical box is not present or is not rated for fan support, a new fan-rated box must be installed. For sloped ceilings, a special sloped ceiling adapter or a fan-rated adjustable electrical box is necessary. These specialized boxes allow for proper mounting and leveling on angled surfaces. Securely attach the box to the ceiling joist, ensuring it is flush with the finished surface of the ceiling. If using a sloped ceiling adapter, follow the manufacturer’s instructions for proper installation and angle adjustment.
Downrod Selection and Assembly: Choosing the correct downrod length is critical for proper fan operation and aesthetics. Longer downrods are typically required for steeper ceiling angles to maintain adequate clearance. Consult the ceiling fan manufacturer’s guidelines for downrod recommendations based on the ceiling angle. Once the appropriate downrod is selected, assemble it according to the manufacturer's instructions. This typically involves running the fan's wiring through the downrod and securing it to the fan motor housing.
Wiring the Ceiling Fan: Turn off the power at the circuit breaker before beginning any electrical work. Use a voltage tester to confirm the power is off. Connect the fan's wires to the house wiring according to the wiring diagram included with the fan. Typically, this involves connecting the black wire (hot) to the black wire, the white wire (neutral) to the white wire, and the green or bare copper wire (ground) to the grounding wire in the electrical box. Use appropriate wire connectors to secure the connections, ensuring a tight and reliable connection. If the fan includes a light kit, connect the light kit wires following the manufacturer’s instructions.
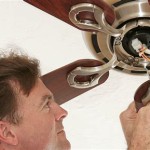
Mounting the Fan to the Ceiling: Carefully lift the assembled fan and downrod unit, aligning the canopy with the mounting bracket attached to the electrical box. Secure the canopy to the mounting bracket using the screws provided. Ensure the canopy is flush against the ceiling and that the fan feels secure. Attach the fan blades to the motor housing, following the manufacturer’s instructions. Ensure all screws are tightened properly to prevent wobbling.
Testing and Final Adjustments: Once the fan is fully assembled and mounted, restore power to the circuit. Test the fan's operation at all speeds, ensuring smooth and wobble-free performance. If the fan wobbles, consult the troubleshooting guide included with the fan, as this often indicates an imbalance in the blades. Balancing kits are available to correct minor wobbling issues.
Safety Considerations: Throughout the installation process, prioritize safety. Always turn off the power at the circuit breaker before working with electrical wiring. Use a voltage tester to double-check that the power is off. Wear safety glasses to protect your eyes from debris. Use a sturdy ladder and ensure it is placed on a stable surface. If unsure about any aspect of the installation, consult a qualified electrician.
Additional Tips for Sloped Ceilings: When working with extremely steep slopes, consider using a close-to-ceiling fan designed specifically for angled ceilings. These fans typically have a shorter profile and are designed to minimize the downrod length required. Ensure the fan blades have adequate clearance from the ceiling and any adjacent walls.
Regular Maintenance: Regularly inspect the fan for any loose screws or signs of wear. Clean the fan blades periodically to prevent dust buildup, which can affect performance and balance. By following these steps and taking necessary precautions, individuals can successfully install a ceiling fan on a slanted wall and enjoy enhanced air circulation and comfort.

How To Install A Ceiling Fan On Sloped Lemon Thistle

Vaulted Sloped Ceiling Adapter For Modern Fan Company Fans

Install Ceiling Fan On Sloped Simple Modern Handmade Home

How To Find Ceiling Fans Slope Adapters And Downrods For Angled Ceilings Delmarfans Com

Electrical Mount Ceiling Fan At The Peak Of A Sloped Home Improvement Stack Exchange

Ensuring Proper Ceiling Fan Installation With Vaulted Ceilings

Install Ceiling Fan On Sloped Simple Modern Handmade Home

How To Choose A Ceiling Fan For Vaulted Ceilings Lightology

Casablanca Angled Ceiling Mount 61706 Hunter Fan

Hunter Fans How To Install Your Ceiling Fan Cpo
Related Posts