How to Mount a Ceiling Fan on an Angled Ceiling
Installing a ceiling fan can significantly improve air circulation and reduce energy costs. While installing a ceiling fan on a flat ceiling is a relatively straightforward process, mounting one on an angled ceiling requires additional considerations and specific hardware to ensure safety and optimal performance. This article provides a comprehensive guide to successfully mounting a ceiling fan on an angled ceiling.
Before commencing the installation, it is crucial to prioritize safety. Turn off the power to the circuit at the breaker box that supplies electricity to the ceiling fixture where the fan will be installed. Verify that the power is off using a non-contact voltage tester. This step is paramount to prevent electrical shock. Also, ensure you have a helper. Ceiling fans can be heavy and awkward to handle alone, especially when working on a ladder.
Gather all necessary tools and materials. This includes a Phillips head screwdriver, a flathead screwdriver, wire strippers, wire connectors (wire nuts), electrical tape, a level, a measuring tape, a stud finder, a pencil, safety glasses, work gloves, and a ladder or scaffolding. As for materials, you will need the ceiling fan itself (including all its components), a mounting bracket specifically designed for angled ceilings, a downrod of the appropriate length (dependent on the ceiling angle and desired fan height), compatible wiring, and wood screws or lag bolts.
Determining Ceiling Angle and Downrod Length
The first critical step is to accurately determine the angle of the ceiling. This measurement is essential for selecting the correct type of mounting bracket and downrod length. Several methods can be used to determine the angle. One method involves using a protractor level, which combines a level with a protractor, allowing for direct measurement of the angle. Position the level against the ceiling and read the angle displayed on the protractor. Another method involves using a digital angle finder, which provides a more precise measurement.
Alternatively, if a specialized tool isn’t available, you can use a manual method. Measure the rise and run of the angled ceiling over a known distance. The rise is the vertical distance, and the run is the horizontal distance. Then, use trigonometric functions (specifically, the arctangent function) to calculate the angle. The angle is equal to the arctangent of the rise divided by the run. Many online calculators or trigonometric tables can assist with this calculation. The angle must be measured accurately, as this determines the suitability of the mounting bracket and downrod required.
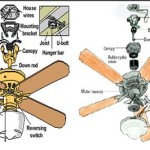
Once the ceiling angle is known, select a mounting bracket specifically designed for angled ceilings. These brackets typically have a swivel ball or a similar mechanism that allows the fan to hang straight down regardless of the ceiling angle. The bracket should be rated to support the weight of the ceiling fan. Inspect the bracket for any signs of damage or defects before installation.
The appropriate downrod length is dependent on both the ceiling angle and the desired height of the fan blades from the floor. A general rule of thumb is that the fan blades should be at least seven feet above the floor. However, for angled ceilings, a longer downrod may be necessary to achieve this height. Consult the ceiling fan manufacturer's instructions for specific recommendations on downrod length based on the ceiling angle. Failure to use an appropriate downrod can result in the fan being too close to the ceiling, which reduces airflow and potentially poses a safety hazard.
Reinforcing the Mounting Location
The electrical box in the ceiling must be rated to support the weight of the ceiling fan. Standard plastic electrical boxes are not designed to bear the weight of a ceiling fan and should not be used. If the existing electrical box is not fan-rated, it must be replaced with a fan-rated box. These boxes are typically made of metal and are securely attached to the ceiling joist. A fan-rated box will have a weight capacity clearly indicated on the box or its packaging.
Locate the ceiling joist using a stud finder. The mounting bracket must be securely attached to the ceiling joist to ensure that the fan is properly supported. Mark the location of the joist with a pencil. If the existing electrical box is not aligned with a joist, it may be necessary to install a brace between two joists to provide a secure mounting point. This is particularly important for angled ceilings, as the weight of the fan will be distributed unevenly.
To install a brace, cut a piece of lumber to fit snugly between the two joists. The lumber should be thick and strong enough to support the weight of the ceiling fan. Attach the brace to the joists using wood screws or lag bolts. Ensure that the brace is level and securely fastened. The electrical box can then be attached to the brace. Use screws to securely attach the fan-rated box to the joist or bracing. The screws should be long enough to penetrate deeply into the wood, but not so long that they protrude through the ceiling.
If you have access to the attic, the bracing process can be significantly easier. You can add additional support structures directly to the joists from above, ensuring a solid and secure mounting point. This approach allows for greater flexibility in positioning the electrical box and ensures that the fan's weight is evenly distributed across multiple joists.
Wiring and Installing the Fan
Before connecting any wires, double-check that the power is still turned off at the breaker box. Using wire strippers, carefully strip the insulation from the ends of the wires in the electrical box and the wires from the ceiling fan. Connect the wires according to the manufacturer's instructions and local electrical codes. Typically, the black wire from the fan connects to the black (hot) wire in the electrical box, the white wire from the fan connects to the white (neutral) wire in the electrical box, and the green or bare copper wire from the fan connects to the green or bare copper wire in the electrical box (ground wire). Use wire connectors (wire nuts) to securely join the wires. Wrap the wire connectors with electrical tape for added safety.
Carefully tuck the wires into the electrical box, ensuring that they are not pinched or damaged. Attach the mounting bracket to the electrical box, ensuring that it is securely fastened. The mounting bracket should be oriented correctly to allow the fan to hang straight down. Follow the manufacturer’s instructions for attaching the downrod to the fan motor.
Lift the fan motor with the downrod attached and carefully slide the downrod into the mounting bracket. Secure the fan to the mounting bracket according to the manufacturer's instructions. This usually involves inserting pins or bolts into the bracket. Ensure that the fan is securely attached and that it can swivel freely. Connect the wiring from the fan motor to the wiring in the downrod. This may involve using wire connectors similar to those used in the electrical box. Again, follow the manufacturer's instructions carefully.
Attach the fan blades to the fan motor according to the manufacturer's instructions. Ensure that the blades are properly aligned and securely fastened. Test the fan to ensure that it is balanced and does not wobble excessively. If the fan wobbles, use the balancing kit provided with the fan to adjust the blades until the wobble is minimized.
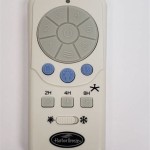
Finally, install the light kit (if applicable) according to the manufacturer’s instructions. Test the fan and the light kit to ensure that they are functioning properly. Turn the power back on at the breaker box. Verify that the fan operates at all speeds and that the light kit illuminates correctly. If any problems are encountered, turn off the power and recheck the wiring and connections.

How To Install A Ceiling Fan On Sloped Lemon Thistle

Install Ceiling Fan On Sloped Simple Modern Handmade Home

How To Install A Ceiling Fan On Sloped Lemon Thistle

Electrical Mount Ceiling Fan At The Peak Of A Sloped Home Improvement Stack Exchange

Mounting Ceiling Fan On Sloped Home Improvement Stack Exchange

How To Choose A Ceiling Fan For Vaulted Ceilings Lightology

Kichler Ceiling Fan Fast Facts Sloped

How To Install A Ceiling Fan On Vaulted Quora

Fans On An Angle Installing Ceiling Angled Or Raked

How To Install A Ceiling Fan Hunter
Related Posts