How to Install Vinyl Beadboard Ceiling
Vinyl beadboard ceilings offer an aesthetically pleasing and durable alternative to traditional drywall or plaster. They are particularly well-suited for areas prone to moisture, such as bathrooms, kitchens, and basements, due to their resistance to water and mildew. Installation, while manageable for a DIY enthusiast, requires careful planning, precise measurements, and adherence to established techniques.
This article provides a comprehensive guide to installing vinyl beadboard ceiling, covering preparation, material selection, cutting, fastening, and finishing. The guide aims to equip the reader with the knowledge and understanding required to achieve a professional-looking installation.
Planning and Preparation
Before commencing the installation process, meticulous planning is crucial. This involves assessing the existing ceiling structure, determining the material requirements, and gathering the necessary tools. Neglecting this preliminary phase can lead to errors, delays, and ultimately, an unsatisfactory result.
The first step is to carefully inspect the existing ceiling. Examine it for any signs of damage, such as water stains, cracks, or loose plaster. Address any pre-existing issues before installing the vinyl beadboard. This might involve repairing drywall, patching holes, or reinforcing weak areas. A level and stable substrate is essential for a seamless installation.
Next, measure the dimensions of the ceiling accurately. This will determine the amount of vinyl beadboard, furring strips, and fasteners required. It is advisable to add an extra 10-15% to the material estimate to account for waste due to cuts and errors. This prevents unexpected shortages during the installation process.
Consider the type of lighting fixtures that will be installed in the ceiling. Recessed lighting requires cutouts in the vinyl beadboard. Plan the locations of these fixtures in advance and mark them on the ceiling. Ensure that the recessed lighting fixtures are compatible with the vinyl beadboard ceiling system, paying attention to factors like heat output and required clearances.
Gather the required tools and materials. Essential tools include a measuring tape, level, stud finder, pencil, safety glasses, dust mask, circular saw or utility knife, drill/driver, hammer, and construction adhesive. The materials required will include vinyl beadboard panels, furring strips (typically 1x3 lumber), appropriate fasteners (screws or nails), and trim pieces for finishing edges.
Acclimatize the vinyl beadboard panels to the room's temperature for at least 24 hours prior to installation. This allows the material to expand or contract, minimizing the risk of buckling or warping after installation. Store the panels flat in the room where they will be installed.
Installing Furring Strips
Furring strips provide a stable framework for attaching the vinyl beadboard panels to the existing ceiling. Properly installed furring strips ensure a level and even surface, preventing sagging or unevenness in the finished ceiling.
Locate the ceiling joists using a stud finder. Mark the location of each joist clearly. The furring strips will be attached perpendicular to the direction of the joists, providing the necessary support for the vinyl beadboard. Typical spacing for furring strips is 12 to 24 inches on center, depending on the thickness of the vinyl beadboard and the load it will support (e.g., heavy light fixtures).
Cut the furring strips to the appropriate length. If the ceiling is longer than the standard length of the lumber, join the furring strips end-to-end, ensuring that the joints are staggered and securely fastened to the ceiling joists. Use a level to ensure that the furring strips are installed straight and even. Adjust the furring strips as needed to compensate for any irregularities in the existing ceiling.
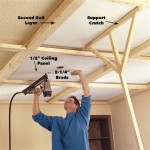
Attach the furring strips to the ceiling joists using screws or nails. Screws provide a more secure and durable connection than nails, especially in areas prone to vibration or movement. Use screws that are long enough to penetrate the joists adequately, typically 2-3 inches. Predrill pilot holes through the furring strips to prevent splitting the wood. Drive the screws straight and flush with the surface of the furring strips.
For concrete ceilings, use concrete screws and a hammer drill to attach the furring strips. Ensure that the screws are properly anchored in the concrete to provide a secure hold. Follow the manufacturer's instructions for installing concrete screws.
Inspect the installed furring strips to ensure that they are level and properly aligned. Make any necessary adjustments before proceeding with the installation of the vinyl beadboard panels. A level framework is critical for a professional-looking finished ceiling.
Installing Vinyl Beadboard Panels
The installation of the vinyl beadboard panels involves precise cutting, careful alignment, and secure fastening. Attention to detail is crucial to ensure a seamless and aesthetically pleasing finished product.
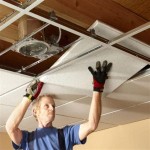
Begin by measuring and cutting the first vinyl beadboard panel to fit the dimensions of the ceiling. Use a circular saw or a utility knife with a sharp blade to make clean and accurate cuts. For intricate cuts around light fixtures or other obstructions, use a jigsaw or a coping saw. Always wear safety glasses and a dust mask when cutting vinyl beadboard.
Apply construction adhesive to the back of the vinyl beadboard panel. Use a generous amount of adhesive, but avoid applying too much, which can cause the adhesive to seep out of the joints. Follow the manufacturer's instructions for the application and curing time of the construction adhesive.
Position the first vinyl beadboard panel against the furring strips, ensuring that it is properly aligned and flush with the wall. Press the panel firmly against the furring strips to ensure good adhesion. Use screws or nails to fasten the panel to the furring strips. Space the fasteners evenly along the length of the panel, typically every 12-16 inches. Ensure that the fasteners are driven straight and flush with the surface of the panel.
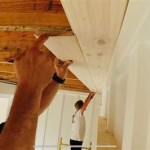
Install subsequent vinyl beadboard panels, interlocking them according to the manufacturer's instructions. Some vinyl beadboard panels have tongue-and-groove edges that interlock to create a seamless joint. Others may require a slight overlap or a special adhesive to create a watertight seal. Ensure that each panel is properly aligned and fastened to the furring strips.
When installing panels around light fixtures or other obstructions, make precise cutouts using a jigsaw or a coping saw. Measure the dimensions of the cutout carefully and transfer them to the vinyl beadboard panel. Use a drill to create a pilot hole for the saw blade. Cut along the marked lines, ensuring that the cut is clean and accurate. Test-fit the panel around the obstruction before permanently attaching it to the ceiling.
For the final row of vinyl beadboard panels, it may be necessary to rip the panels to the required width. Measure the remaining space carefully and cut the panels accordingly. Use a table saw or a circular saw with a rip fence to make consistent and accurate cuts. Install the final row of panels in the same manner as the previous panels, ensuring that they are properly aligned and fastened to the furring strips.
Finishing and Detailing
Finishing and detailing are crucial for achieving a professional-looking vinyl beadboard ceiling. This involves concealing fasteners, trimming edges, and caulking gaps to create a clean and polished appearance.
Conceal the fastener heads by using color-matched caulk or putty. Apply a small amount of caulk or putty to each fastener head and smooth it out with a putty knife or your finger. Allow the caulk or putty to dry completely before painting or applying a topcoat. Alternatively, use screws with color-matched heads to minimize their visibility.
Install trim pieces along the edges of the ceiling to conceal the cut edges of the vinyl beadboard panels. Trim pieces can be made of vinyl, wood, or metal, depending on the desired aesthetic. Choose trim pieces that complement the style and color of the vinyl beadboard panels. Attach the trim pieces to the furring strips using nails or screws. Miter the corners of the trim pieces for a clean and professional look.
Caulk any gaps or seams between the vinyl beadboard panels and the trim pieces. Use a high-quality caulk that is paintable and mildew-resistant. Apply the caulk in a thin, even bead and smooth it out with your finger or a caulk smoothing tool. Wipe away any excess caulk with a damp cloth.
If desired, paint the vinyl beadboard ceiling to match the existing décor. Use a paint that is specifically designed for vinyl surfaces. Clean the vinyl beadboard thoroughly before painting to remove any dirt or grease. Apply two coats of paint, allowing each coat to dry completely before applying the next. Consider using a primer to improve adhesion and coverage.
Install any light fixtures or other accessories that were planned during the initial phase. Follow the manufacturer's instructions for installing these fixtures. Ensure that all electrical connections are properly made and that the fixtures are securely attached to the ceiling. Test the light fixtures to ensure that they are functioning properly.
Inspect the finished vinyl beadboard ceiling carefully for any imperfections. Touch up any areas that need attention. Clean the ceiling with a mild detergent and water to remove any dust or dirt. Enjoy your newly installed vinyl beadboard ceiling.

Vinyl Beadboard Ceiling Common Problems And A Better Alternative Allura Usa

Vinyl Beadboard Ceiling Common Problems And A Better Alternative Allura Usa

Using Vinyl Beadboard Soffit For Porch Ceilings

Diy Beadboard Ceiling Tutorial Easy And Inexpensive Custom Treatment

Vinyl Beadboard Ceiling In Bathroom Simple And Stylish Remodel

Diy Beadboard Ceiling Tutorial Easy And Inexpensive Custom Treatment

How To Install A Beadboard Porch Ceiling This Old House

Awesome Diy Vinyl Bead Board Ceiling The Perfect For A Farmhouse Bathroom Lehman Lane

How To Install A Wood Plank Ceiling Young House Love

Vinyl Beadboard Ceiling On Porch Patio Ideas
Related Posts