How To Install a Return Air Duct in Your Ceiling
Installing a return air duct in the ceiling is a project that may be undertaken to improve the efficiency and effectiveness of a home's heating, ventilation, and air conditioning (HVAC) system. A properly installed return air duct ensures that air is drawn back to the HVAC unit for conditioning, contributing to a more balanced and comfortable indoor climate. This process involves careful planning, precise cutting, secure installation, and thorough sealing. This document provides a step-by-step guide on how to install a return air duct in the ceiling, emphasizing safety precautions and best practices.
Before commencing with the installation, it is crucial to understand the fundamentals of HVAC systems and the role of return air ducts. The HVAC system circulates air throughout a building, conditioning it to maintain a desired temperature and humidity level. Supply vents deliver conditioned air into rooms, while return vents draw air back to the HVAC unit for reconditioning. Without adequate return air, the system may struggle to maintain consistent temperatures, leading to inefficiencies and increased energy consumption.
Proper placement of return air ducts is essential for optimal performance. Ideally, return vents should be located in areas where air tends to stagnate or where heat or cold accumulates. Common locations include hallways, common areas, and near ceilings, as heat rises. Avoid placing return vents in bathrooms, kitchens, or other areas where odors or contaminants may be present, as these can be circulated throughout the house. Also, avoid placing returns directly behind furniture or other obstructions which can significantly reduce airflow. The design and placement of the ductwork should be considered carefully to ensure adequate airflow and efficient system operation.
Prior to starting the physical installation, it is imperative to obtain any necessary permits and approvals from local building authorities. Building codes often dictate specific requirements for HVAC systems, including ductwork materials, sizing, and installation methods. Failure to comply with these regulations can result in costly rework or fines. Contacting the local building department or a qualified HVAC professional will ensure that the installation meets all applicable standards.
Key Point 1: Planning and Preparation
The success of any DIY project relies heavily on meticulous planning and preparation. For installing a return air duct, this involves several crucial steps:
*Determining Location:
Identify the optimal location for the return air duct. Consider factors such as airflow patterns, room size, and the presence of obstructions. A central location or an area with poor air circulation is often a good choice. Analyze the existing ductwork to determine the best connection point for the new duct. Ensure that the chosen location does not interfere with structural elements such as joists, beams, or electrical wiring. *Gathering Materials and Tools:
Compile all the necessary materials and tools before beginning the installation. Essential materials include: return air duct (round or rectangular, based on system requirements), return air grille, duct connectors (such as duct tape, screws, or clamps), insulation (if required), sheet metal screws, sealant, and sheet metal. Essential tools include: safety glasses, work gloves, a utility knife, a measuring tape, a drill, a screwdriver, sheet metal snips (or a reciprocating saw), a stud finder, a pencil or marker, a level, and a duct tape dispenser. *Safety Precautions:
Prioritize safety throughout the entire installation process. Wear safety glasses and work gloves to protect eyes and hands from debris and sharp edges. Disconnect the power to any electrical circuits in the work area to prevent electrocution. When cutting sheet metal, use caution to avoid cuts and lacerations. Ensure adequate ventilation to prevent the build-up of fumes from sealants or adhesives. If working at heights, use a sturdy ladder and take precautions to prevent falls.Once the planning stage is complete, the actual installation process can begin. This involves cutting the ceiling opening, running the ductwork, connecting the duct to the existing system, and installing the return air grille.
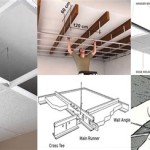
Key Point 2: Cutting the Ceiling Opening and Running the Ductwork
Creating the opening for the return air duct and installing the ductwork requires precision and attention to detail:
*Locating and Marking the Opening:
Use a stud finder to locate ceiling joists and identify a suitable location for the return air duct opening. Choose a spot that is centered between joists and away from any obstructions. Mark the perimeter of the opening on the ceiling using a pencil or marker. Ensure that the marked area is slightly smaller than the dimensions of the return air grille to allow for a snug fit. *Cutting the Ceiling Opening:
Using a utility knife or drywall saw, carefully cut along the marked lines to create the ceiling opening. Take care not to damage any wiring or plumbing concealed within the ceiling cavity. Once the opening is cut, remove the drywall or plaster and dispose of it properly. *Running the Ductwork:
Measure the distance from the ceiling opening to the existing ductwork where the return air duct will connect. Cut the return air duct to the required length using sheet metal snips or a reciprocating saw. If necessary, use elbows or other fittings to navigate around obstructions or change the direction of the ductwork. Secure the ductwork to the ceiling joists using duct straps or hangers to prevent sagging or movement. Ensure the ductwork is properly supported and does not put undue strain on any connections. *Insulating the Ductwork (Optional):
For added energy efficiency, consider insulating the return air duct with fiberglass or foam insulation. Wrap the ductwork with insulation and secure it with duct tape or foil tape. Ensure that all seams and joints are tightly sealed to prevent air leakage. Insulation helps to minimize heat loss or gain, improving the overall performance of the HVAC system.With the ceiling opening cut and the ductwork in place, the next step is to connect the new duct to the existing HVAC system and install the return air grille.
Key Point 3: Connecting the Ductwork and Installing the Return Air Grille
The final stages of the installation involve securely connecting the new duct to the existing system and finishing the project with the return air grille:
*Connecting the Duct to the Existing System:
Locate the appropriate point of connection on the existing ductwork. This may involve cutting an opening in the existing duct or using a pre-existing branch connection. Securely attach the new return air duct to the existing ductwork using duct connectors such as duct tape, screws, or clamps. Ensure that the connection is airtight and leak-proof to prevent air loss. If using screws, pre-drill pilot holes to prevent the sheet metal from splitting. *Sealing the Connections:
Use a high-quality sealant to seal all joints and seams in the ductwork. This will prevent air leakage and ensure that the HVAC system operates efficiently. Apply the sealant liberally to all connections and allow it to dry completely before testing the system. Use foil tape over the sealant for added security and to prevent degradation of the sealant over time. *Installing the Return Air Grille:
Insert the return air grille into the ceiling opening. Secure the grille to the ceiling using screws or clips. Ensure that the grille is flush with the ceiling surface and that it is properly aligned. The grille should be securely attached to prevent it from falling or rattling. *Testing the System:
Once the installation is complete, turn on the HVAC system and test the airflow through the new return air duct. Use a piece of tissue or a smoke pen to verify that air is being drawn into the return air grille. Check for any leaks or drafts around the connections. If any problems are detected, troubleshoot the issues and make any necessary adjustments. Monitor the system's performance over time to ensure that it is operating efficiently and effectively.By following these steps, homeowners can effectively install a return air duct in their ceiling, thereby improving the performance of their HVAC system and enhancing the comfort of their living space. Remember that proper planning, preparation, and meticulous execution are key to a successful installation. If at any point the task feels overwhelming or beyond your skill level, consult with a qualified HVAC professional for assistance.

Learn How To Install Return Air Duct In Your Home The Kings

How To Install A Return Air Duct Doityourself Com

Return Air Vent Internachi Forum

Hvac Return Air Duct Vent Installation

How To Install A Return Air Vent Plumbersstock Com

Ducts In Dropped Ceilings Building America Solution Center

How To Install A Return Air Duct In Basement Proair Industries Inc

An Easy Retrofit For Return Air From Bedrooms Energy Vanguard

Why Adding A Return Air Vent Improves Your Home S Comfort Bird Family Insulation

The Central Vs Dedicated Return Vent Debate Energy Vanguard
Related Posts