How To Install Recessed Lights In A Drop Ceiling
Recessed lighting, also known as can lights or pot lights, offers a clean, modern aesthetic and functional illumination for various spaces. Installing recessed lights in a drop ceiling presents a relatively straightforward project for experienced DIY enthusiasts. However, safety precautions and adherence to electrical codes are paramount. This article provides a comprehensive guide on how to install recessed lights in a drop ceiling, covering planning, preparation, installation, and testing.
Planning and Preparation: Laying the Groundwork for Success
Before commencing the installation process, meticulous planning is essential to ensure a successful outcome. This phase involves assessing the ceiling, determining the light placement, and gathering the necessary materials and tools.
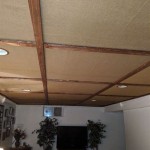
Assessing the Drop Ceiling Structure: The initial step involves a thorough inspection of the existing drop ceiling. Examine the grid system, confirming its stability and load-bearing capacity. Drop ceilings typically consist of metal T-bars suspended from the structural ceiling above, with lightweight ceiling tiles resting within the grid. Ensure the grid is securely fastened and in good condition. If the grid shows signs of damage, such as bent or rusted sections, repairs or reinforcement may be necessary before proceeding. Furthermore, evaluate the space above the drop ceiling. Obstructions such as ductwork, pipes, or wiring could impact the placement of the recessed lights and might necessitate adjustments to the planned layout.
Determining Light Placement and Quantity: The optimal placement and number of recessed lights depend on the size of the room, the desired level of illumination, and the room's function. Consider the following guidelines when determining the light layout. As a general rule, space recessed lights evenly throughout the ceiling to achieve uniform illumination. The distance between lights should be approximately equal to the ceiling height. For example, in a room with an 8-foot ceiling, space the lights about 8 feet apart. For ambient lighting, position lights to cover the entire space evenly. Task lighting, on the other hand, should be focused on specific areas, such as workstations or reading nooks. To calculate the appropriate wattage for the recessed lights, consider the square footage of the room and the desired foot-candle level (a unit of illuminance). Consult lighting design resources or use online calculators to determine the optimal wattage per square foot. Also, avoid placing recessed lights directly above heat-generating appliances or fixtures, as this could shorten the lifespan of the bulbs and potentially create a fire hazard.
Selecting Recessed Lighting Fixtures: Choose recessed lighting fixtures that are specifically designed for drop ceilings. These fixtures typically feature spring clips or other mounting mechanisms that securely attach to the ceiling tiles without causing damage. Consider the type of bulb you prefer, such as LED, incandescent, or halogen. LED bulbs are energy-efficient and have a long lifespan, making them a popular choice. When selecting recessed lighting fixtures, ensure they are suitable for the intended application and meet all applicable safety standards and building codes. In particular, pay attention to the fire-rating of the fixtures, especially if the space above the drop ceiling is used for storage or contains combustible materials. IC-rated (Insulation Contact) fixtures are designed to be in direct contact with insulation, while non-IC-rated fixtures require a minimum clearance from insulation.
Gathering Materials and Tools: Before starting the installation, gather all the necessary materials and tools. This will streamline the process and minimize interruptions. Ensure you have the following items: Recessed lighting fixtures (appropriate type and quantity), electrical wire (NM-B cable, gauge appropriate for the circuit), wire connectors (wire nuts or push-in connectors), electrical tape, junction boxes (if required by local codes), drill with hole saw attachment (matching the diameter of the recessed light fixtures), wire stripper, voltage tester, screwdriver (Phillips and flathead), measuring tape, pencil, safety glasses, gloves, ladder, and a stud finder (optional, to locate structural studs above the drop ceiling). Verify that all materials comply with local electrical codes.
Installation Process: Step-by-Step Guide
The installation process involves cutting the holes for the recessed lights, wiring the fixtures, and securing them in place. Safety is paramount during this phase. Ensure the power to the circuit is turned off before commencing any electrical work, and wear appropriate safety gear.
Turning Off the Power: Before starting any electrical work, locate the circuit breaker that controls the power to the area where you will be installing the recessed lights. Turn off the breaker and confirm that the power is off by using a voltage tester. Test the wires at the existing light fixture or junction box to ensure there is no voltage present. This step is crucial for preventing electrical shock or injury. Tag the breaker with a warning label to prevent someone from accidentally turning it back on while you are working.
Cutting the Holes: Using a measuring tape and pencil, mark the locations for the recessed lights on the ceiling tiles. Use the hole saw attachment on your drill to cut the holes. Ensure the hole saw is the correct diameter for the recessed light fixtures. Drill slowly and carefully to prevent damaging the ceiling tiles or the grid system. After cutting each hole, remove any debris or dust.
Wiring the Fixtures: Connect the electrical wires to the recessed light fixtures according to the manufacturer's instructions and local electrical codes. If the existing wiring is not long enough to reach the new fixtures, you may need to extend the wires using junction boxes. Ensure all connections are secure and properly insulated with wire connectors or electrical tape. Connect the black wire (hot) to the black wire on the fixture, the white wire (neutral) to the white wire on the fixture, and the green or bare copper wire (ground) to the ground terminal on the fixture. Use wire connectors that are appropriate for the gauge of wire being used. Secure the connections with electrical tape to provide additional insulation and prevent accidental disconnections. If using junction boxes, mount them securely to the structural ceiling above the drop ceiling or to the T-bars of the grid system. Make sure the junction boxes are accessible for future maintenance or repairs.
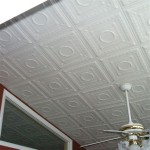
Securing the Fixtures: Insert the recessed light fixtures into the holes and secure them in place using the spring clips or other mounting mechanisms provided. Ensure the fixtures are flush with the ceiling tiles and properly aligned. The spring clips should provide a firm and secure grip on the ceiling tiles. If the fixtures are loose or wobbly, adjust the clips or add shims as needed. Make sure the trim rings or bezels are properly installed and aligned with the ceiling tiles. Once the fixtures are secured, carefully tuck the wiring into the recessed can to keep them away from the hot lamp. Do not overload the fixture; only use the recommended bulb wattage to prevent overheating and fire hazards. Check that the metal body of the light fixture is grounded, and the connections are secure.
Testing and Final Touches: Ensuring Proper Functionality and Aesthetics
After installing the recessed lights, testing and final touches are necessary to verify proper functionality and aesthetic appeal. This includes turning the power back on, checking the lights, and addressing any issues that may arise.
Turning the Power Back On: After completing the wiring and securing the fixtures, carefully turn the power back on at the circuit breaker. Observe the recessed lights as they illuminate. If any of the lights do not turn on, or if there are any other issues, immediately turn off the power and troubleshoot the problem.
Checking the Lights: After turning the power back on, check each recessed light to ensure it is functioning properly. Verify that the lights turn on and off smoothly, without any flickering or dimming. Also, check for any unusual noises or smells coming from the fixtures. If you detect any problems, immediately turn off the power and inspect the wiring and connections. Ensure the bulbs are properly seated in the sockets and that there are no loose connections. If necessary, replace the bulbs or the entire fixture. If the issue persists, consult a qualified electrician.
Addressing Any Issues: If you encounter any issues during the testing process, address them promptly. Common problems include loose connections, incorrect wiring, or faulty fixtures. Double-check the wiring connections to ensure they are secure and properly insulated. Verify that the correct gauge of wire was used for the circuit. If the problem is with the fixture itself, replace it with a new one. If you are not comfortable troubleshooting electrical issues, consult a qualified electrician.
Final Touches: After verifying that the recessed lights are functioning properly, perform any necessary final touches. This may include adjusting the trim rings or bezels to ensure a seamless fit with the ceiling tiles. Clean any fingerprints or smudges from the fixtures. Replace any damaged or missing ceiling tiles. If the drop ceiling is old or discolored, consider painting it to create a brighter and more uniform appearance. Inspect the entire installation to ensure it meets your aesthetic preferences and satisfies all applicable safety standards.

How To Install Recessed Lights In A Drop Ceiling Temecula Handyman

Light Installation In A Ceiling Tile

Diy Recessed Lighting Installation In A Drop Ceiling Tiles Part 3 Super Nova Adventures

Diy Recessed Lighting Installation In A Drop Ceiling Tiles Prep Work Super Nova Adventures Dropped Finishing Basement

Diy Recessed Lighting Installation In A Drop Ceiling Tiles Part 3 Super Nova Adventures

How To Install Recessed Lights In A Drop Ceiling The Home Depot

Operation Laundry Room Lighting Reality Daydream

Recessed Lighting In Basement Drop Ceiling Made Easy Suspended Ceilings And Recesse Dropped

How To Put Recessed Lights In The Ceiling

Install Recessed Lights Installing Lighting Drop Ceiling Diy
Related Posts