How To Install A Pool Table Light in a Drop Ceiling
Installing a pool table light can significantly enhance the playing experience by providing focused illumination, reducing shadows, and improving visibility. While the task might seem daunting, especially in a drop ceiling environment, it is a manageable project for many homeowners with a basic understanding of electrical wiring and some DIY skills. This article provides a comprehensive guide on how to safely and effectively install a pool table light in a drop ceiling.
Before commencing any electrical work, it is paramount to prioritize safety. This includes turning off the power to the circuit at the breaker box that will be used for the pool table light. Double-check that the power is off using a non-contact voltage tester before proceeding with any wiring. Furthermore, wearing appropriate safety gear, such as safety glasses and gloves, is highly recommended throughout the installation process.
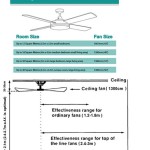
Proper planning is also crucial for a successful installation. Accurate measurements are essential to ensure the light is centered above the pool table and hung at the correct height. The standard recommendation is to hang the bottom of the light fixture approximately 31 to 36 inches above the playing surface of the pool table. This height minimizes glare and shadows while providing adequate illumination.
Key Point 1: Gathering Necessary Materials and Tools
The first step in the installation process involves gathering all the necessary materials and tools. Having everything readily available will streamline the project and minimize interruptions. Here is a comprehensive list of items typically required:
1. Pool Table Light Fixture: Choose a light fixture specifically designed for pool tables. These fixtures are typically elongated to provide even illumination across the entire playing surface. Ensure the fixture is compatible with the existing electrical system (voltage and wattage).
2. Electrical Wiring: Sufficient length of appropriately rated electrical wire (usually 12 or 14 gauge, depending on local electrical codes and the fixture's requirements). Check local building codes for specific requirements.
3. Wire Connectors (Wire Nuts): For safely connecting the wires from the fixture to the existing electrical wiring. Choose connectors that are appropriately sized for the gauge of wire used.
4. Electrical Tape: To further insulate wire connections after using wire connectors.
5. Non-Contact Voltage Tester: A crucial tool for ensuring the power is off before working with electrical wiring.
6. Wire Strippers: For safely removing the insulation from the electrical wires.
7. Pliers: For various tasks, such as twisting wires together and tightening connections.
8. Screwdriver Set: Including both Phillips head and flathead screwdrivers for various screws on the light fixture and junction box.
9. Drill with Appropriate Drill Bits: May be required for creating mounting holes in the ceiling support structure or for installing a junction box.
10. Ladder or Step Stool: To safely reach the ceiling area.
11. Measuring Tape: For accurate measurements of the pool table and the light fixture placement.
12. Pencil or Marker: For marking the desired location of the light fixture.
13. Drop Ceiling Support Wire or Chain: For suspending the light fixture from the drop ceiling grid. This is crucial as drop ceilings are not designed to support the weight of a light fixture directly.
14. S-Hooks or Carabiners: For connecting the support wire or chain to the light fixture and the drop ceiling grid.
15. Junction Box (if necessary): If there isn't an existing junction box in the location where you want to install the light, you will need to install one to safely house the electrical connections.
16. Hole Saw (if necessary): If you need to create a hole in the drop ceiling tile for wiring to pass through.
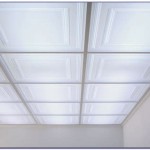
Key Point 2: Installing the Support System in the Drop Ceiling
Drop ceilings are designed for aesthetics and sound dampening, not for supporting heavy loads. Therefore, it is crucial to create a robust and independent support system for the pool table light. The most common methods involve using support wires or chains attached to the building's structural elements above the drop ceiling.
1. Locating Structural Support: Access the area above the drop ceiling by carefully lifting a ceiling tile. Identify suitable structural elements such as joists, beams, or the building's roof structure. These elements will serve as the anchor points for the support system.
2. Installing Support Wires or Chains: Securely attach support wires or chains to the identified structural elements. Use appropriate fasteners such as eye bolts, screws, or clamps, ensuring they are rated to handle the weight of the light fixture with a significant safety margin. The number of support wires or chains will depend on the weight of the fixture and the load-bearing capacity of the chosen anchors. Generally, at least two support points are recommended for stability.
3. Dropping the Support System: Extend the support wires or chains down through the drop ceiling grid at the desired location for the light fixture. If necessary, use a hole saw to create clean openings in the ceiling tiles for the wires or chains to pass through.
4. Leveling and Adjusting: Before attaching the light fixture, ensure the support wires or chains are properly positioned and adjusted to achieve the desired height and levelness. Use a level to verify the accuracy of the positioning. Minor adjustments can be made by shortening or lengthening the support wires or chains.
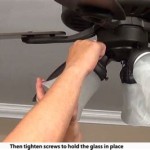
5. Attaching the Light Fixture: Connect the light fixture to the support wires or chains using S-hooks or carabiners. Ensure the connection is secure and that the weight of the fixture is evenly distributed across all support points. Double-check the levelness of the fixture after it is attached.
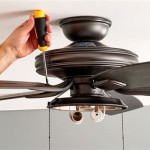
Key Point 3: Wiring the Pool Table Light Fixture
Once the support system is in place and the light fixture is securely attached, the next step involves wiring the fixture to the electrical system. This step requires meticulous attention to detail and adherence to all applicable electrical codes.
1. Identifying the Existing Wiring: Locate the existing electrical wiring in the ceiling. This may involve finding an existing junction box or tapping into an existing circuit. If tapping into an existing circuit, ensure it is capable of handling the additional load of the pool table light without overloading the circuit.
2. Preparing the Wires: Carefully strip the insulation from the ends of the electrical wires (both from the fixture and the existing wiring) using wire strippers. Expose approximately ½ to ¾ inch of bare wire. Ensure the wires are clean and free of any damage.
3. Making the Connections: Connect the wires from the light fixture to the corresponding wires in the existing electrical system. Typically, this involves connecting the black (hot) wire from the fixture to the black (hot) wire in the ceiling, the white (neutral) wire from the fixture to the white (neutral) wire in the ceiling, and the green (ground) wire (or bare copper wire) from the fixture to the green (ground) wire (or bare copper wire) in the ceiling.
4. Securing the Connections: Use wire connectors (wire nuts) to securely join the wires together. Twist the wires together tightly before screwing on the wire connector. Ensure the wire connector is properly sized for the gauge of wire used.
5. Insulating the Connections: After securing the connections with wire connectors, wrap electrical tape around the wire connectors and the exposed wires for added insulation and protection. This helps to prevent accidental shorts and ensures a safer connection.
6. Organizing the Wires: Carefully tuck the wires and wire connectors into the junction box (if applicable) or into the space above the drop ceiling. Ensure the wires are not pinched or strained.
7. Testing the Installation: After completing the wiring, carefully turn the power back on at the breaker box. Test the light fixture to ensure it is working properly. If the light does not turn on, immediately turn the power back off and re-examine the wiring connections for any errors.
8. Final Inspection: Once the light is working, perform a final inspection of the installation. Ensure all wires are properly secured and insulated, the light fixture is level and securely attached to the support system, and the drop ceiling tiles are properly reinstalled.
Installing a pool table light in a drop ceiling requires careful planning, proper execution, and strict adherence to safety guidelines. By following these steps and taking the necessary precautions, homeowners can successfully complete this project and enjoy enhanced illumination for their pool table.

How To Install Perimeter Arena Billiard Light Diy And Review

How To Install Perimeter Arena Billiard Light Diy And Review

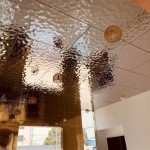
Installation Was A Snap Ceilume

Height To Hang A Pool Table Light Plus Tips Considerations

How To Install Pool Table Lighting Blogs Home Leisure Direct

How To Install Pool Table Lighting Blogs Home Leisure Direct

How To Install Pool Table Lighting Blogs Home Leisure Direct

Diy How To Make A Pool Table Led Light For I Still Suck At Woodworking

Drop Ceiling Installation Milwaee Suspended Installers Acoustical Wisconsin Design Illinois Strictly Ceilings

Browse Drop Ceiling Tiles Ceilings Armstrong Residential
Related Posts