How to Install Heat Vents in Drop Ceiling Boxes in Illinois Houses
Installing heat vents in drop ceilings, especially within boxes or custom enclosures, necessitates careful planning, execution, and adherence to local building codes, particularly in Illinois houses. This article outlines the procedural steps and considerations for a successful and safe installation. It covers the necessary tools, safety precautions, and best practices for integrating heat vents into drop ceiling boxes.
Before embarking on the installation, it’s crucial to understand the purpose of the drop ceiling and the existing HVAC system. Drop ceilings are often installed to conceal ductwork, wiring, and plumbing, creating a more aesthetically pleasing and accessible space. The HVAC system's design dictates the optimal placement and type of heat vents needed to effectively distribute warm air throughout the room. Improper installation can lead to inefficient heating, discomfort, and potentially, fire hazards. Due diligence is paramount, and consultation with a qualified HVAC professional is advisable, particularly if the existing system is complex or unfamiliar. Furthermore, in Illinois, local building codes might have specific requirements regarding ventilation and fire safety, which must be strictly adhered to.
Key Point 1: Planning and Preparation
The planning phase is critical for a successful heat vent installation. It involves assessing the existing HVAC system, determining the appropriate vent size and location, gathering necessary materials and tools, and ensuring compliance with Illinois building codes. A well-defined plan minimizes errors and ensures a smooth installation process.
First, a thorough inspection of the existing HVAC system is essential. This includes identifying the duct size, airflow capacity, and any existing vents. Understanding the system's capacity will help determine the appropriate size and number of heat vents required for the room. Overloading the system with too many vents can reduce overall heating efficiency, while insufficient venting can lead to uneven temperature distribution.
Next, the ideal location for the heat vent(s) within the drop ceiling box must be determined. Several factors influence this decision, including the room's layout, furniture placement, and the direction of airflow from the ductwork. Ideally, the vent should be positioned to maximize air circulation and minimize obstructions. Consider the throw distance of the vent, which is the distance the air will travel from the vent before losing velocity. For larger rooms, multiple vents may be necessary to ensure even heating.
Once the location is determined, the appropriate size and type of heat vent can be selected. Common types of vents include adjustable registers, diffusers, and linear slot diffusers. Adjustable registers allow for directional control of airflow, while diffusers provide a wider, more dispersed airflow pattern. Linear slot diffusers are often used in modern designs to provide a sleek and unobtrusive appearance. The choice of vent depends on the room's aesthetics and heating requirements.
The necessary materials and tools should be gathered before starting the installation. These typically include: the heat vent(s), a measuring tape, a pencil, a drywall saw or utility knife, sheet metal screws, a drill, a screwdriver, safety glasses, gloves, and potentially, insulation. Depending on the design of the drop ceiling box, additional materials such as wood screws, furring strips, or metal framing may be required to provide adequate support for the vent.
Finally, a comprehensive review of Illinois building codes related to ventilation and fire safety is crucial. These codes may specify requirements for vent placement, fire-rated materials, and smoke detectors. Contacting the local building department or consulting with an HVAC professional can help ensure compliance. Failure to comply with building codes can result in fines or mandatory corrections.
Key Point 2: Installation Process
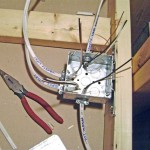
The installation process involves cutting the opening in the drop ceiling box, attaching the vent to the ductwork or plenum, and securing the vent to the box. Each step requires precision and attention to detail to ensure a secure and airtight fit. Furthermore, safety precautions must be taken to avoid injury during the installation process.
Before cutting the opening, ensure that the power to the HVAC system is turned off at the breaker. This will prevent any accidental activation of the system during the installation. Use a measuring tape and pencil to mark the dimensions of the vent opening on the drop ceiling box. Double-check the measurements to ensure accuracy, as a mistake at this stage can be difficult to correct.
Using a drywall saw or utility knife, carefully cut out the opening along the marked lines. It is important to make clean and precise cuts to ensure a snug fit for the vent. If the drop ceiling box is made of a different material, such as wood or metal, use appropriate cutting tools. Wear safety glasses to protect the eyes from debris during the cutting process.
Once the opening is cut, the vent can be attached to the ductwork or plenum. The specific method of attachment will depend on the type of vent and the design of the HVAC system. In some cases, the vent may simply slide into the opening and be secured with sheet metal screws directly into the ductwork. In other cases, an adapter or transition piece may be required to connect the vent to the ductwork. Ensure the connection is airtight to prevent air leakage and maintain heating efficiency. Use duct tape or mastic sealant to seal any gaps or cracks.
After attaching the vent to the ductwork, it must be securely fastened to the drop ceiling box. This can be accomplished using sheet metal screws, wood screws, or metal framing, depending on the construction of the box. Ensure that the vent is level and flush with the surface of the box. If necessary, use shims to adjust the vent's position. Do not overtighten the screws, as this can damage the vent or the drop ceiling box.
After the installation is complete, turn the power back on to the HVAC system and test the vent. Ensure that air is flowing freely and that the vent is properly distributing the heat. Adjust the vent's louvers or dampers to optimize airflow. If any problems are detected, such as air leaks or uneven heating, troubleshoot the issue and make necessary adjustments.
Key Point 3: Addressing Specific Challenges in Illinois Houses
Illinois houses, especially older ones, often present unique challenges during heat vent installations. These challenges can include asbestos concerns, older ductwork materials, and specific building code requirements related to energy efficiency and fire safety. Addressing these challenges proactively ensures a safe and compliant installation.
Asbestos is a significant concern in many older homes in Illinois. Asbestos was commonly used in building materials, including ductwork insulation and ceiling tiles, prior to the 1980s. Disturbing asbestos-containing materials during a heat vent installation can release harmful fibers into the air, posing a serious health risk. If asbestos is suspected, it is crucial to have the materials tested by a certified asbestos inspector before proceeding with the installation. If asbestos is present, it must be removed or encapsulated by a licensed asbestos abatement contractor. Do not attempt to remove asbestos yourself, as this is illegal in Illinois and can expose you to significant health risks.
Older ductwork materials, such as galvanized steel or flexible ductwork, may be damaged or deteriorated. Damaged ductwork can leak air, reducing heating efficiency and increasing energy costs. Before installing a new heat vent, inspect the existing ductwork for leaks, cracks, or other damage. Repair or replace any damaged sections of ductwork to ensure optimal performance. Consider upgrading to modern, energy-efficient ductwork materials, such as insulated metal ductwork or flexible ductwork with a vapor barrier.
Illinois building codes have specific requirements related to energy efficiency and fire safety. These requirements may include insulation standards for ductwork, minimum airflow rates for ventilation, and the use of fire-rated materials. Ensure that the heat vent installation complies with all applicable building codes. Consult with the local building department or an HVAC professional to obtain clarification on any specific requirements. Failure to comply with building codes can result in fines or mandatory corrections.
Another potential challenge in Illinois houses is the presence of vermin or pests in the attic or crawl space where the ductwork is located. These pests can damage ductwork, insulation, and wiring, creating unsanitary conditions and potentially posing a health risk. Before installing a new heat vent, inspect the area for signs of pest infestation. If pests are present, contact a licensed pest control company to eliminate the infestation before proceeding with the installation. Seal any openings or cracks in the building envelope to prevent future pest entry.
Furthermore, in areas of Illinois prone to extreme temperature variations, proper insulation of the ductwork within the drop ceiling box is paramount to maintaining heating efficiency. Uninsulated ductwork can lose significant heat to the surrounding unconditioned space, increasing energy consumption and reducing comfort. Wrap the ductwork with insulation that meets or exceeds the requirements of the Illinois Energy Conservation Code. Ensure that the insulation is properly sealed to prevent moisture intrusion. Consider using duct wrap with a vapor barrier to further enhance insulation performance.
By carefully planning the installation, paying attention to detail during the process, and addressing specific challenges related to Illinois houses, a safe and effective heat vent installation can be achieved. Regular maintenance of the HVAC system, including cleaning the vents and inspecting the ductwork, will help ensure continued optimal performance and efficiency.

Installing Woodhaven Planks And Hiding Drop Ceiling Grid Sawdust Girl

Installing Woodhaven Planks And Hiding Drop Ceiling Grid Sawdust Girl

Installing Woodhaven Planks And Hiding Drop Ceiling Grid Sawdust Girl

Ceiling Ac Vents Pros And Cons Aire Serv

Ceiling Cassette Mini Split Guide How To Pick The Perfect Unit

Installing Woodhaven Planks And Hiding Drop Ceiling Grid Sawdust Girl

Ceiling Suspended Mini Split Guide How To Pick The Perfect Indoor Unit

Can You Save Money By Closing Hvac Vents In Unused Rooms Energy Vanguard

Installing Woodhaven Planks And Hiding Drop Ceiling Grid Sawdust Girl

Drop Grid Ceiling Fan With Remote Wireless 3 Sd
Related Posts