Harbor Breeze Ceiling Fan Remote Control Installation: A Comprehensive Guide
Upgrading your ceiling fan with a remote control adds convenience and ease of use to your indoor comfort system. Harbor Breeze, a renowned manufacturer of ceiling fans, offers a wide range of remote controls for its fans, catering to various needs.
Tools and Materials
Before you begin, gather the following tools and materials:
- Phillips-head screwdriver
- Wire cutters or strippers
- Electrical tape
- New Harbor Breeze ceiling fan remote control (specific to your fan model)
- Ladder or step stool
Safety Precautions
For safety reasons, ensure the following before commencing installation:
- Turn off the power supply at the circuit breaker or fuse box.
- Allow the fan blades to come to a complete stop.
- Wear safety glasses or goggles.
- Use a sturdy ladder or step stool for stability.
Step-by-Step Installation
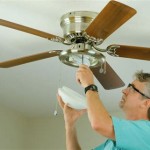
1. Prepare the Remote Control- Open the battery compartment on the remote control. - Insert the included batteries, observing the correct polarity (+ and -). - Close the battery compartment. 2. Remove the Existing Transmitter (Optional)
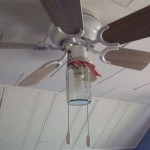
- If your fan already has an existing remote control transmitter (receiver), remove it by gently pulling it straight out from the fan's housing. - Disconnect the wires connected to the transmitter. 3. Connect the New Transmitter
- Remove the wire nuts from the wires protruding from the fan's motor housing. - Twist the bare ends of the wires clockwise to create a secure connection. - Connect the wires to the corresponding terminals on the new transmitter: black to black, white to white. - Secure the connections with wire nuts and electrical tape. 4. Mount the Transmitter
- Insert the transmitter back into the fan's housing. - Push it gently until it snaps into place. - Secure the transmitter with the screws provided. 5. Pair the Remote
- Stand in front of the fan. - Aim the remote control towards the fan. - Press and hold the "Pair" button on the remote for 5 seconds. - The fan's light will blink once to indicate successful pairing.
Troubleshooting Tips
If you encounter any issues during the installation process:
- Ensure the power supply is turned off.
- Check that all wire connections are secure.
- Verify that the batteries in the remote are properly installed.
- Contact Harbor Breeze customer support for assistance.
Enjoy the Convenience
Once the installation is complete, you can now conveniently control your Harbor Breeze ceiling fan from anywhere in the room with the remote control. Enjoy the added comfort and ease of adjusting fan speed, reversing blade direction, and turning the light on or off.

Harbor Breeze Ceiling Fan Remote Program Dimmer And Conflict Fix

Harbor Breeze Ceiling Fan With Remote

Harbor Breeze Wiring Diagram Ceiling Fan Installation Switch

Harbor Breeze Ceiling Fan Re Wiring New Transmitter Remote Help Doityourself Com Community Forums

How To Wire A Harbor Breeze Fan And Light 2 Switches Quora

Anderic Rrtx012 For Harbor Breeze A25 Tx012 Ceiling Fan Remote Control Remotes Remade

Universal Ceiling Fan Remote Control Kit 3 In 1 Light Timing Sd For Hunter Harbor Breeze Westinghouse Honeywell Other Lamp Batteries Are Not Included Temu United Kingdom

Ceiling Fan Remote Control Kit 3 In 1 Light Timing Sd For Hunter Harbor Breeze Westinghouse Honeywell Other Lamp Newegg Com

Universal Ceiling Fan Remote Control Kit Replacement For Harbor Breeze Hunter Hampton Bay Litex 3 Sd Light Dimmer With Fan28r Receiver Replace 53t 2aazpfan53t 11t Kujce9103 Uc7030t Cenming Yahoo Ping

Converting Remote Operated Fan To 2 Wall Switches Doityourself Com Community Forums
Related Posts