How To Install a Hampton Bay Ceiling Fan With Remote
Installing a Hampton Bay ceiling fan with a remote control enhances comfort and convenience. This guide provides a comprehensive step-by-step process for a successful installation. Always consult the specific instructions included with your particular fan model as details may vary.
Safety Precautions: Before beginning any electrical work, turn off the power to the circuit at the breaker box. Verify the power is off using a non-contact voltage tester. Using a ladder rated for the necessary height ensures safe working conditions. Eye protection and work gloves are recommended.
1. Mounting Bracket Installation: The mounting bracket secures the fan to the ceiling. Remove the old bracket if replacing an existing fixture. Hampton Bay fans typically include a mounting bracket designed for various electrical box types. Ensure the electrical box is securely attached to a structural ceiling member and is rated to support the fan's weight. Secure the mounting bracket to the electrical box using the appropriate screws and hardware provided.
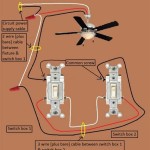
2. Wiring Connections: The wiring process connects the fan to the house's electrical system. The fan's wiring typically consists of wires for the fan motor (often black and white), the light kit (blue or other color), and the ground wire (green or bare copper). The house wiring typically consists of black (hot), white (neutral), and green or bare copper (ground) wires. Carefully match the wires according to the included instructions, using wire nuts to secure the connections. The remote receiver unit is also integrated into this wiring process. Connect the wires from the receiver to the fan and house wires as outlined in the instructions.
3. Hanging the Fan: Once the wiring is complete, carefully hang the fan from the mounting bracket. Hampton Bay fans usually employ a ball-and-socket system or a hook for mounting. Ensure the fan is securely hung before proceeding.
4. Attaching the Blades: Most Hampton Bay ceiling fans have pre-assembled blade irons that attach directly to the motor housing. Align the blade iron with the motor housing and secure using the provided screws. Repeat this process for each blade. Secure the blades themselves to the blade irons using the provided screws.
5. Installing the Light Kit (if applicable): Not all Hampton Bay ceiling fans include a light kit. If yours does, carefully follow the instructions to attach the light kit to the fan housing. Typically, this involves connecting the light kit wires to the corresponding wires from the fan and securing the light kit with screws. Install the light bulbs after the light kit is securely mounted.
6. Installing the Canopy: The canopy covers the wiring and mounting hardware, providing a finished look. Align the canopy with the mounting bracket and secure it with screws. Ensure all wiring is tucked neatly inside the canopy before securing it.
7. Remote Control Setup: Hampton Bay ceiling fan remotes typically operate on radio frequency. Install the battery in the remote control. The remote often requires a “learning” process with the receiver unit. Consult the instructions for the specific pairing procedure, which generally involves pressing a specific button sequence on the remote and the receiver unit. This synchronizes the remote with the fan’s receiver.
8. Testing the Fan: Once the installation is complete, restore power to the circuit at the breaker box. Test the fan’s operation using the remote control. Check the fan speed, light operation, and direction. Ensure all functions operate correctly.
Troubleshooting Tips: If the fan does not operate correctly, double-check all wiring connections and ensure the remote is properly paired with the receiver. Refer to the troubleshooting section of the included manual for specific issues.
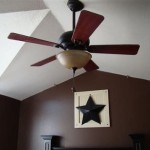
Choosing the Right Location: Optimal fan placement maximizes airflow and efficiency. Install the fan in the center of the room whenever possible. Maintain a minimum clearance of 7 feet from the floor to the fan blades and 18 inches from the ceiling to the top of the fan. Consider the room’s size and layout when selecting a fan size.
Maintaining Your Fan: Regular maintenance prolongs the lifespan of your Hampton Bay ceiling fan. Periodically clean the fan blades to remove dust and debris. Check for loose screws and tighten as needed. Lubricate the motor bearings as recommended by the manufacturer. Keep the fan remote control clean and dry. Replace the battery periodically to maintain optimal operation. These steps ensure efficient performance and prevent potential problems.

How To Install A Ceiling Fan With Light And Remote Hampton Bay Installation

How To Install A Hampton Bay Ceiling Fan Rockport 52 In Led Brushed Nickel Ceilingfan Diy

Hampton Bay Remote Installation Instructions Ehow

Hampton Bay Ceiling Fan Remote Control Removal

Troubleshooting Your Remote Controls Step By Hampton Bay Ceiling Fans Lighting

How To Wire And Install A Hampton Bay Ceiling Fan

Hampton Bay Lakemoore 48 In Led Indoor Outdoor Matte Black Ceiling Fan With Light Kit 50248 The Home Depot

Hampton Bay Universal 3 Sd Damp Rated Ceiling Fan Remote Control With Dimming Black 98130 The Home Depot

How To Install The Hampton Bay 52 Rockport Ceiling Fan

Hampton Bay 3 Sd Universal Ceiling Fan Thermostatic Remote Control
Related Posts