How To Install a Fan on an Angled Ceiling
Installing a ceiling fan on an angled or sloped ceiling presents a unique set of challenges compared to a standard, flat ceiling installation. The primary difference lies in the need for a specialized mounting bracket that can accommodate the angle and ensure the fan hangs properly and operates safely. This article provides a step-by-step guide on how to install a ceiling fan on an angled ceiling, emphasizing safety precautions and proper techniques.
Before commencing any electrical work, it is imperative to prioritize safety. This involves turning off the power to the circuit that will be used for the ceiling fan. Locate the appropriate circuit breaker in the electrical panel and switch it off. To confirm that the power is completely off, use a non-contact voltage tester. Hold the tester near the wires you will be working with. If the tester indicates the presence of voltage, double-check that you have turned off the correct breaker. Never assume the power is off without verifying it with a testing device.
Gather all necessary tools and materials. A properly equipped workspace will contribute to a more efficient and safer installation. Essential tools include a screwdriver set (both Phillips head and flathead), wire strippers, wire connectors (wire nuts), electrical tape, a measuring tape, a level, a drill with appropriate drill bits, a stud finder, and safety glasses. Necessary materials include the ceiling fan itself, a downrod suitable for the ceiling angle, a sloped ceiling adapter or mounting bracket, and any additional wiring required to connect the fan to the existing electrical system.
Key Point 1: Assessing the Ceiling and Choosing the Right Mounting Hardware
The first critical step is to accurately assess the angle of the ceiling. This angle will determine the type of mounting hardware required. A protractor or an angle finder can be used to measure the slope. Most ceiling fan manufacturers specify the maximum allowable angle for their fans, and using a mounting bracket designed for a steeper angle than the ceiling actually has can compromise the stability of the fan. Similarly, attempting to install a fan designed for a flat ceiling on a sloped ceiling without the correct adapter is extremely dangerous.
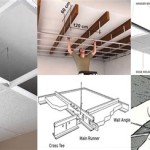
Once the ceiling angle is determined, select a sloped ceiling adapter or mounting bracket approved for that angle. These brackets are specifically designed to provide a level mounting surface for the fan motor housing. The adapter will typically attach to a standard electrical box, but it is crucial to ensure that the electrical box is rated to support the weight of the ceiling fan. A standard plastic electrical box is often insufficient and should be replaced with a metal box specifically designed for ceiling fans.
Locating the ceiling joist is another crucial step. The mounting bracket must be securely attached to a solid structural member. Use a stud finder to identify the joist. If a joist is not conveniently located, it may be necessary to install a brace between existing joists to provide adequate support. This brace should be made of solid wood and securely fastened to the adjacent joists using screws or nails. The electrical box should then be attached to this new brace.
The appropriate downrod length is also crucial for angled ceilings. A longer downrod is generally required to ensure the fan blades clear the ceiling and provide adequate airflow. The manufacturer’s instructions will provide guidance on the optimal downrod length based on the ceiling height and angle. Consider the aesthetic impact of the downrod length as well. Too short, and the fan will look crowded against the ceiling; too long, and it may hang too low, potentially posing a hazard.
Key Point 2: Installing the Mounting Bracket and Wiring
With the power off and the appropriate hardware selected, the process of installing the mounting bracket can begin. Remove any existing light fixture or ceiling fan. Disconnect the wiring, carefully noting the color-coding of the wires. Typically, black is the hot wire, white is the neutral wire, and green or bare copper is the ground wire. Use wire connectors to cap off the exposed wires if the new mounting bracket is not installed immediately.
Attach the sloped ceiling adapter or mounting bracket to the electrical box. Ensure that the bracket is securely fastened and level. Use shims if necessary to achieve a level mounting surface. Follow the manufacturer's instructions for the specific mounting bracket being used, as installation procedures can vary slightly between models.
Run the fan's wires through the downrod and into the mounting bracket. Connect the wires according to the manufacturer's wiring diagram. This typically involves connecting the black wire from the fan to the black wire from the electrical box (hot), the white wire from the fan to the white wire from the electrical box (neutral), and the green or bare copper wire from the fan to the green or bare copper wire from the electrical box (ground). Use wire connectors to securely join the wires, and then wrap the connections with electrical tape for added insulation and protection.
Carefully tuck the wires into the electrical box, ensuring that they are not pinched or damaged. This is especially important in angled ceilings where space can be limited. The wires should be arranged in a way that allows the fan motor housing to be easily attached to the mounting bracket without putting excessive strain on the connections.
Key Point 3: Attaching the Fan Motor and Blades
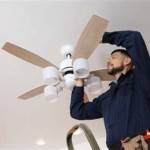
Once the wiring is complete and the mounting bracket is securely installed, the fan motor housing can be attached. This usually involves lifting the motor housing up to the bracket and aligning it with the appropriate slots or screws. Follow the manufacturer's instructions closely, as the precise method of attachment varies between different fan models.
Ensure that the motor housing is securely fastened to the mounting bracket. Check for any wobble or looseness. If the motor housing is not securely attached, it could pose a safety hazard. The motor housing should be able to rotate freely within the mounting bracket, allowing for proper airflow distribution.
Attach the fan blades to the motor housing. This usually involves using screws to secure the blades to the blade holders, which are then attached to the motor. Ensure that all screws are tightened securely to prevent the blades from coming loose during operation. Follow the manufacturer’s instructions for blade installation, paying attention to the specified torque settings for the screws.
Install the light kit, if applicable. The light kit typically attaches to the bottom of the motor housing and is wired in a similar manner to the fan motor. Connect the wires for the light kit according to the manufacturer's instructions. Secure the light kit to the motor housing using the provided screws or fasteners.
After the fan and light kit (if applicable) are fully assembled, turn the power back on at the circuit breaker. Test the fan to ensure that it operates correctly at all speeds and that the light kit functions properly. Check for any unusual noises or vibrations. If any issues are detected, turn off the power and re-examine the installation, paying particular attention to the wiring connections and the tightness of the screws.
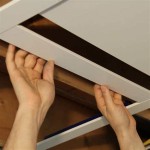
Finally, consider using covers to conceal any exposed screws or wiring. These covers can improve the overall appearance of the installation and provide an extra layer of safety by preventing accidental contact with electrical components. Regular maintenance, such as tightening screws and cleaning the blades, will help ensure the long-term performance and safety of the ceiling fan.

How To Install A Ceiling Fan On Sloped Lemon Thistle

How To Install A Ceiling Fan On Sloped Lemon Thistle

Fans On An Angle Installing Ceiling Angled Or Raked

How To Choose A Ceiling Fan For Vaulted Ceilings Lightology

How To Choose A Ceiling Fan For Vaulted Ceilings Lightology

How To Install A Ceiling Fan On Sloped Lemon Thistle

Ceiling Fans For Angled Ceilings

How To Install Vaulted Ceiling Fan

Hunter Fans How To Install Your Ceiling Fan Cpo S

How To Choose A Ceiling Fan For Vaulted Ceilings Lightology
Related Posts