How to Install False Ceiling Lights
Installing false ceiling lights can dramatically enhance the aesthetics and functionality of a room. False ceilings, also known as drop ceilings, provide a versatile canvas for lighting design, allowing for creative arrangements and sophisticated illumination. This process involves integrating lighting fixtures into the suspended ceiling structure, adding a touch of elegance and ambiance to any space. This guide will provide a comprehensive overview of how to install false ceiling lights, encompassing essential steps and safety precautions.
Step 1: Planning and Preparation
Prior to embarking on the installation process, meticulous planning and preparation are crucial. Start by determining the desired lighting scheme for the room. Consider the type of lights, their placement, and the overall effect you wish to achieve. Factors such as the room's size, shape, and intended use should be carefully considered.
Next, select the appropriate false ceiling materials. Gypsum boards are a common choice due to their affordability and ease of installation. Ensure that the materials are fire-resistant and meet local building codes.
Gather the necessary tools and materials, including:
- False ceiling panels
- Lighting fixtures
- Electrical wiring
- Screwdriver
- Drill
- Level
- Tape measure
- Safety glasses
- Work gloves
Before starting any electrical work, it is imperative to disconnect the power supply to the area where you will be working. Consult an electrician if you are unfamiliar with electrical wiring or have any doubts about the safety of the installation.
Step 2: Installing the False Ceiling
Start by creating a framework for the false ceiling using metal or wooden beams. Ensure that the framework is securely attached to the existing ceiling and is level. The framework serves as the base for the false ceiling panels.
Cut the false ceiling panels to the desired size and fit them into the framework. Secure the panels using screws or nails. Ensure that the panels are properly aligned and level.
Once the false ceiling is in place, you can start installing the lighting fixtures. Mark the locations for the lights on the false ceiling panels. Cut holes in the panels to accommodate the fixtures, ensuring that the holes are the appropriate size.
Step 3: Installing the Lighting Fixtures
Run the necessary electrical wiring for the lights through the false ceiling. Connect the wiring to the fixture's terminals, ensuring that the connections are secure.
Install the lighting fixtures in the cut holes. Secure the fixtures to the false ceiling using the provided mounting hardware.
Connect the fixtures to the electrical wiring and test the lights. Ensure that all lights are functioning correctly. Reconnect the power supply to the area and test the lights once again.
Step 4: Finishing Touches
After installing the lighting fixtures, apply any necessary finishing touches to the false ceiling. This may include painting the ceiling panels or adding trim to the edges.
Be sure to dispose of any waste materials properly and clean up the work area.
For more complex installations or intricate lighting designs, it is advisable to consult a qualified electrician or lighting designer. They can provide expert advice and ensure that the installation meets safety standards and aesthetic requirements.

How To Install Led Strip Lights On The Ceiling Lighting Info

False Ceiling Strip Light Design For Modern Homes

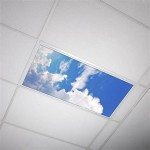
Light Installation In A Ceiling Tile

How To Install Hanging Light False Ceiling म क स लग त ह Interiorjagat

Technique To False Ceiling Installation Contractorbhai

How To Install The Led Strip Light On Ceiling

How To Position Your Led Strip Lights

How To Hide Led Strip Lights On The Ceiling Light Supplier

Top 3 Ideas To Light Up Your Ceiling Saint Gobain Gyproc

False Ceiling म Led Stripes Light क स लग त ह Stripe Installation In
Related Posts