How To Install Crown Moulding On Sloped Ceilings
Installing crown molding on a sloped ceiling presents a unique set of challenges compared to installing it on a standard, flat ceiling. The angled ceiling line necessitates precise measurements, specialized cuts, and a thorough understanding of how the molding will interact with the sloping surface. This article provides a detailed guide on successfully installing crown molding on a sloped ceiling, ensuring a professional and aesthetically pleasing result.
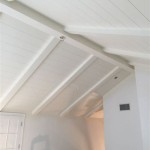
Crown molding, typically installed where walls meet the ceiling, adds a decorative touch that enhances the sophistication and visual appeal of a room. When a ceiling is sloped, the traditional installation methods need to be adapted. The angles at which the molding meets the wall and ceiling are often compound angles, requiring more than just simple 45-degree cuts. Successfully navigating these complexities ensures a seamless and elegant transition between the wall, ceiling, and molding.
Key Point 1: Preparation and Measurement
Prior to any cutting or installation, meticulous preparation and accurate measurement are crucial. This stage determines the overall success of the project. Failing to properly prepare and measure can lead to wasted materials, incorrect cuts, and a final product that doesn't meet expectations.
The first step involves gathering the necessary tools and materials. Essential tools include a measuring tape, a pencil, a miter saw (preferably with a compound cutting capability), a coping saw, a stud finder, a level, a nail gun (or hammer and nails), wood glue, sandpaper, and a caulking gun with paintable caulk. Materials required include the crown molding, wood shims, painter’s tape, and safety glasses. Ensure that the crown molding is of sufficient length to cover the entire perimeter of the room, allowing for some extra material to account for mistakes.
Next, accurately measure the length of each wall section where the crown molding will be installed. This includes measuring the walls adjoining the sloped ceiling. Mark these measurements clearly on the walls using a pencil. It is recommended to double-check these measurements to minimize errors. Also identify and mark the location of wall studs using a stud finder. This will provide secure points for attaching the crown molding and prevent it from sagging or becoming loose over time.
Determining the spring angle of the crown molding is critical. The spring angle is the angle at which the molding sits against the wall and ceiling. This angle is typically provided by the manufacturer or can be measured using a protractor. Knowing the spring angle is essential for making accurate miter cuts. Furthermore, the angle of the slope itself needs to be determined. Use an adjustable bevel gauge to measure the angle where the sloped ceiling meets the wall. This measurement is a starting point for calculating the precise miter and bevel angles needed for cutting the molding.
Once all measurements are obtained, create a detailed cutting plan. This plan should clearly outline the length and angle of each piece of crown molding required. This step can prevent costly mistakes and streamline the cutting process. Careful measurement and planning are the foundation of a successful crown molding installation, especially when working with sloped ceilings.
Key Point 2: Cutting the Crown Molding
Cutting crown molding for a sloped ceiling requires precision and an understanding of compound miter cuts. Unlike installing crown molding on a standard ceiling with 90-degree angles, the sloped ceiling introduces non-standard angles that demand more complex cuts. Incorrect cuts will result in gaps and an unprofessional appearance.
The type of cuts required will depend on the specific angles of the sloped ceiling and the corners of the room. Inside corners, where two walls meet, typically require coping cuts, which involve cutting one piece of molding at a 45-degree angle and coping the other piece to fit against it. Outside corners, where the walls protrude, require miter cuts that accommodate the outward angle. For sloped ceilings, these miter angles will differ from the standard 45 degrees.
Using the measurements and angles obtained during the preparation phase, adjust the miter saw accordingly. Most miter saws have settings for both miter and bevel angles. The miter angle determines the angle of the cut in the horizontal plane, while the bevel angle determines the angle of the cut in the vertical plane. Refer to a miter angle chart or online calculator specifically designed for crown molding to determine the correct settings for the saw. These tools take into account the spring angle of the molding and the angle of the sloped ceiling to provide accurate miter and bevel angles.
When making the cuts, always cut slightly longer than the measured length. This allows for fine-tuning and adjustments later on. Use a sharp blade to ensure clean and precise cuts. After each cut, test the fit of the molding in the corner before proceeding. If the fit is not perfect, make small adjustments to the miter or bevel angle until the molding fits snugly. Practice on scrap pieces of molding to refine your technique and ensure accuracy before cutting the final pieces.
Coping the inside corners requires a coping saw. Make a 45-degree miter cut on one piece of molding. Then, using the coping saw, carefully cut away the back of the molding along the profile line created by the miter cut. This creates a contoured edge that will fit perfectly against the adjacent piece of molding. Sand the cut edge for a smooth finish. Coping provides a tight, seamless joint that is less susceptible to gaps than a simple mitered joint.
Safety is paramount when using power tools. Always wear safety glasses to protect your eyes from flying debris. Use ear protection to minimize noise exposure. Ensure the miter saw is properly secured and that the work area is well-lit. Take your time and focus on making accurate cuts. Rushing the cutting process can lead to mistakes and potentially dangerous situations.
Key Point 3: Installation and Finishing
Once the crown molding has been cut to the appropriate lengths and angles, the next step is to install it along the sloped ceiling. Proper installation techniques are crucial for ensuring that the molding is securely attached, visually appealing, and structurally sound. This stage involves attaching the molding to the wall, addressing any gaps or imperfections, and finishing the surface for a polished look.
Before installing the molding, apply a bead of wood glue to the back of the molding where it will come into contact with the wall and ceiling. The wood glue provides additional adhesion and helps to create a strong, long-lasting bond. Position the crown molding along the marked lines on the wall, ensuring that it aligns properly with the ceiling and is flush against the wall surface. Use a level to verify that the molding is straight and level, making any necessary adjustments before securing it.
Attach the crown molding to the wall studs using a nail gun or hammer and nails. Drive the nails at an angle through the molding and into the studs to provide a secure hold. Space the nails approximately 12 to 16 inches apart. If there are areas where studs are not accessible, use construction adhesive to supplement the nails. Apply a generous amount of construction adhesive to the back of the molding and press it firmly against the wall. Use painter's tape to hold the molding in place while the adhesive dries.
At the corners, ensure that the mitered or coped joints fit tightly together. If there are any small gaps, fill them with paintable caulk. Apply a thin bead of caulk along the joints and smooth it out with your finger or a damp cloth. The caulk will conceal any imperfections and create a seamless transition between the pieces of molding. Allow the caulk to dry completely before painting.
Inspect the entire length of the installed crown molding for any imperfections, such as nail holes or uneven surfaces. Fill these imperfections with wood filler. Apply the wood filler with a putty knife, smoothing it out to match the surrounding surface. Allow the wood filler to dry completely before sanding it smooth with fine-grit sandpaper. Sanding ensures a smooth, even surface that is ready for painting.
Finally, apply a coat of primer to the crown molding. Primer helps to seal the wood and provides a uniform surface for the paint to adhere to. Allow the primer to dry completely before applying the paint. Choose a high-quality paint in the desired color and finish. Apply two coats of paint, allowing each coat to dry completely before applying the next. Use a brush for detailed areas and a roller for larger surfaces. The finished result should be a smooth, even, and professional-looking crown molding installation that enhances the aesthetic appeal of the room.

Installing Crown Moulding Part Two Canadian Woodworking

Installing Crown Moulding On A Sloped Ceiling Doityourself Com Community Forums

Crown Moulding On Angled Ceiling Sawdust Girl

Installing Crown Molding Around A Cathedral Ceiling Fine Homebuilding

Installing Crown Moulding On A Sloped Ceiling Doityourself Com Community Forums

Crown Moulding On Angled Ceiling Sawdust Girl

Crown Molding On Angled Ceilings Makely

Installing Crown Moulding On A Sloped Ceiling Doityourself Com Community Forums

Install Crown Molding Cathedral Vaulted Ceiling

Installing Crown Moulding Part Two Canadian Woodworking
Related Posts