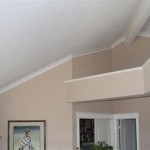
How To Install Crown Molding on a Vaulted Ceiling
Installing crown molding on a vaulted ceiling presents a unique set of challenges compared to installing it on a standard flat ceiling. The angles involved are more complex, requiring precise measurements and cutting techniques. However, with careful planning, the right tools, and a systematic approach, achieving a professional-looking result is entirely possible. This article provides a comprehensive guide to installing crown molding on vaulted ceilings.
Planning and Preparation
Prior to initiating the installation process, meticulous planning and preparation are essential. This phase involves assessing the existing structure, selecting the appropriate materials, gathering the necessary tools, and accurately calculating the angles. Neglecting these preliminary steps can lead to inaccuracies, material waste, and ultimately, a less-than-satisfactory outcome.
The first step involves a thorough inspection of the vaulted ceiling. Identify any imperfections in the ceiling or wall surfaces, such as unevenness, bowing, or gaps. These imperfections will need to be addressed before the molding is installed. Minor imperfections can often be corrected with shims or patching compound. More significant issues may require structural repairs to ensure a stable and consistent surface for the crown molding.
Next, select the appropriate crown molding profile and material. Crown molding is available in a variety of profiles, ranging from simple and understated to ornate and elaborate. The choice of profile should complement the overall architectural style of the room. Common materials include wood, MDF (Medium-Density Fiberboard), and polyurethane. Wood offers a classic look and can be stained or painted, but it is also more susceptible to moisture damage. MDF is a cost-effective alternative that is less prone to warping. Polyurethane is a lightweight and moisture-resistant option that is ideal for bathrooms or kitchens.
Gathering the necessary tools is a crucial step. Essential tools include a miter saw with a sharp blade designed for cutting molding, a compound miter saw is highly recommended for the complex angles involved, a measuring tape, a level, a stud finder, a pencil, a coping saw, a nail gun or hammer, wood glue, and painter's caulk. Safety glasses and ear protection are strongly recommended when operating power tools.
Calculating the angles is perhaps the most critical aspect of preparing for crown molding installation on a vaulted ceiling. The angles are determined by the pitch of the ceiling and the spring angle of the crown molding. The spring angle refers to the angle at which the crown molding sits against the wall and ceiling when installed. Various online calculators and angle finders can assist in determining the correct miter and bevel settings for the miter saw. It is crucial to input accurate measurements to ensure precise cuts.
Cutting the Crown Molding
Cutting crown molding for vaulted ceilings requires precision and understanding of compound angles. Unlike flat ceilings where only miter cuts are typically necessary, vaulted ceilings often require both miter and bevel cuts. Understanding the "nested" and "flat" cutting methods can greatly improve accuracy and reduce material waste.
The "nested" cutting method involves placing the crown molding in the miter saw with the same orientation as it will be installed against the wall and ceiling. This method can be easier to visualize, but it requires careful adjustment of both the miter and bevel angles. The key is to ensure the molding sits snugly against the fence and table of the miter saw during the cut.
The "flat" cutting method involves laying the crown molding flat on the table of the miter saw. This method requires a different set of angle calculations, but it can be more accurate for certain types of cuts. Using a jig or support system to hold the molding securely in place is critical for consistent results.
Inside corners on vaulted ceilings are typically handled with a coped joint. A coped joint involves cutting one piece of molding to fit snugly against the profile of the adjacent piece. This technique provides a cleaner and more professional look than a simple mitered joint, especially when the wall angles are not perfectly square. Use a coping saw to carefully remove the material behind the profile of the molding, creating a precise fit.
Outside corners present a different set of challenges. Accurately measuring the outside corner angle is essential. Using a protractor or angle finder can help determine the correct miter angle for the outside corner cuts. Remember to consider the spring angle of the crown molding when making these cuts.
Before cutting all the pieces, it is advisable to make test cuts on scrap pieces of crown molding. This allows for verifying the accuracy of the angle calculations and fine-tuning the miter saw settings. By testing on scrap material, errors can be identified and corrected without wasting expensive crown molding.
Installing the Crown Molding
Once the crown molding has been cut, the next step is to install it onto the vaulted ceiling. Proper installation techniques are crucial for ensuring a secure and aesthetically pleasing result. Key factors to consider include securing the molding to studs, using adhesive for added support, and carefully filling any gaps or imperfections.
Using a stud finder to locate the studs behind the wall surfaces is essential. Nailing or screwing the crown molding into the studs provides a strong and stable attachment. Mark the location of the studs on the wall before starting the installation. Additional support can be obtained by adding blocking between the studs in areas where there is no solid backing.
Applying a bead of construction adhesive to the back of the crown molding before attaching it to the wall and ceiling can significantly improve its holding power. The adhesive provides a bond that supplements the mechanical fastening of nails or screws. Ensure the adhesive is compatible with the type of crown molding being used.
When installing long runs of crown molding, it is advisable to use scarf joints to join the pieces together. A scarf joint involves cutting the ends of the molding at a slight angle and overlapping them. This creates a stronger and less noticeable joint than a simple butt joint.
Pay close attention to the alignment of the crown molding during installation. Use a level to ensure that the molding is perfectly horizontal or vertical, depending on its orientation. Shims can be used to correct minor imperfections in the wall or ceiling surfaces and ensure a consistent and even installation.
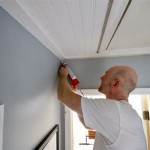
After the crown molding has been installed, carefully inspect all of the joints and seams. Any gaps or imperfections can be filled with painter's caulk. Apply the caulk smoothly and evenly, and then wipe away any excess with a damp cloth. The caulk will create a seamless transition between the crown molding and the wall and ceiling.
Finally, fill all nail holes with wood filler. Allow the wood filler to dry completely, and then sand it smooth. Once the sanding is complete, the crown molding is ready for painting or staining. Choose a paint or stain that complements the overall décor of the room.
Addressing Common Challenges
Installing crown molding on a vaulted ceiling can present several challenges. Addressing these challenges effectively is essential for achieving a professional-looking result. Some common challenges include dealing with non-square corners, managing large gaps, and handling long runs of molding.
Non-square corners are a common occurrence in many homes. Attempting to force crown molding into a perfectly mitered joint on a non-square corner will result in visible gaps. The best approach is to use a coping saw to create a coped joint that conforms to the actual angle of the corner. This technique allows for a tight and seamless fit, even when the corner is not perfectly square.
Large gaps between the crown molding and the wall or ceiling can be caused by uneven surfaces or inaccurate cuts. In such cases, using shims to fill the gaps is a simple and effective solution. Place the shims behind the crown molding and secure them with construction adhesive. Once the adhesive has dried, trim off any excess shim material.
Handling long runs of crown molding can be challenging, especially when working alone. Using temporary supports or clamps to hold the molding in place while it is being secured can be very helpful. Consider using a second set of hands to assist with the installation of long and heavy pieces of crown molding.

How To Install Crown Molding On Vaulted Or Cathedral Ceilings The Joy Of Moldings

Installing Crown Moulding Part Two Canadian Woodworking

How To Install Crown Molding On A Vaulted Cathedral Ceiling Without Transition Piece

Installing Crown Moulding On A Sloped Ceiling Doityourself Com Community Forums

Installing Crown Molding Around A Cathedral Ceiling Fine Homebuilding

Crown Molding On Angled Ceilings Makely

Crown Moulding On Angled Ceiling Sawdust Girl

Install Crown Molding Cathedral Vaulted Ceiling

How To Cut A Crown For Vaulted Ceilings Quora

How To Install Crown Molding On Vaulted Or Cathedral Ceilings The Joy Of Moldings
Related Posts