How To Install Crown Molding On A Vaulted Ceiling
Installing crown molding on a vaulted ceiling presents a unique set of challenges compared to installing it on a standard flat ceiling. The angles and irregular surfaces require precise measurements, accurate cuts, and a solid understanding of geometry. This article outlines the necessary steps and considerations for successfully installing crown molding on a vaulted ceiling, ensuring a professional and aesthetically pleasing result.
Prior to commencing the installation, careful planning and preparation are essential. This involves accurately measuring the ceiling angles, selecting the appropriate molding profile and material, and gathering the necessary tools and safety equipment. A methodical approach will minimize errors and contribute to a smoother, more efficient installation process.
Planning and Preparation
The initial phase of installing crown molding on a vaulted ceiling focuses on meticulous planning and preparation. This stage is crucial for ensuring accuracy and efficiency throughout the project. Neglecting proper preparation can lead to costly mistakes and a less-than-satisfactory final product.
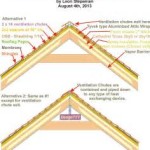
Measuring the Vaulted Ceiling Angles: The most critical aspect of preparing for crown molding installation on a vaulted ceiling is accurately determining the angles where the walls meet the ceiling, and where the two angled ceiling planes converge. A protractor, angle finder, or combination square can be used for this purpose. Digital angle finders offer a higher degree of precision. Measure the angle at each corner and where the ceiling planes change direction. Record these measurements meticulously. These angles will dictate the miter saw settings required for precise cuts. Inaccurate measurements will result in gaps and misaligned molding.
Selecting the Crown Molding Profile and Material: Crown molding is available in a wide array of profiles, ranging from simple and elegant to ornate and elaborate. The choice of profile should complement the architectural style of the room. Consider the size of the room and the height of the ceiling when selecting the profile. A larger profile may overwhelm a smaller room, while a smaller profile might be lost in a larger space. The choice of material is also crucial. Common materials include wood, MDF (Medium Density Fiberboard), and polyurethane. Wood offers a classic look and can be stained or painted. MDF is less expensive and paints well, but may not be as durable as wood. Polyurethane is lightweight, moisture-resistant, and easy to cut, making it a good choice for bathrooms or areas prone to humidity. Each material has its own set of advantages and disadvantages, and the best choice depends on the specific needs and budget of the project.
Gathering Tools and Safety Equipment: Having the right tools on hand will streamline the installation process and improve the quality of the results. Essential tools include a miter saw (preferably with a sliding compound miter saw for wider moldings), a coping saw, a stud finder, a level (including a long level for checking alignment), a measuring tape, a pencil, a pneumatic finish nailer with compressor (or a hammer and nails), wood glue, caulk, putty, safety glasses, and a ladder or scaffolding. Safety glasses are crucial for protecting the eyes from dust and debris. A ladder or scaffolding is necessary for reaching high areas safely and comfortably. A stud finder is used to locate studs behind the drywall, providing secure attachment points for the molding. A pneumatic finish nailer is recommended for a fast and efficient installation, but traditional hammer and nails can also be used. Wood glue is applied to the joints for added strength. Caulk is used to fill any gaps between the molding and the wall or ceiling, creating a seamless finish. Putty is used to fill nail holes and imperfections in the molding. Ensure all tools are in good working order before starting the project.
Cutting and Installing the Crown Molding
Once the planning and preparation phase is complete, the next step involves accurately cutting the crown molding to fit the vaulted ceiling angles and securely installing it. This stage requires precision and attention to detail to achieve a professional-looking result.
Cutting Inside and Outside Corners: Vaulted ceilings present unique challenges when it comes to cutting crown molding corners. Unlike standard 90-degree corners, vaulted ceiling corners typically require compound miter cuts, which involve setting both the miter angle and the bevel angle on the miter saw. The exact angles will depend on the measurements taken earlier. Use a miter angle calculator to determine the correct miter and bevel settings for each corner. For inside corners, coping is often necessary to achieve a tight fit. Coping involves cutting away the back of one piece of molding to match the profile of the adjacent piece. This creates a seamless joint that hides any minor imperfections in the corner. For outside corners, precise miter cuts are essential. Double-check the angles and make test cuts on scrap pieces of molding before cutting the final pieces. Use a sharp blade and a smooth, steady motion to ensure clean, accurate cuts.
Installing the Crown Molding: With the crown molding cut to the correct angles, the next step is to install it securely. Start by applying a bead of wood glue to the back of the molding where it will contact the wall and ceiling. Position the molding carefully, aligning it with the marked guidelines. Use a pneumatic finish nailer to attach the molding to the studs behind the drywall. If a pneumatic nailer is not available, use a hammer and finish nails, being careful not to damage the molding. Space the nails approximately 12-16 inches apart. For longer runs of molding, it may be necessary to use temporary supports to hold the molding in place while the glue dries. Check the alignment of the molding frequently with a level to ensure it is straight and consistent. At corners, ensure that the joints are tight and flush. If necessary, use clamps to hold the pieces together while the glue dries.
Addressing Vaulted Ceiling Specifics: When installing crown molding on a vaulted ceiling, pay special attention to areas where the ceiling angles change. These transitions often require custom cuts and careful planning. Consider using flexible molding in areas where the angles are particularly complex or irregular. Flexible molding can be bent and shaped to conform to the contours of the ceiling, making it easier to achieve a seamless finish. In some cases, it may be necessary to build up the ceiling with shims or furring strips to create a level surface for the molding to attach to. This is particularly important if the ceiling is uneven or warped. Take the time to address these specific challenges to ensure a professional and aesthetically pleasing result.
Finishing Touches and Refinement
After the crown molding is installed, the final step involves adding finishing touches and refining the installation to achieve a polished and professional look. This includes filling nail holes, caulking gaps, and painting or staining the molding.
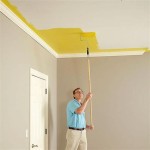
Filling Nail Holes and Seams: Even with careful installation, there will likely be nail holes and small seams that need to be filled. Use wood putty or spackle to fill nail holes and any imperfections in the molding. Allow the putty to dry completely before sanding it smooth with fine-grit sandpaper. For seams between pieces of molding, use caulk to fill any gaps. Apply the caulk in a thin, even bead and smooth it with a wet finger or a caulking tool. This will create a seamless transition between the pieces of molding. Choose a caulk that is paintable and matches the color of the molding. After the caulk is dry, sand any rough edges and smooth the surface.
Caulking and Painting/Staining: Caulking is an essential step in achieving a professional-looking crown molding installation. In addition to filling seams, caulk should also be applied along the top and bottom edges of the molding where it meets the wall and ceiling. This will create a seal that prevents drafts and moisture from entering behind the molding. Choose a high-quality paintable caulk and apply it carefully, smoothing it with a wet finger or a caulking tool. Once the caulk is dry, the crown molding can be painted or stained. If painting, apply a coat of primer first to ensure good adhesion and coverage. Then, apply two coats of paint, allowing each coat to dry completely before applying the next. If staining, use a stain that matches the color of the existing trim or woodwork in the room. Apply the stain evenly and wipe off any excess with a clean cloth. Follow the manufacturer's instructions for drying time and finishing.
Final Inspection and Touch-Ups: Once the painting or staining is complete, conduct a final inspection of the crown molding installation. Look for any areas that need touch-ups, such as spots where the paint is uneven or where the caulk is cracked. Touch up these areas as needed to ensure a flawless finish. Also, check the alignment of the molding and make sure that all corners are tight and flush. If necessary, use shims or caulk to correct any minor imperfections. With careful attention to detail, you can achieve a professional-looking crown molding installation that will enhance the beauty and value of your home.
Install Crown Molding Cathedral Vaulted Ceiling
Installing Crown Moulding Part Two Canadian Woodworking
How To Install Crown Molding On Vaulted Or Cathedral Ceilings The Joy Of Moldings
How To Install Crown Molding On A Vaulted Cathedral Ceiling Without Transition Piece
Installing Crown Moulding On A Sloped Ceiling Doityourself Com Community Forums
Installing Crown Molding Around A Cathedral Ceiling Fine Homebuilding
Crown Molding On Angled Ceilings Makely
Install Crown Molding Cathedral Vaulted Ceiling
Installing Crown Molding On A Vaulted Ceiling Pro Construction Guide
Crown Moulding On Angled Ceiling Sawdust Girl
Related Posts