How To Install a Ceiling Fan Remote Control
Installing a ceiling fan remote control can significantly enhance convenience and comfort. This guide provides a step-by-step process for installing a ceiling fan remote, offering a comprehensive overview for various fan types.
1. Gather Necessary Tools and Materials
Before beginning the installation, gather the necessary tools and materials. These typically include a screwdriver (Phillips and flathead), wire strippers, electrical tape, a ladder, and the remote control kit. The kit should include a receiver unit, a remote transmitter, wire connectors, and mounting hardware. Always refer to the specific instructions provided with your remote control kit for any unique requirements.
2. Turn Off the Power Supply
Safety is paramount when working with electrical fixtures. Locate the circuit breaker that controls the ceiling fan and turn it off. Double-check that the power is off by attempting to turn on the fan. Using a non-contact voltage tester is also recommended to ensure the circuit is completely de-energized.
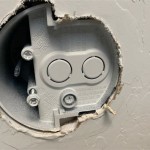
3. Remove the Existing Fan Canopy
The canopy is the decorative cover that attaches the fan to the ceiling. Carefully remove the canopy by unscrewing the screws that hold it in place. Lower the canopy slightly to access the wiring connections within the electrical box.
4. Identify and Disconnect the Wires
Inside the electrical box, you will find wires connected to the fan. These wires typically include a black (hot), white (neutral), and green or bare copper (ground) wire. Carefully disconnect these wires from the existing fan wiring. If your fan includes a light kit, there will be additional blue and white wires for the light. Document the existing wiring configuration with photos or diagrams before disconnecting.
5. Install the Receiver Unit
The receiver unit included in the remote control kit needs to be installed within the electrical box. Secure the receiver to the mounting bracket inside the electrical box using the screws provided. The specific mounting method may vary depending on the model of the remote control kit.
6. Connect the Receiver Wiring
Connect the wires from the ceiling fan to the corresponding wires on the receiver unit. This typically involves connecting black to black, white to white, and green to green. Use wire connectors to secure each connection and ensure they are tight. If the fan has a light kit, connect the blue and white wires from the fan to the corresponding wires on the receiver. Consult the wiring diagram included with your remote control kit for precise instructions.
7. Tuck the Wires and Attach the Canopy
Carefully tuck all the wires and the receiver unit into the electrical box. Align the canopy with the mounting bracket and secure it with the screws. Ensure the canopy sits flush against the ceiling.
8. Install the Batteries and Test the Remote
Insert the batteries into the remote transmitter as indicated in the manufacturer's instructions. Once the batteries are installed, restore power to the circuit breaker. Test the remote control functionality by operating the fan and light (if applicable). Verify that all speeds and light functions are working correctly.
9. Addressing Common Installation Challenges
Occasionally, installers may encounter challenges such as limited space within the electrical box or difficulty identifying the correct wire connections. If the electrical box is overcrowded, consider using a deeper box to accommodate the receiver unit and wiring. In cases of uncertainty with the wiring, consult a qualified electrician to ensure proper and safe installation.
10. Synchronization and Dip Switch Settings
Some remote control kits require synchronization between the transmitter and receiver. This process typically involves pressing a learn button on the receiver and a corresponding button on the transmitter. Refer to your specific remote control instructions for the synchronization procedure. Additionally, some models utilize dip switches on both the transmitter and receiver for frequency matching. These switches must be set identically for the remote to function correctly.
11. Compatibility and Fan Types
Most ceiling fan remote control kits are designed to work with a variety of fan types. However, it's essential to ensure compatibility before purchasing. Specifically, check if the remote control kit is compatible with the existing fan's motor and light kit (if present). Some remote controls are designed for specific fan brands or motor types. Consult the manufacturer's specifications to confirm compatibility.

How To Wire A Ceiling Fan Control Using Dimmer Switch

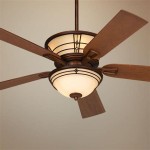
How To Install A Ceiling Fan With Remote Control

How To Wire A Ceiling Fan Control Using Dimmer Switch

How To Install A Ceiling Fan Remote Diy Family Handyman

How To Install A Ceiling Fan Remote Diy Family Handyman

How To Install A Ceiling Fan Remote Control

Universal Ceiling Fan And Light Remote Control Kit Add A No In Wall Wiring Required Switch Sd Timming On Off Scene With Receiver Plate

Universal Ceiling Fan Remote Replacement Ifixit Repair Guide

How To Install A Ceiling Fan Remote Diy Family Handyman
.jpg?strip=all "Universal Ceiling Fan Remote Control Kit 3 In 1 Light Timing Sd For Hunter Harbor Breeze Westinghouse Honeywell Other Lamp")
Universal Ceiling Fan Remote Control Kit 3 In 1 Light Timing Sd For Hunter Harbor Breeze Westinghouse Honeywell Other Lamp
Related Posts