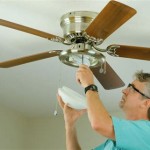
How to Install Ceiling Fan Blades
Ceiling fans are a practical and stylish addition to any room, offering both cooling and decorative benefits. Installing fan blades is a relatively simple DIY task, requiring basic tools and a little patience. While many ceiling fans come pre-assembled, it's important to understand the steps involved in mounting and attaching the blades for proper installation and optimal fan performance.
1. Gather Your Tools and Materials
Before you begin, gather the necessary tools and materials to ensure a smooth and successful installation process. You'll need:
- Ceiling fan blades
- Phillips screwdriver
- Ladder
- Level
- Tape measure
- Pencil
- Safety glasses
- Work gloves
It's crucial to always prioritize safety during any DIY project. Ensure the ladder is sturdy and stable, and wear safety glasses to protect your eyes from any potential debris.
2. Prepare the Ceiling Fan
Before attaching the blades, make sure the ceiling fan is properly mounted and secured. If you're installing a new fan, refer to the manufacturer's instructions. If you are simply replacing the blades, ensure the existing fan is securely fastened to the ceiling.
Check the fan's wiring to ensure it is correctly connected and functioning. If necessary, refer to the fan's owner's manual or contact a qualified electrician for assistance.
3. Attach the Fan Blades
Attaching the blades to the ceiling fan is a straightforward process. Follow these steps:
-
Identify the blade positions:
Most ceiling fans have a clear indication of where the blades should be attached. Refer to the included instructions or the fan's assembly diagram. -
Align the blade arms:
Carefully align the blade arms with the designated positions on the fan. Make sure the arms are securely locked in place using the provided clips or screws. -
Insert the blades:
Slide the blades onto the arms, ensuring they are properly seated and secured. You may need to use a slight amount of force to push the blades into position. -
Tighten the screws:
Once the blades are in place, securely fasten the screws provided by the manufacturer to firmly attach the blades to the arms. -
Check for balance:
After all blades are attached, ensure they are balanced by giving the fan a gentle spin. If any blade is loose or unbalanced, adjust the screw tension or reposition the blade until proper balance is achieved.
It's essential to ensure the blades are properly secured and balanced before operating the fan. Unbalanced blades can create excessive vibrations and noise, compromising the fan's efficiency and longevity.
4. Final Steps
Once the blades are installed and balanced, you can move onto the final steps:
-
Adjust the height:
Most ceiling fans have adjustable height settings. Adjust the fan height to your desired level, ensuring it clears any obstructions and provides optimal air circulation. -
Test the fan:
Before leaving the project, test the fan to ensure it operates smoothly and silently. Check the fan's speed settings, light fixture, and any other features to confirm everything is working properly. -
Clean up:
After the installation is complete, clean up any debris or tools. Wipe down the fan and its blades with a soft cloth, removing any dust or fingerprints.
Installing ceiling fan blades is a simple DIY project that adds both functionality and style to your home. By following these steps and prioritizing safety, you can successfully install and enjoy the benefits of a well-functioning ceiling fan.

Installing A Ceiling Fan Fine Homebuilding

How To Install A Ceiling Fan The Home Depot

How To Install A Ceiling Fan With Pictures Wikihow

Hunterexpress Easy Installation Ceiling Fan Hunter

Wiring A Ceiling Fan And Light With Diagrams Ptr

How To Install A Ceiling Fan Dummies

Do It Yourself Ceiling Fan Installation Delmarfans Com

How To Install A Ceiling Fan Liz Pacini

How To Install A Ceiling Fan Brennan Electric In Seattle Wa

How To Install Ceiling Fans Reinforce The Prepare Fan Box
Related Posts