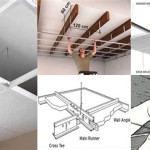
How To Install Canless Recessed Lights In a Drop Ceiling
Canless recessed lights, also known as LED wafer lights or edge-lit panels, are a modern and energy-efficient alternative to traditional recessed lighting fixtures. Their slim profile makes them particularly well-suited for drop ceilings, also referred to as suspended ceilings, where space above the tiles is often limited. Installing canless recessed lights in a drop ceiling is a manageable project for homeowners with basic electrical knowledge and DIY experience. This article provides a comprehensive guide to installing canless recessed lights in a drop ceiling, outlining the necessary tools, materials, and step-by-step instructions to ensure a successful installation.
Before beginning any electrical project, safety is paramount. Always turn off the power to the circuit you will be working on at the main breaker panel. Verify the power is off using a non-contact voltage tester. It is also advisable to wear safety glasses throughout the installation process to protect your eyes from debris. If you are uncomfortable working with electricity, it is recommended to hire a qualified electrician to perform the installation.
Before delving into the installation process, it's essential to understand the advantages of using canless recessed lights in drop ceilings. Traditional recessed lights require a housing can, which can be bulky and may not fit easily above a drop ceiling, especially where ductwork, pipes, or other obstructions exist. Canless lights, on the other hand, are significantly thinner, often only requiring a few inches of clearance. This makes them ideal for situations where space is at a premium. They also provide a more even light distribution and are generally more energy-efficient than traditional fixtures.
The following is a detailed guide to installing canless recessed lights in a drop ceiling.
Planning and Preparation
Proper planning is crucial for a smooth and successful installation. This stage involves assessing the existing lighting, determining the desired layout, and gathering the necessary tools and materials.
Assessment of Existing Lighting: Begin by evaluating the current lighting situation in the room. Determine the number of existing fixtures, their wattage, and their placement. This will help you decide how many canless lights you will need and where they should be positioned to provide adequate illumination. Consider the size and shape of the room, as well as the desired ambiance. A smaller room might require fewer, lower-wattage lights, while a larger room will need more lights or lights with higher output.
Layout Planning: Plan the layout of the new canless lights carefully. Consider the overall design of the room and the areas where light is most needed. Common placements include evenly spaced grids or focusing light on specific areas such as work surfaces or seating areas. Use a measuring tape to mark the locations of the new lights on the drop ceiling tiles. Ensure that the lights are evenly spaced and that they are not too close to any obstructions above the ceiling. Remember to account for the joist or framing layout above the drop ceiling to ensure the lighting fixture and junction box can be properly supported. Some local codes dictate the type of wiring and junction boxes that must be used. Check with your local authority to be certain you are following all code requirements.
Gathering Tools and Materials: Before starting the installation, gather all the necessary tools and materials. This will save time and prevent interruptions during the project. The following is a list of essential items:
* Canless recessed lights (ensure they are compatible with your voltage and dimming system if applicable) * Wire stripper * Wire connectors (e.g., wire nuts) * Non-contact voltage tester * Screwdriver (Phillips and flathead) * Pencil * Measuring tape * Drywall or circle saw (for cutting the holes in the drop ceiling tiles) * Ladder * Safety glasses * Gloves * Electrical tape * Fish tape or wire snake (optional, for running wires) * Junction Boxes (if not integrated with the light fixture.) * Appropriate gauge wire (check the light fixture's specifications for the correct wire type and gauge. NM-B wire is common.)Ensure that all materials are appropriate for the electrical load and that they meet local electrical codes.
Installation Process
With the planning and preparation complete, the installation process can begin. Follow these steps carefully to ensure a safe and successful installation.
Turn Off the Power: Before starting any electrical work, turn off the power to the circuit at the main breaker panel. Use a non-contact voltage tester to verify that the power is off before proceeding. Confirm the power is off at the existing light fixture by attempting to switch the power on. Double-check to ensure your safety. It is imperative to ensure the power is off to prevent electric shock.
Remove Existing Fixtures (if applicable): If you are replacing existing fixtures, carefully disconnect and remove them. Disconnect the wires from the old fixture, using wire connectors to cover the exposed ends if you are not immediately connecting them to the new lights. Ensure that the wires are properly labeled to avoid confusion later.
Cut the Holes in the Drop Ceiling Tiles: Using the circle saw, carefully cut the holes in the drop ceiling tiles at the marked locations. The size of the hole should match the specified diameter for the canless recessed lights. Most canless lights include a template to use when cutting the correct sized hole. Take your time and cut slowly to avoid damaging the tiles. If the tiles are fragile, consider using a utility knife to score the circle first before using the saw.
Run the Wiring: Run the electrical wiring from the existing junction box or power source to the locations of the new lights. Use fish tape or a wire snake to pull the wires through the ceiling if necessary. Ensure that the wires are properly supported and that they do not sag or dangle. Use cable staples to secure the wiring to the ceiling joists or framing. Follow all local electrical codes regarding wire placement and support.
Install Junction Boxes (if necessary): Some canless lights come with integrated junction boxes, while others require separate boxes. If separate junction boxes are needed, install them above the drop ceiling near the locations of the lights. Secure the junction boxes to the ceiling joists or framing. Ensure that the junction boxes are properly grounded. Verify the junction box is approved for the wiring being used.
Wire the Lights: Connect the wires from the power source to the canless lights according to the manufacturer's instructions. Typically, this involves connecting the black (hot) wire to the black wire on the light, the white (neutral) wire to the white wire on the light, and the green (ground) wire to the ground wire on the light. Use wire connectors to make secure connections. Ensure that all connections are tight and that no bare wire is exposed. Some fixtures will use push-in style connectors, while others will use wire nuts. Refer to the light fixture's installation guide.
Install the Lights: Carefully insert the canless lights into the holes in the drop ceiling tiles. Most canless lights have spring-loaded clips that hold them in place. Push the light up into the hole until the clips engage and the light is flush with the ceiling tile. Some lights will have other mounting methods, such as a retention arm that folds upwards.
Test the Lights: Once all the lights are installed, turn the power back on at the main breaker panel. Test the lights to ensure that they are working properly. If the lights do not turn on, double-check the wiring connections and the breaker. If you are using dimmable lights, test the dimmer switch to ensure that it is functioning correctly.
Key Considerations for Drop Ceiling Installations
Installing canless recessed lights in a drop ceiling presents some unique considerations that need to be addressed to ensure a safe and reliable installation.
Weight and Support: Drop ceilings are not designed to support heavy loads. Ensure that the canless lights are lightweight and that they do not exceed the weight capacity of the drop ceiling grid. If necessary, reinforce the grid with additional support wires or brackets. Remember to account for the weight of the wiring, junction boxes, and any other components that are suspended from the ceiling.
Accessibility: Drop ceilings provide easy access to the wiring and components above the ceiling. However, it is also important to ensure that the lights and junction boxes are accessible for future maintenance or repairs. Position the lights and junction boxes in locations where they can be easily reached from below the ceiling. Consider creating access panels or removable tiles to facilitate maintenance.
Ventilation and Heat Dissipation: While canless LED lights generate less heat than traditional incandescent lights, it is still important to ensure adequate ventilation. Avoid installing the lights in enclosed spaces where heat can build up. If necessary, consider using lights with integrated heat sinks or providing additional ventilation to dissipate heat. High temperatures can shorten the lifespan of the LED drivers.
Compliance with Codes: Always comply with all applicable local electrical codes and regulations. These codes are in place to ensure the safety of the installation and to prevent electrical hazards. Consult with a qualified electrician or building inspector if you have any questions or concerns about code compliance. Verify the canless recessed lights are appropriately rated (UL, ETL, etc.) for their intended use and environment.
By following these steps and paying attention to the key considerations, homeowners can successfully install canless recessed lights in a drop ceiling, enhancing the aesthetics and functionality of their space while also saving energy.

How To Install An Led Ultra Thin Wafer Downlight Lithonia Lighting

How To Install Aspectled Low Voltage Can Free Recessed Lights

Installing Woodhaven Planks And Hiding Drop Ceiling Grid Sawdust Girl

Silentaire 8 In Canless Integrated Led Recessed Light Trim Plasma Air Disinfection H1n1 Certified 120 277v Adjust Color And Lumens 559011010 The Home Depot

8 Recessed Lighting Installation Tips For Diyers Bob Vila

Delight 7 Inch Led Recessed Light Ceiling Panel 10 Pack 1000lm Canless Downlight 3000 3500k Warm White 15w Ultra Thin Wafer Fixtures Lamp Rohs Certified Com

8 Recessed Lighting Installation Tips For Diyers Bob Vila

How To Install Recessed Lights In A Drop Ceiling The Home Depot

Led Basics In A Drop Ceiling

Commercial Electric Part 91364 4 In Selectable New Construction And Remodel Canless Recessed Integrated Led Kit For Shallow Ceiling Pack Housing Home Depot Pro
Related Posts

