How to Install Can Lights in a Drop Ceiling
Installing can lights in a drop ceiling is a relatively straightforward project that can enhance the lighting and aesthetics of any room. These lights, also known as recessed lights, are integrated into the ceiling, providing a clean and modern look. The process involves carefully cutting the ceiling tiles, running electrical wires, and securing the light fixtures. This article will guide you through the steps of safely and effectively installing can lights in a drop ceiling.
Planning and Preparation
Before diving into the installation process, proper planning and preparation are crucial for a successful outcome. These steps will minimize errors and ensure a smooth installation.
1.
Determine the Number and Placement:
Start by deciding how many can lights you need and where you want to place them. Consider the room's size, layout, and desired illumination levels. Ensure the chosen locations allow for proper spacing between lights to achieve even lighting.2.
Gather Necessary Tools and Materials:
Assemble the required tools and materials, including: * Can lights (with appropriate trim) * Electrical wire (appropriate gauge) * Wire connectors (wire nuts) * J-box (for each can light) * Electrical tape * Screwdriver * Wire strippers * Level * Measuring tape * Utility knife * Safety glasses * Work gloves3.
Turn Off Power:
For safety, ensure the power is off to the circuit that will supply the can lights. Use a voltage tester to confirm the power is truly disconnected.4.
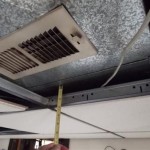
Inspect the Ceiling:
Examine the drop ceiling for potential obstacles, such as ductwork or plumbing pipes. These obstructions may affect the placement of the can lights.Installation Steps
Once you have gathered the necessary supplies and prepared the workspace, you can begin the installation process. The following steps will guide you through the installation of each can light:
1.
Mark the Locations:
Use the level and measuring tape to mark the precise locations for the can lights on the ceiling tiles. Ensure the marks are straight and consistent.2.
Cut the Ceiling Tiles:
Carefully cut the ceiling tile using a utility knife. Make a square or rectangular opening slightly larger than the can light housing. Avoid cutting too deep and damaging the structural ceiling.3.
Install the J-Box:
Position the J-box within the cut-out opening and secure it to the ceiling joist using screws or nails.4.
Run the Wires:
Connect the electrical wire from the existing ceiling wiring to the J-box. Strip the ends of the wires and securely connect them using wire connectors. Wrap the connections with electrical tape for insulation.5.
Install the Can Light:
Carefully push the can light into the J-box, aligning the mounting tabs with the J-box slots. Secure the can light with screws provided.6.
Attach the Trim:
Attach the decorative trim around the can light. Ensure the trim is flush with the ceiling tile.7.
Repeat for Additional Lights:
Follow steps 1-6 to install each additional can light in the same manner.Safety Precautions
Throughout the installation process, prioritizing safety is paramount. Here are some key safety precautions to follow:
1.
Wear Protective Gear:
Wear safety glasses and work gloves to protect your eyes and hands from potential injuries.2.
Use a Voltage Tester:
Before working with wires, always use a voltage tester to confirm the power is off to the circuit.3.
Avoid Contact with Live Wires:
Avoid touching exposed electrical wires to prevent electrical shock.4.
Securely Connect Wires:
Use wire connectors (wire nuts) to securely connect the wires. Avoid loose connections that could lead to short circuits.5.
Follow Electrical Codes:
Adhere to local electrical codes and regulations throughout the installation process.Installing can lights in a drop ceiling can significantly enhance the lighting and aesthetics of any room. By following these steps and prioritizing safety, you can successfully complete this project and enjoy the benefits of upgraded lighting. Remember, if you are unsure about any aspect of the installation process or have concerns about electrical work, consult a qualified electrician.

How To Install Recessed Lights In A Drop Ceiling Temecula Handyman

Diy Recessed Lighting Installation In A Drop Ceiling Tiles Part 3 Super Nova Adventures

Light Installation In A Ceiling Tile

Recessed Lighting In Basement Drop Ceiling Made Easy Suspended Ceilings And Recesse Dropped

Operation Laundry Room Lighting Reality Daydream

Installing Woodhaven Planks And Hiding Drop Ceiling Grid Sawdust Girl

Diy Recessed Lighting Installation In A Drop Ceiling Tiles Part 3 Super Nova Adventures

How To Install Recessed Lights In A Drop Ceiling The Home Depot

Drop Ceiling Installation How To Install A Homeserve Usa

Drop Ceiling Tiles Installation Tips Diy Family Handyman
Related Posts