How To Install Azek Beadboard Ceiling
Installing an Azek beadboard ceiling can significantly enhance the aesthetic appeal of a room, providing a classic, clean look with the added benefits of durability and moisture resistance. Azek, a brand of cellular PVC, is an excellent material choice for ceilings, especially in areas prone to humidity, such as bathrooms and kitchens. Unlike wood, Azek resists rot, mildew, and insect infestation, ensuring a long-lasting and low-maintenance ceiling solution. This article provides a detailed guide on installing an Azek beadboard ceiling, covering essential steps from preparation to finishing.
Planning and Preparation
Before commencing the installation, meticulous planning and preparation are crucial for a successful outcome. This phase involves assessing the existing ceiling structure, determining the required materials and tools, and ensuring a properly prepared surface for the Azek beadboard.
The first step is to thoroughly inspect the existing ceiling. Identify any signs of water damage, sagging, or structural issues. Address any underlying problems before proceeding with the Azek installation. Repair any cracks or holes in the existing ceiling and ensure it is level. If the existing ceiling is severely damaged or uneven, consider installing furring strips to create a level and stable surface.
Accurately measure the ceiling area to determine the amount of Azek beadboard needed. Add approximately 10% to the total square footage to account for waste due to cuts and pattern matching. When calculating the material requirements, factor in the desired beadboard orientation – whether it will run parallel or perpendicular to the room's longest dimension. Consider the visual impact of the orientation on the overall aesthetic of the room.
Gather all necessary tools and materials. This includes: Azek beadboard panels, furring strips (if required), construction adhesive, pneumatic nail gun with finish nails (or screws), measuring tape, level, stud finder, miter saw, jigsaw (for intricate cuts), safety glasses, dust mask, caulk, and paint (optional). Select a high-quality construction adhesive specifically designed for PVC materials to ensure a strong and lasting bond. If painting the Azek beadboard, use a paint formulated for PVC, following the manufacturer's recommendations for surface preparation and application.
Acclimate the Azek beadboard to the room's environment for at least 24 hours prior to installation. This allows the material to adjust to the temperature and humidity levels, minimizing potential expansion or contraction issues after installation. Store the beadboard in a flat, dry location to prevent warping or damage during acclimation.
If installing furring strips, locate the ceiling joists using a stud finder. Mark the joist locations clearly on the ceiling. Install the furring strips perpendicular to the direction of the Azek beadboard. Space the furring strips according to the manufacturer's recommendations for the Azek beadboard being used, typically 16 or 24 inches on center. Ensure the furring strips are level using a level and shims if necessary. Securely fasten the furring strips to the ceiling joists using screws or nails.
Installing the Azek Beadboard Panels
With the preparation complete, the next phase involves the actual installation of the Azek beadboard panels onto the ceiling. This process requires precision and attention to detail to ensure a seamless and professional-looking finish.
Begin by establishing a reference line along one edge of the ceiling. This line will serve as a guide for the first row of beadboard panels, ensuring that the entire ceiling is aligned properly. Use a level to draw a straight line along the ceiling, parallel to the wall. The accuracy of this reference line is critical for a successful installation.
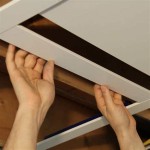
Starting at the reference line, apply a bead of construction adhesive to the back of the first Azek beadboard panel. Position the panel against the ceiling, aligning it with the reference line. Press the panel firmly against the ceiling to ensure good contact with the adhesive. Use a pneumatic nail gun with finish nails (or screws) to secure the panel to the furring strips (or directly to the ceiling joists if furring strips are not used). Place the nails or screws at regular intervals along the panel's edges and field, following the manufacturer's recommendations for spacing.
Continue installing the remaining Azek beadboard panels, row by row, ensuring that each panel is properly aligned and securely fastened. Apply adhesive to the back of each panel and press it firmly against the ceiling. Use a level to check the alignment of each row as you proceed. Maintaining consistent alignment is essential for a professional appearance.
When installing subsequent rows, ensure that the tongue-and-groove edges of the Azek beadboard panels are properly interlocked. This creates a seamless and visually appealing surface. If necessary, use a rubber mallet to gently tap the panels into place, ensuring a tight fit. Avoid using excessive force, which could damage the panels.
As you approach the walls, you will likely need to cut the Azek beadboard panels to fit. Accurately measure the distance between the last installed panel and the wall. Use a miter saw to cut the Azek beadboard panels to the required size. Ensure the cuts are clean and precise for a professional finish. For intricate cuts around pipes or other obstructions, use a jigsaw.
When installing the cut panels, apply adhesive to the back and press them firmly against the ceiling and the adjacent panels. Secure them with finish nails or screws. Pay close attention to the alignment and ensure a tight fit.
Finishing and Detailing
The final stage of the Azek beadboard ceiling installation involves finishing and detailing to achieve a polished and professional appearance. This includes filling nail holes, caulking seams, and painting (if desired).
After all the Azek beadboard panels are installed, inspect the ceiling for any imperfections, such as gaps, nail holes, or uneven seams. Use a paintable caulk to fill any gaps between the panels and the walls or around any fixtures. Smooth the caulk with a wet finger or a damp sponge for a seamless finish.
Fill all nail holes with a paintable wood filler or a specialized filler designed for PVC. Allow the filler to dry completely according to the manufacturer's instructions. Sand the filled areas smooth with fine-grit sandpaper, ensuring a flush and even surface.
If desired, paint the Azek beadboard ceiling. Clean the surface thoroughly to remove any dust or debris. Apply a primer specifically designed for PVC to promote adhesion of the paint. Allow the primer to dry completely. Apply two coats of a high-quality paint formulated for PVC, following the manufacturer's recommendations for application and drying time. Choose a paint color that complements the overall aesthetic of the room.
Install trim around the perimeter of the ceiling to conceal any gaps or imperfections and to provide a finished look. Choose a trim style that complements the Azek beadboard and the overall design of the room. Measure and cut the trim pieces to fit, using a miter saw to create clean and accurate corners. Attach the trim to the ceiling using finish nails or construction adhesive. Caulk any gaps between the trim and the ceiling or walls. Paint the trim to match the Azek beadboard or to create a contrasting accent.
Clean the installed Azek beadboard ceiling with mild soap and water to remove any dust or fingerprints. Avoid using abrasive cleaners or solvents, which could damage the surface. Inspect the ceiling regularly for any signs of damage or wear. Repair any minor issues promptly to prevent further deterioration. With proper installation and maintenance, an Azek beadboard ceiling can provide years of beauty and durability.

How To Put Up Azek Beadboard Ceiling

How To Put Up Azek Beadboard Ceiling

How To Install Pvc Trim Beadboard

How To Install Beadboard On Your Ceiling

Replace Vinyl Ceiling W Azek Beadboard Fine Homebuilding

How To Put Up Azek Beadboard Ceiling

Installing A Pvc Porch Ceiling Fine Homebuilding

Building Beadboard 1025852 Arcat

Beadboard Azek Exteriors

How To Install Pvc Trim Beadboard
Related Posts