How To Install a Pendant Light Ceiling Hook: A Home Depot Guide
Hanging a pendant light can dramatically transform a room's ambiance, providing focused illumination and adding a touch of style. While the electrical connections often require professional assistance, installing the ceiling hook – the crucial anchor point for the light fixture – is a task many homeowners can confidently undertake. This guide provides a detailed, step-by-step approach to installing a pendant light ceiling hook, utilizing readily available materials and tools often found at Home Depot.
Prior to beginning any electrical project, safety is paramount. Disconnecting the power supply to the circuit you'll be working on is absolutely essential. Locate the circuit breaker that controls the lighting at the intended location and switch it to the "OFF" position. To confirm the power is indeed off, use a non-contact voltage tester. This device will detect any live electricity without requiring direct contact with the wires, providing an added layer of protection. Never assume the power is off based solely on the breaker position.
Choosing the correct ceiling hook is crucial for the successful and safe installation of a pendant light. The selection process is influenced by several factors, primarily the weight of the pendant light fixture and the type of ceiling it will be mounted on. Home Depot offers a variety of ceiling hooks designed for different weight capacities and ceiling materials, including drywall, plaster, and wood.
For lighter pendant lights (generally those weighing less than 10 pounds) being installed into drywall, a toggle bolt ceiling hook is often a suitable choice. These hooks utilize a butterfly-like toggle that expands behind the drywall, distributing the weight over a larger area. However, it's imperative to ensure the drywall is in good condition and not crumbling or damaged, as this can compromise the hook's ability to securely hold the fixture.
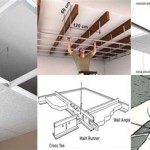
For heavier pendant lights or installations into plaster or wood ceilings, a sturdier option is required. Screw-in ceiling hooks, designed to be directly anchored into a ceiling joist, provide a much more secure attachment. These hooks typically feature a threaded shank that screws directly into the wood, offering significantly greater weight-bearing capacity. If a joist isn't directly accessible at the desired location, a mounting plate or crossbar can be used to span between two joists, providing a solid foundation for the hook.
The tools required to install a pendant light ceiling hook are relatively basic and readily available. A drill with a selection of drill bits (including a pilot bit smaller than the screw thread diameter, and a bit suitable for creating a toggle bolt hole if needed) is essential for creating the necessary holes for the hook. A stud finder is crucial for locating ceiling joists if installing a screw-in hook. A level ensures the hook is installed straight, preventing the pendant light from hanging at an angle. A screwdriver (matching the head of the screws provided with the hook) is needed for tightening the connections. Finally, safety glasses are a must to protect your eyes from debris during the drilling process.
Locating a Ceiling Joist and Preparing the Mounting Location
The first and often most challenging step is identifying the location of a ceiling joist. These structural members run parallel to each other and provide the necessary support for the ceiling. A stud finder is an invaluable tool for this task. Most stud finders utilize sensors to detect changes in density behind the drywall, indicating the presence of a joist. Follow the manufacturer's instructions for calibrating and using the stud finder to accurately locate the edges of the joist.
Once a joist is located, mark its position on the ceiling using a pencil. To confirm the accuracy of the stud finder, a small pilot hole can be drilled along the marked line. If the drill bit encounters solid wood, it confirms the presence of a joist. If the drill bit passes through drywall and then meets empty space, it indicates that the initial reading was inaccurate, and the process should be repeated in a slightly different location.
If installing a hook directly into the joist, mark the precise center point of the joist for the hook's location. If using a mounting plate or crossbar, ensure it is centered over the joist and spans far enough to provide adequate support on either side. Use screws long enough to penetrate deeply into the joist for a secure hold, but not so long that they protrude through the other side of the ceiling. The length of the screw should be at least half the thickness of the joist.
For drywall installations using toggle bolts, carefully measure the diameter of the toggle bolt wings when fully open. Use a drill bit that is slightly larger than this diameter to create a hole in the drywall at the desired location. Ensure the hole is clean and free of any loose debris that could interfere with the toggle bolt's expansion.
Installing the Ceiling Hook
With the location properly prepared, the next step is to install the ceiling hook. The specific installation procedure will vary depending on the type of hook being used.
For screw-in hooks, start by drilling a pilot hole at the marked location. The diameter of the pilot hole should be slightly smaller than the screw threads of the hook. This will allow the hook to screw in securely without stripping the wood. Carefully screw the hook into the pilot hole, applying even pressure to ensure it goes in straight. Avoid overtightening the hook, as this can damage the surrounding wood. The hook should be firmly seated against the ceiling surface.
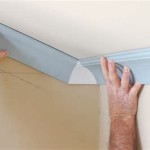
For toggle bolt hooks, thread the toggle wings onto the bolt. Compress the wings and carefully insert them through the pre-drilled hole in the drywall. Once the wings are completely through the hole, they will spring open inside the ceiling cavity. Gently pull back on the bolt to seat the wings firmly against the back of the drywall. Tighten the bolt using a screwdriver until the hook is securely fastened to the ceiling. Avoid overtightening, as this can crush the drywall and weaken the connection.
When using a mounting plate or crossbar, first attach the plate or bar to the ceiling joists using appropriate screws. Ensure the plate or bar is level and securely fastened before proceeding. Once the plate or bar is in place, attach the ceiling hook to the designated mounting point on the plate or bar, using the screws or hardware provided with the hook. Again, ensure all connections are tight and secure.
Testing and Hanging the Pendant Light
Before hanging the pendant light, it's crucial to test the stability of the installed ceiling hook. Gently apply a downward force to the hook, mimicking the weight of the pendant light fixture. Observe the hook for any signs of movement, loosening, or instability. If the hook feels secure and doesn't show any signs of weakness, it's ready to support the light fixture.
If the hook shows any signs of instability, immediately remove the hook and re-evaluate the installation. Ensure the correct type of hook is being used for the weight of the fixture and the type of ceiling. Check that all screws are properly tightened and that the hook is securely anchored into the ceiling joist or drywall. If necessary, consider using a stronger hook or reinforcing the mounting location with additional support.
Once the hook has been thoroughly tested and confirmed to be stable, carefully hang the pendant light fixture onto the hook. Ensure the light is properly balanced and hangs straight. Adjust the chain or cord length as needed to achieve the desired height and appearance. After the physical hanging is complete, the electrical wiring process can begin – which, as mentioned previously, may be best left to a licensed electrician, depending on the homeowner's expertise. Remember to follow all local electrical codes and safety regulations.
Regularly inspect the ceiling hook and the pendant light fixture for any signs of loosening or damage. Tighten any loose screws immediately and address any issues promptly to prevent the light fixture from falling and causing injury or damage. A well-installed ceiling hook, coupled with a properly wired pendant light, will provide years of reliable illumination and add a touch of elegance to any room.

How To Install A Hanging Light Fixture The Home Depot

Commercial Electric 2 1 5 In White Modern Swag Hooks For Ceiling Light Fixtures Pack 804924 The Home Depot

How To Install A Hanging Light Fixture The Home Depot

How To Wire A Ceiling Pendant Lemon Thistle

Newhouse Lighting 48 Ft String Light Hanging Mounting Kit Wire Hooks Stringkit2 The Home Depot

Newhouse Lighting 48 Ft String Light Hanging Mounting Kit Wire Hooks Stringkit2 The Home Depot

Ook 1 Pieces White Contemporary Design Swag Hook 9984707 The Home Depot

Edvivi Mateo 1 Light Black And Antique Brass Mini Pendant With Clear Glass Shade Epj4934bkab The Home Depot

Design House Mason 1 Light Swag Pendant In Galvanized 579409 The Home Depot

Design House Mason 1 Light Swag Pendant In Galvanized 579409 The Home Depot
Related Posts