How To Install A Harbor Breeze Ceiling Fan Remote Control Replacement
Replacing a Harbor Breeze ceiling fan remote control can seem daunting, but with careful planning and execution, it is a manageable task for most homeowners. This article provides a comprehensive guide to installing a replacement remote control for a Harbor Breeze ceiling fan, covering the necessary preparations, safety precautions, detailed steps, and troubleshooting tips.
Ensuring Compatibility and Gathering Necessary Tools
Before beginning the installation process, it is crucial to ensure that the replacement remote control is compatible with the specific Harbor Breeze ceiling fan model. Consult the fan's manual or the Harbor Breeze website to verify compatibility. If the original remote control is available, its model number can be used to identify a suitable replacement. Purchasing a universal ceiling fan remote control is also an option, but it is imperative to confirm that it supports the features of the existing fan, such as fan speed control, light dimming, and reverse function.
Once compatibility is established, gather the necessary tools and materials. These typically include:
*A replacement Harbor Breeze remote control kit, inclusive of the remote and receiver.
*A ladder or stepladder to safely reach the ceiling fan.
*A Phillips head screwdriver to remove and install screws.
*Wire strippers to prepare electrical wires.
*Wire connectors (wire nuts) to securely join wires.
*Electrical tape for insulation and added safety.
*A multimeter (optional) for testing voltage.
*Safety glasses to protect the eyes.
*Work gloves for added grip and protection.
Having all necessary tools and materials readily available will streamline the installation process and minimize potential delays.
Prioritizing Safety: Disconnecting Power and Understanding Wiring
Safety is paramount when working with electrical systems. Before commencing any work on the ceiling fan, disconnect the power supply to the fan at the circuit breaker. This seemingly simple step is crucial in preventing electrical shock and ensuring personal safety. Verify that the power is off by testing the fan's wiring with a non-contact voltage tester or a multimeter. If using a multimeter, set it to the appropriate AC voltage range and carefully touch the probes to the fan's wires. A reading of zero volts indicates that the power is safely disconnected.
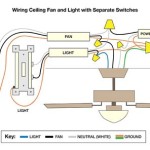
Understanding the wiring of the ceiling fan and the replacement receiver is essential for a successful installation. Ceiling fans typically have the following wires:
*Black wire: This is the "hot" wire, carrying the electrical current to the fan.
*White wire: This is the "neutral" wire, which completes the electrical circuit.
*Green or bare copper wire: This is the "ground" wire, providing a safe path for electrical current in case of a fault.
*Blue wire (sometimes): This wire typically controls the fan's light fixture.
The replacement receiver will have similar wires, which need to be connected to the corresponding wires in the ceiling fan wiring. Carefully examine the wiring diagrams provided with the replacement remote control kit and the existing ceiling fan. Pay close attention to the color coding of the wires and their intended functions.
Take photographs of the existing wiring configuration before disconnecting anything. This will serve as a valuable reference during the reassembly process, minimizing the risk of incorrect wiring.
Step-by-Step Installation Procedure
With the power safely disconnected and a clear understanding of the wiring, the installation can proceed. Follow these steps meticulously:
-
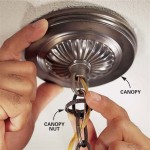
Access the Ceiling Fan Wiring: Carefully remove the ceiling fan's canopy, the decorative cover that conceals the wiring in the ceiling. Loosen the screws that secure the canopy and gently slide it down to expose the wiring connections.
-
Disconnect the Old Receiver: Locate the existing remote control receiver. It is typically a small box wired between the ceiling wiring and the fan's wiring. Disconnect the wires connected to the old receiver. Use wire strippers to expose fresh wire ends if necessary. Discard the old receiver.
-
Install the New Receiver: Connect the wires from the new receiver to the corresponding wires in the ceiling fan wiring, using wire connectors (wire nuts). Ensure that each connection is secure by twisting the wire nut tightly. The connections should be as follows:
-
Receiver's black wire to the ceiling's black wire.
-
Receiver's white wire to the ceiling's white wire.
-
Receiver's green or bare wire to the ceiling's green or bare wire.
-
Receiver's fan wire (usually black or blue) to the fan's motor wire (usually black).
-
Receiver's light wire (usually blue) to the fan's light wire (usually blue).
-
-
Secure the Connections: After making each wire connection, wrap it with electrical tape to provide additional insulation and secure the wire nut in place. This helps prevent accidental disconnections and minimizes the risk of electrical shorts.
-
Position the Receiver: Carefully tuck the receiver and the wiring back into the ceiling fan's mounting bracket. Ensure that the receiver does not interfere with the fan's operation or the canopy's ability to sit flush against the ceiling.
-
Reinstall the Canopy: Slide the ceiling fan's canopy back up to the ceiling and secure it with the screws that were removed earlier. Make sure that the canopy is securely attached and sits flush against the ceiling.
-
Install Batteries in the Remote: Install the batteries in the new remote control, following the polarity markings inside the battery compartment. Typically, remotes use AA or AAA batteries. Make sure to use new batteries for optimal performance.
-
Restore Power: Turn the power back on to the ceiling fan at the circuit breaker.
-
Test the Remote Control: Test all the functions of the remote control, including fan speed control, light dimming (if applicable), and reverse function. If the fan does not respond to the remote control, proceed to the troubleshooting section.
Troubleshooting Common Issues
Despite careful installation, issues can sometimes arise. Here are some troubleshooting tips for common problems:
*Fan does not respond: Verify that the batteries in the remote control are new and correctly installed. Ensure that the power to the ceiling fan is turned on at the circuit breaker. Check all wire connections at the receiver to confirm they are secure. If the fan still does not respond, the receiver may be defective and require replacement.
*Light does not work: Check the light bulb to ensure it is not burned out. Verify that the light kit wires are securely connected to the receiver. If the light still does not work, the light kit or the receiver may be defective.
*Fan operates erratically: Check for loose wire connections. Radio frequency interference from other devices can sometimes interfere with the remote control signal. Try changing the frequency settings on the remote control and receiver (refer to the instructions for your specific model).
*Remote control range is limited: Ensure that the antenna wire on the receiver is extended and not obstructed. Avoid placing the receiver near metal objects, which can interfere with the signal. Replace the batteries in the remote control.
If troubleshooting steps fail to resolve the issues, consult a qualified electrician for assistance. Attempting repairs beyond one's expertise can be dangerous and may void the fan's warranty.
Proper disposal of the old remote control and batteries is important. Check with local waste management authorities for information on electronic waste recycling programs. Batteries should be disposed of separately, following local regulations.
Successful installation of a Harbor Breeze ceiling fan remote control replacement requires careful preparation, adherence to safety precautions, and meticulous execution of the installation steps. By following the guidelines outlined in this article, homeowners can confidently replace their ceiling fan remote control and restore full functionality to their fan.

How To Install A Ceiling Fan With Remote Control

Harbor Breeze Ceiling Fan Remote Program Dimmer And Conflict Fix

Harbor Breeze Kujce9603 Operation And Installation Instructions Manualslib

Anderic Fd40 H03r Harbor Breeze Wakefield With Up And Down Light User Manual

35t1 Ceiling Fan Remote Control Replacement For Harbor Breeze Allen Roth 303 9mhz 3 Sd Light Dimmer Learn Key Replace 53t 11t Hd

How To Install A Ceiling Fan Remote Control

Ceiling Fan Remote Replacement Easy To Replace

Universal Ceiling Fan Remote Control Kit With Light Dimmer Replacement For Harbor Breeze Hampton Bay Hunter Litex Westinghouse Honeywell 28r

Harbor Breeze 40837 Instruction Manual Manualslib

Universal Ceiling Fan Remote Control Kit With Light Dimmer Replacement For Harbor Breeze Hampton Bay Hunter Litex Westinghouse Honeywell 28r
Related Posts