1.
Installing a ceiling fan with light can be a great way to add style and practicality to any room. Not only do ceiling fans provide a cooling breeze in the summer and warm air in the winter, they can also be used to brighten up a room with their additional lighting. In this article, we’ll show you everything you need to know about installing a ceiling fan with light.
Step 1: Choose a Ceiling Fan With Light
The first step in installing a ceiling fan with light is to choose the right fan for your space. Consider the size of the room and the type of light you’d like to use. You can choose from a variety of sizes and styles of ceiling fan with light, from traditional to modern, and from flush mount to hugger. Make sure to check the wattage rating for the fan light to ensure it will be bright enough for your needs.
Step 2: Gather the Necessary Supplies
Once you’ve chosen your ceiling fan with light, it’s time to gather the necessary supplies. You’ll need a ladder, wire cutters, screwdriver, wire stripper, electrical tape, and light bulbs. Make sure your fan comes with mounting hardware and a complete set of instructions.
Step 3: If Necessary, Install an Electrical Box
If you’re replacing an existing ceiling fan, you’ll need to install a new electrical box. Make sure the box is rated for the weight of the fan and is securely mounted to the ceiling joists. If you’re installing a new fan from scratch, you’ll need to install an electrical box first.
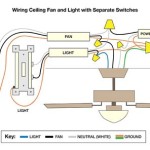
Step 4: Connect the Wires
Once the electrical box is installed, it’s time to connect the wires. Start by connecting the black wire from the fan to the black wire from the electrical box. Connect the white wire from the fan to the white wire from the electrical box. The green wire from the fan should be connected to the ground wire from the electrical box. Once the wires are connected, secure them with electrical tape.
Step 5: Install the Fan and Light
Once the wires are connected, it’s time to install the fan and light. Follow the instructions included with the fan to attach the fan to the mounting bracket. Once the fan is securely in place, install the light fixtures and bulbs. Make sure to secure the bulbs tightly so they don’t come loose.
Step 6: Test and Enjoy
Once the fan and light are installed, it’s time to test them. Make sure the fan and light are both working properly. If everything is working correctly, enjoy the new look and feel of your room!


Related Posts