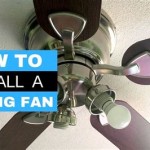
How To Hang A Ceiling Fan On A Vaulted Ceiling
Installing a ceiling fan on a vaulted ceiling presents unique challenges compared to a standard flat ceiling. The sloped nature of the ceiling requires specialized hardware and careful planning to ensure proper installation and safe operation. This guide provides a comprehensive overview of the process.
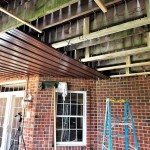
Assessment and Planning: Before beginning any work, assess the existing electrical wiring and the ceiling's structure. Determine if the current wiring can handle the fan's electrical load. If not, consult a qualified electrician for an upgrade. Locate a ceiling joist capable of supporting the fan's weight. Using a stud finder is recommended. Measure the ceiling's slope or angle to determine the correct downrod length needed. This measurement is crucial for proper fan blade clearance and optimal airflow. A downrod extends the fan from the mounting point, ensuring adequate distance from the sloped ceiling.
Gathering Necessary Materials and Tools: Assemble all necessary materials before starting the installation. This includes the ceiling fan kit, a sloped ceiling adapter (also known as a vaulted ceiling adapter), appropriate length downrod, electrical wiring (if necessary), wire connectors, electrical tape, a stud finder, a voltage tester, a drill with appropriate drill bits, screwdrivers, a ladder, safety glasses, and work gloves.
Disconnecting Power: Safety is paramount. Before starting any electrical work, turn off the power to the circuit at the breaker box. Double-check the power is off at the ceiling fixture box using a voltage tester. This step prevents electrical shock and ensures a safe working environment.
Installing the Mounting Bracket: The mounting bracket is the foundation of the fan's installation. A standard mounting bracket may not be suitable for a vaulted ceiling. A sloped ceiling adapter is typically required to ensure the fan hangs level. This adapter compensates for the ceiling angle and allows the fan to hang perpendicular to the floor, rather than angled with the ceiling. Attach the adapter to the electrical box securely, following the manufacturer's instructions. This adapter typically attaches to the ceiling fan's mounting bracket and then to the electrical box in the ceiling.
Assembling the Fan: Assemble the fan motor housing and blades according to the manufacturer’s instructions. Attach the downrod to the fan motor housing, ensuring a tight and secure connection. The downrod length is determined by the ceiling angle and the desired fan height. The goal is to achieve a proper distance between the fan blades and both the ceiling and the floor.
Wiring the Fan: Carefully connect the fan's wiring to the house wiring within the electrical box. Match the wires according to their color coding (black to black, white to white, green to ground). Secure the connections with wire connectors and wrap them with electrical tape for added security. If unsure about any wiring connections, consult a qualified electrician. Incorrect wiring can damage the fan or create a safety hazard.
Securing the Fan to the Mounting Bracket: Once the wiring is complete, carefully lift the assembled fan and attach it to the mounting bracket already secured to the ceiling. Ensure the connection is secure and stable. Most fans have a locking mechanism that engages when the fan is properly seated. Test this mechanism to ensure it is properly engaged.
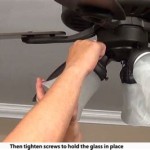
Installing the Fan Blades and Light Kit (if applicable): Attach the fan blades to the motor housing using the provided screws and hardware, making sure each blade is securely fastened. If the fan includes a light kit, install it according to the manufacturer's instructions. Wiring the light kit usually involves connecting wires similarly to the main fan wiring.
Restoring Power and Testing: Once the installation is complete, restore power to the circuit at the breaker box. Turn on the fan and light kit (if applicable) to test the operation. Check for any wobbling or unusual noises. If the fan wobbles, consult the manufacturer's instructions for balancing the fan blades. Balancing kits are often included with ceiling fans.
Final Checks: Inspect the fan's operation. Ensure the blades rotate smoothly and quietly. Verify the light kit functions correctly (if installed). Confirm the fan is securely mounted and does not wobble excessively.
While these instructions provide a general guide, always refer to the manufacturer's specific instructions included with your ceiling fan and sloped ceiling adapter. If any uncertainty exists about any aspect of the installation, consult a qualified electrician. Safety should always be the top priority during any electrical installation project.

How To Install A Ceiling Fan On Sloped Lemon Thistle

How To Choose A Ceiling Fan For Vaulted Ceilings Lightology

Ensuring Proper Ceiling Fan Installation With Vaulted Ceilings

How To Install A Ceiling Fan On Sloped Lemon Thistle

How To Choose A Ceiling Fan For Vaulted Ceilings Lightology

How To Hang A Ceiling Fan From Vaulted Homes Valy

How To Choose A Ceiling Fan For Vaulted Ceilings Lightology

Fans On An Angle Installing Ceiling Angled Or Raked

How To Install Vaulted Ceiling Fan

How To Choose A Ceiling Fan For Vaulted Ceilings Lightology
Related Posts