How to Repair Nail Pops in Popcorn Ceilings: A Comprehensive Guide
Nail pops, those unsightly raised bumps that appear on ceilings and walls, are a common problem in homes, particularly those with drywall construction. While not indicative of a structural issue in most cases, they can detract from the aesthetic appeal of a room. When these nail pops occur in a popcorn ceiling, the repair process becomes slightly more complex due to the textured surface. This article provides a detailed guide on how to effectively repair nail pops in popcorn ceilings, covering everything from identification to finishing touches, while considering the associated costs.
Understanding the causes of nail pops is crucial for preventing future occurrences. The primary culprit is lumber shrinkage. As the wood framing behind the drywall dries out over time, it contracts. This contraction puts stress on the fasteners (nails or screws) holding the drywall in place. Eventually, the fastener can push outward, creating a raised bump. Environmental factors like humidity fluctuations can exacerbate this issue. Inadequate or improperly installed fasteners, such as using nails that are too short or driving them in at an angle, can also contribute to nail pops. Additionally, movement within the building, whether from settling or external vibrations, can loosen fasteners. Understanding these causes provides a foundation for implementing preventative measures alongside the actual repair.
Identifying and Assessing Nail Pops
The first step in repairing nail pops is to accurately identify them. Nail pops typically present as small, circular bumps on the ceiling surface. They can be subtle or quite pronounced, depending on the extent of the fastener protrusion. Before commencing any repairs, it's essential to assess the extent of the problem. Determine how many nail pops are present and their distribution across the ceiling. Examine the surrounding drywall for any signs of cracking or damage, which may indicate a more significant underlying issue. Carefully probe around the nail pop to determine if the fastener is indeed loose or simply protruding due to drywall movement. This initial assessment will help in determining the appropriate repair strategy and the materials required.
Once the nail pops have been identified, it's important to differentiate them from other blemishes, such as dirt accumulation or water stains. Water stains often have a brownish or yellowish tinge and might indicate a roof leak or plumbing problem. Dirt accumulation tends to be more superficial and can usually be wiped away. If there's any doubt about the cause of a blemish, it's advisable to investigate further before proceeding with any repairs. Addressing the underlying cause, such as fixing a leak, is paramount to preventing the recurrence of the issue.
Safety precautions should be considered before beginning any repair. Working at ceiling height involves using a ladder, thus safety procedures are paramount. Ensure the ladder is stable and placed on a level surface. It's also advisable to wear safety glasses to protect the eyes from falling debris, particularly when dealing with popcorn ceilings, as the texture tends to flake off easily. Additionally, consider wearing a dust mask to avoid inhaling any potentially harmful substances, especially if the popcorn ceiling was installed before the ban on asbestos-containing materials. If there is reason to suspect the presence of asbestos, professional testing and abatement are strongly recommended.
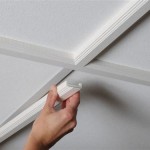
The Repair Process: Securing the Drywall and Fasteners
The core of the repair involves re-securing the drywall to the framing and addressing the protruding fastener. Start by attempting to re-drive the existing nail or screw. Using a hammer or drill, gently tap or drive the fastener back into the drywall until it is flush with the surface, or slightly recessed. Be careful not to damage the surrounding drywall. If the nail or screw spins freely and does not grip, it has likely stripped the wood. In this case, remove the old fastener entirely using pliers or a screwdriver. Place a new drywall screw approximately one or two inches away from the original location, driving it at a slight angle towards the original hole to ensure it catches the framing member. Use a dimpler bit with the drill to avoid driving the screw too deep and damaging the drywall paper. This new screw provides a secure anchor point for the drywall.
It might be necessary to add additional screws around the nail pop to further secure the drywall. Space the screws approximately 6 to 8 inches apart in a circular pattern around the affected area. This helps to distribute the stress and prevent future movement. Ensure that all screws are driven to the correct depth – flush with the drywall surface or slightly recessed – to allow for proper patching. Overdriving the screws can damage the drywall paper and create a larger problem. After securing the drywall, inspect the repaired area again to ensure that there are no remaining protrusions or loose sections.
For particularly stubborn nail pops, consider using construction adhesive in addition to screws. Apply a small bead of construction adhesive to the back of the drywall before driving in the screws. This provides an extra layer of bonding between the drywall and the framing, helping to prevent future movement. However, be cautious when using construction adhesive, as it can be difficult to remove if future repairs are needed. Choose an adhesive that is specifically designed for drywall applications and follow the manufacturer's instructions carefully. Allow the adhesive to dry completely before proceeding with the patching process.
Matching the Popcorn Texture and Finishing
The most challenging aspect of repairing nail pops in popcorn ceilings is matching the existing texture. Popcorn ceilings, also known as acoustic ceilings, were popular for their sound-dampening properties and their ability to conceal imperfections. However, replicating the texture can be tricky. Before attempting any patching, it's essential to identify the type of popcorn texture used on the ceiling. There are different variations in particle size and density. Take a small sample of the existing texture to a local hardware store or home improvement center to see if a matching product is available. Some stores even offer color-matching services to ensure a seamless blend.
Several products are available for patching popcorn ceilings, including aerosol cans of pre-mixed texture and dry mixes that need to be combined with water. Aerosol cans are generally easier to use for small repairs, while dry mixes are more economical for larger areas. When using an aerosol can, shake it thoroughly and practice spraying on a piece of cardboard to get a feel for the spray pattern and distance. Hold the can approximately 12 to 18 inches away from the ceiling and apply the texture in light, even coats. Avoid applying too much texture at once, as this can cause drips and an uneven finish. Allow each coat to dry completely before applying the next one.
For larger repairs or when using a dry mix, apply a thin layer of drywall compound over the repaired area using a putty knife. Feather the edges of the compound to blend it seamlessly with the surrounding ceiling. Allow the compound to dry completely, then sand it lightly with fine-grit sandpaper to remove any imperfections. Apply the popcorn texture using a hopper gun or a texture brush. A hopper gun provides a more consistent and even application, while a texture brush allows for more control and precision. Practice applying the texture on a piece of cardboard to achieve the desired effect. Apply the texture in light, even coats, allowing each coat to dry completely before applying the next one.
Once the texture has been applied and allowed to dry completely, inspect the repaired area carefully. If necessary, apply additional texture to blend the repaired area seamlessly with the surrounding ceiling. Use a small brush or sponge to stipple the texture if needed to match the existing pattern. Finally, prime and paint the repaired area to match the existing ceiling color. Use a high-quality ceiling paint that is specifically designed for textured surfaces. Apply the paint in light, even coats, allowing each coat to dry completely before applying the next one. The goal is to create a seamless and invisible repair that blends in perfectly with the surrounding ceiling.
The cost of repairing nail pops in a popcorn ceiling can vary depending on several factors, including the extent of the damage, the type of materials used, and whether the work is done DIY or by a professional. For a small DIY repair, the cost might range from $20 to $50, including the cost of drywall screws, drywall compound, popcorn texture, primer, and paint. Hiring a professional contractor can cost significantly more, ranging from $100 to $500 or more, depending on the scope of the project and the contractor's rates. Factors that influence the cost include the size of the repair area, the complexity of matching the existing texture, and the geographic location. Obtaining multiple quotes from different contractors is crucial to ensure a fair price.

How Much Does Ceiling Repair Cost 2025 Data Angi

2025 Drywall Repair Cost Holes S Ceiling Costs

How Much Does Ceiling Repair Cost 2025 Data Angi

How Much Does It Cost To Repair Plaster 2025 Data

How Much Does Ceiling Repair Cost 2025 Data Angi

How Much Does Ceiling Repair Cost 2025 Data Angi

Tongue And Groove Ceiling Cost To Install 2025 Homeguide

3 Must Haves To Bid Drywall Fast Easy Estimates

How Much Does Drywall Repair Cost 2025 Data

2025 Cost To Finish Drywall Tape Mud
Related Posts