How To Fix a Ceiling Fan Light Pull Chain
A malfunctioning ceiling fan light pull chain is a common household issue. This problem can manifest in several ways, including the chain breaking, becoming stuck, failing to turn the light on or off, or simply not engaging with the switch mechanism. Addressing this issue promptly not only restores functionality but also prevents further damage to the ceiling fan and ensures safe operation.
Before attempting any repairs, it is crucial to prioritize safety. Always turn off the power to the ceiling fan at the circuit breaker. This eliminates the risk of electrical shock during the repair process. Once the power is off, gather the necessary tools and materials. These typically include a screwdriver set (Phillips and flathead), needle-nose pliers, replacement pull chain(s), and potentially a replacement light switch assembly, depending on the extent of the damage. A ladder or step stool will also be required to safely reach the ceiling fan.
A methodical approach is essential for diagnosing and resolving the pull chain issue. Begin by visually inspecting the chain and the switch mechanism to identify the source of the problem. This initial assessment will determine the appropriate repair strategy. The following sections will outline the most common problems associated with pull chains and provide detailed instructions on how to fix them.
Replacing a Broken Pull Chain
The most common issue is a broken pull chain. Constant use or accidental excessive force can lead to the chain snapping, rendering the light switch inoperable. Replacing the chain is often a simple and straightforward process.
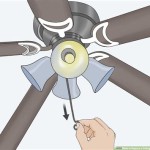
First, visually inspect the existing chain to determine how it is connected to the switch mechanism. Most chains are attached via a small connector link or a knot. Using needle-nose pliers, carefully detach the broken chain from the connector or untie the knot. If the remaining portion of the chain is too short to grip comfortably, use the pliers to hold it while removing the broken section.
Next, obtain a replacement pull chain. These are readily available at most hardware stores and home improvement centers. Ensure the replacement chain is of similar length and gauge to the original to prevent future problems. Cut the replacement chain to the appropriate length using wire cutters or pliers. It is generally recommended to err on the side of slightly longer than necessary, as excess chain can easily be removed later.
Attach the new chain to the switch mechanism. If the original chain used a connector link, use the pliers to open the link and attach it to the new chain. Securely close the link to prevent the chain from detaching. If the original chain was knotted, carefully tie a secure knot to attach the new chain to the switch mechanism. Ensure the knot is tight and will not easily come undone. Test the chain by gently pulling it to confirm it is securely attached and operates the switch mechanism.
Once the new chain is attached, carefully restore power to the ceiling fan at the circuit breaker. Test the light switch by pulling the chain. If the light turns on and off as expected, the repair is complete. If the light does not function correctly, further troubleshooting may be necessary. In such cases, the switch mechanism itself may be faulty and require replacement.
Freeing a Stuck Pull Chain
Another common problem is a pull chain that becomes stuck. This can be caused by debris, corrosion, or a malfunctioning switch mechanism. A stuck chain often prevents the light from turning on or off, or it may make it difficult to operate the fan.
Before attempting to force the chain, carefully examine the area where the chain enters the switch housing. Look for any visible obstructions, such as dust, dirt, or debris. Use a can of compressed air to gently blow away any loose particles. This may be sufficient to free the chain.
If compressed air does not resolve the issue, apply a small amount of lubricant to the chain where it enters the switch housing. A silicone-based lubricant is generally recommended, as it will not attract dust or damage the plastic components. Avoid using oil-based lubricants, as they can attract dust and grime over time, potentially exacerbating the problem.
After applying lubricant, gently try to move the chain back and forth. Avoid using excessive force, as this could damage the switch mechanism. The goal is to gradually work the lubricant into the mechanism and loosen any internal obstructions. If the chain starts to move, continue to work it back and forth until it operates smoothly.
If the chain remains stuck, it may indicate a more serious problem with the switch mechanism. In this case, replacing the entire switch assembly is often the most effective solution. Refer to the next section for instructions on replacing the light switch assembly.
Replacing the Light Switch Assembly
When the pull chain mechanism itself is faulty, replacing the entire light switch assembly is often necessary. This is usually required when the chain is broken internally, the switch is unresponsive, or cleaning and lubrication fail to resolve the issue.
Begin by turning off the power to the ceiling fan at the circuit breaker. Remove the light fixture cover from the ceiling fan. This usually involves unscrewing or unlatching the cover. Once the cover is removed, the light switch assembly will be visible.
Carefully disconnect the wires connected to the old light switch assembly. Before disconnecting any wires, it is crucial to note their positions and colors. Taking a photograph or drawing a diagram can be helpful for reassembling the wires correctly. Typically, there will be two or three wires connected to the switch: a hot wire, a neutral wire, and potentially a ground wire. Use needle-nose pliers to disconnect the wires from the switch terminals. If the wires are connected with wire connectors, untwist the connectors to release the wires.
Once the wires are disconnected, remove the old light switch assembly from the ceiling fan housing. This typically involves loosening a screw or releasing a clip. Once the assembly is detached, carefully remove it from the fan.
Install the new light switch assembly in the ceiling fan housing. Secure it in place using the screw or clip that held the old assembly. Connect the wires to the new light switch assembly, matching the positions and colors noted earlier. Use wire connectors to securely connect the wires to the switch terminals. Ensure the connections are tight and secure.
Carefully replace the light fixture cover on the ceiling fan. Ensure it is properly aligned and securely fastened. Restore power to the ceiling fan at the circuit breaker. Test the light switch by pulling the chain. If the light turns on and off as expected, the repair is complete. If the light still does not function correctly, double-check the wiring connections and ensure the switch assembly is properly installed.
By following these steps, most ceiling fan light pull chain issues can be effectively resolved. If the problem persists after attempting these repairs, consulting a qualified electrician may be necessary to diagnose and address more complex electrical issues.

How To Fix Replace A Ceiling Fan Pull Chain Switch

Fix A Snapped Fan Pull Chain At No Cost How To

Ceiling Fan Pull Chain Came Out Doityourself Com Community Forums

4 Ways To Replace A Ceiling Fan Pull Chain Switch Pulls

Ceiling Fan Light Repair Home Tutor

Ceiling Fan Pull Chain Switch Replacement How To Replace A On Easy

How To Fix A Ceiling Fan Pull Switch With Light Pulls

4 Ways To Replace A Ceiling Fan Pull Chain Switch Wikihow

How To Repair Pull Chain Light Switch In Ceiling Fan

4 Ways To Replace A Ceiling Fan Pull Chain Switch Wikihow
Related Posts