How to Cut Crown Molding On a Sloped Ceiling
Installing crown molding on a sloped ceiling can add a touch of elegance and sophistication to any room. However, cutting the molding to fit the angles of the ceiling can be a bit tricky. Here are the essential steps to help you cut crown molding on a sloped ceiling: ### Measuring and Marking 1. Determine the angle of the slope: Use a protractor or angle finder to measure the angle of the sloped ceiling. This will help you determine the correct miter angle to cut the molding. 2. Measure the length of the molding: Measure the length of the molding you need to cover the sloped section of the ceiling. Mark this measurement on the molding using a pencil or tape measure. ### Cutting the Miter Angles 1. Set up your miter saw: Adjust your miter saw to the angle you measured in step 1. Ensure that the saw is level and stable. 2. Cut the first miter angle: Hold the molding against the saw fence and make the first miter cut at the measured length. 3. Cut the second miter angle: Flip the molding over and make the second miter cut at the same length. ### Cutting the Spring Angle 1. Measure the spring angle: Use a bevel gauge or angle finder to measure the angle between the ceiling and the molding where it meets the wall. This is known as the spring angle. 2. Adjust your miter saw: Adjust your miter saw to the spring angle you measured. 3. Cut the spring angle: Hold the molding against the saw fence and make a cut at the measured length. ### Fitting and Installing 1. Dry fit the molding: Place the cut molding pieces together on the ceiling to check the fit. Adjust the angles as needed until the molding fits snugly. 2. Apply adhesive: Apply a bead of construction adhesive to the back of the molding pieces. 3. Install the molding: Carefully position the molding pieces on the ceiling and press them into place, starting from the center and working your way outwards. 4. Secure with nails: Use a brad nailer or finishing nails to secure the molding to the ceiling. Countersink the nails slightly below the surface of the molding. ### Tips for Cutting Crown Molding on a Sloped Ceiling - Use a sharp saw blade to ensure clean and precise cuts. - Double-check your measurements before making any cuts. - Practice cutting on scrap pieces of molding before making cuts on the actual molding. - Use a miter saw guide or a protractor to help you achieve precise angles. - If the miter cuts don't fit perfectly, adjust the angles slightly until you get a snug fit. - Be patient and take your time, as cutting crown molding on a sloped ceiling can be a bit time-consuming.
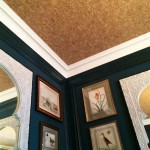
Crown Moulding On Angled Ceiling Sawdust Girl

Installing Crown Moulding On A Sloped Ceiling Doityourself Com Community Forums

Installing Crown Moulding Part Two Canadian Woodworking

Installing Crown Moulding On A Sloped Ceiling Doityourself Com Community Forums

Crown Moulding On Angled Ceiling Sawdust Girl

Install Crown Molding Cathedral Vaulted Ceiling

Crown Molding On Angled Ceilings Makely

Installing Crown Molding Around A Cathedral Ceiling Fine Homebuilding

Install Crown Molding Cathedral Vaulted Ceiling

Installing Crown Moulding Part Two Canadian Woodworking
Related Posts