How to Cut Crown Molding for Angled Ceiling: A Comprehensive Guide
Crown molding adds an elegant and sophisticated touch to any room, but when it comes to angled ceilings, cutting the molding can be a bit more challenging. However, with the right tools and techniques, you can achieve a professional-looking finish that complements the unique angles of your ceiling. Here's a comprehensive guide on how to cut crown molding for angled ceilings:
1. Gather Your Tools and Materials
Before you start cutting, make sure you have the necessary tools and materials:
* Crown molding * Miter saw * Measuring tape * Pencil * Protractor * Crown molding cutting jig (optional)2. Measure and Mark the Angles
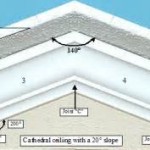
Using a measuring tape, determine the length of the crown molding needed for each section of the ceiling. Then, use a protractor to measure the angle where the ceiling meets the wall. Transfer these measurements to the crown molding using a pencil.
3. Set Up Your Miter Saw
Adjust the miter saw to the appropriate angle based on your measurements. It's generally recommended to set the saw to half the angle of the ceiling to create a 45-degree cut.
4. Secure the Crown Molding
Secure the crown molding to the miter saw using clamps or a vice. Ensure it's held firmly in place to prevent any movement during cutting.
5. Make the Cut
Slowly and carefully make the cut through the crown molding. Hold the saw steady and follow the marked line. If you're using a crown molding cutting jig, it will automatically adjust the saw to the correct angle for a precise cut.
6. Test Fit
Before installing the crown molding, test fit the cut pieces together on a flat surface. This will help you identify any minor adjustments needed for a perfect fit.
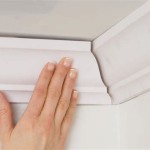
7. Install the Crown Molding
Apply adhesive to the back of the crown molding and carefully place it against the ceiling. Hold it in place for a few minutes to allow the adhesive to set. Secure the molding further using nails or screws.
8. Caulk and Paint
Once the crown molding is installed, fill any gaps or nail holes with caulk. Allow the caulk to dry completely and then paint the molding to match the ceiling or walls.
Tips for Success:
* Use a sharp saw blade to ensure clean and precise cuts. * Double-check your measurements and angles before cutting. * Practice on scrap pieces before cutting the actual crown molding. * Consider using a crown molding cutting jig for greater accuracy. * If the angle is particularly complex, you may need to create a template by tracing the ceiling onto a piece of cardboard. * Don't be afraid to seek professional help if you're not comfortable cutting the crown molding yourself.
Crown Moulding On Angled Ceiling Sawdust Girl

Installing Crown Moulding Part Two Canadian Woodworking

Installing Crown Moulding On A Sloped Ceiling Doityourself Com Community Forums

Crown Moulding On Angled Ceiling Sawdust Girl

Installing Crown Moulding On A Sloped Ceiling Doityourself Com Community Forums

Crown Molding On Angled Ceilings Makely

Installing Crown Molding Around A Cathedral Ceiling Fine Homebuilding

Install Crown Molding Cathedral Vaulted Ceiling

Installing Crown Moulding Part Two Canadian Woodworking

Install Crown Molding Cathedral Vaulted Ceiling
Related Posts