How To Cut And Install Crown Molding On A Vaulted Ceiling
Crown molding adds a touch of elegance and sophistication to any room. However, installing it on a vaulted ceiling presents unique challenges compared to standard flat ceilings. The angled surfaces require precise cuts and careful installation to ensure a seamless and professional finish. This article provides a comprehensive guide on how to cut and install crown molding on a vaulted ceiling, covering everything from measuring and cutting techniques to installation and finishing.
Before embarking on this project, it is crucial to gather the necessary tools and materials. Accuracy is paramount, and using the right equipment will significantly improve the quality of the finished product. The following list outlines the essential tools and materials for installing crown molding on a vaulted ceiling:
*Crown molding (sufficient quantity, plus extra for mistakes)
*Miter saw (with sharp blade)
*Coping saw
*Measuring tape
*Pencil
*Angle finder or protractor
*Construction adhesive
*Nail gun (or hammer and finishing nails)
*Wood filler
*Sandpaper (various grits)
*Caulk
*Paint or stain (matching existing trim or desired finish)
*Safety glasses
*Dust mask
*Ladder or scaffolding
Proper preparation is key to a successful crown molding installation. This includes accurately measuring the angles of the vaulted ceiling, selecting the appropriate molding profile, and preparing the surfaces for adhesion. Failing to adequately prepare can lead to miscuts, gaps, and an overall unprofessional appearance.
Determining the Vaulted Ceiling Angle
The most critical step in installing crown molding on a vaulted ceiling is accurately determining the angle where the walls meet the ceiling. Unlike a standard 90-degree corner, vaulted ceilings typically have angles greater or less than 90 degrees, which significantly impacts the required miter cuts. Measuring the angle is essential to achieving tight, seamless joints.
Several methods can be used to determine the vaulted ceiling angle. One of the most reliable methods involves using an angle finder or protractor. These tools allow for direct measurement of the angle between the wall and the ceiling. Place the angle finder in the corner, ensuring it sits flush against both surfaces. Read the measurement displayed on the tool. It's advisable to take several measurements along the length of the wall to account for any inconsistencies in the ceiling angle. Average the measurements to obtain the most accurate value.
Another method involves using a bevel gauge and a level. Hold the bevel gauge in the corner, aligning one arm with the wall and the other with the ceiling. Lock the gauge in place. Then, transfer the angle to a piece of paper or cardboard. Use a protractor to measure the angle on the paper. This method requires careful transfer of the angle to avoid errors.
Once the ceiling angle is determined, divide it by two. This resulting number is the miter angle needed for the crown moulding cuts. For example, if the vaulted ceiling angle is 130 degrees, divide it by two to get 65 degrees. This is the angle that should be used for both pieces of crown moulding to form a clean joint.
Cutting the Crown Molding
Cutting crown molding requires precision and attention to detail. A miter saw is the most common and effective tool for making accurate cuts. Understanding how to position the crown molding in the saw is essential for achieving the correct angles. Keep in mind that inside and outside corners require different cutting techniques.
The "spring angle" of the crown molding refers to the angle at which the molding sits against the wall and ceiling. This angle is typically predetermined by the molding's design. It is crucial to maintain this spring angle when cutting the molding in the miter saw. Most miter saws have adjustable stops that allow for precise angle settings. Adjust the saw to the calculated miter angle (half of the vaulted ceiling angle).
For inside corners on vaulted ceilings, the crown molding is typically cut using a technique known as coping. Coping involves cutting one piece of molding at a 45-degree angle (or half of the angle between the walls), then using a coping saw to remove the back portion of the molding along the profile line. The coped piece will then fit snugly against the flat surface of the adjoining piece, providing a tight, seamless joint. Coping is particularly useful when dealing with walls that are not perfectly square, as it allows for slight adjustments to ensure a precise fit.
Outside corners on vaulted ceilings require a miter cut on both pieces of molding. The miter angle will be determined by dividing the angle between the walls by two. For example, if the angle is 90 degrees, each piece of molding should be cut at a 45-degree angle. However, vaulted ceilings introduce a degree of complexity. If the vaulted ceiling angle is wider than normal, the outside corner angle will be different than a flat installation. Precise angle measurement is extremely important for proper corner joints.
Before cutting any crown molding, it is advisable to practice on scrap pieces. This allows for familiarization with the cutting techniques and ensures that the saw is properly calibrated. It also helps to avoid costly mistakes on the actual molding.
Installing the Crown Molding
Once the crown molding has been cut, the next step is to install it onto the vaulted ceiling. This involves applying construction adhesive, securing the molding with nails, and addressing any gaps or imperfections.
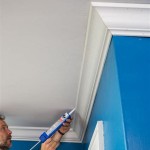
Begin by applying a bead of construction adhesive to the back of the crown molding. This adhesive will provide a strong bond between the molding and the wall and ceiling. Position the molding carefully, ensuring that it aligns properly with the previously installed pieces. Press the molding firmly against the wall and ceiling to allow the adhesive to make good contact.
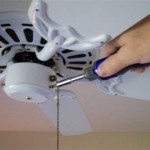
For additional security, use a nail gun or hammer and finishing nails to fasten the crown molding to the wall studs and ceiling joists. Drive nails through the molding at regular intervals, making sure to sink them slightly below the surface. Be careful not to split the molding when nailing. If using a hammer, use a nail set to drive the nails below the surface without damaging the surrounding wood.
When installing crown molding on a vaulted ceiling, it is common to encounter gaps or imperfections, particularly at the corners. These can be addressed using wood filler and caulk. Apply wood filler to any nail holes or small gaps in the molding. Allow the filler to dry completely, then sand it smooth with fine-grit sandpaper. Use caulk to seal any gaps between the crown molding and the wall or ceiling. Apply a thin, even bead of caulk along the seams, then smooth it with a wet finger or a caulking tool.
Repeat this process for all sections of crown molding, working your way around the room. Take frequent breaks to ensure accuracy and avoid fatigue. Double-check the alignment of the molding at each step to catch any errors before they become permanent.
After the crown molding has been fully installed, the final step is to paint or stain it to match the existing trim or desired finish. Before painting, prime the molding to ensure proper adhesion and a uniform finish. Apply two coats of paint or stain, allowing each coat to dry completely before applying the next. Use a brush or sprayer to apply the finish, ensuring that it is applied evenly and smoothly.
For a professional-looking finish, consider using a high-quality paint or stain specifically designed for trim. These products typically provide better coverage, durability, and resistance to wear and tear.
In summary, installing crown molding on a vaulted ceiling requires careful planning, precise measurements, and attention to detail. By following these instructions and utilizing the suggested tools and materials, it is possible to achieve a professional and elegant finish that will enhance the beauty of any room.
Key Considerations for Vaulted Ceilings
Vaulted ceilings present unique challenges for crown molding installation. These challenges stem from the varying angles and often uneven surfaces that are inherent in this type of architectural design. Understanding these challenges and implementing strategies to address them is crucial for a successful project.
One key consideration is the varying angles along the vaulted ceiling. Unlike a standard, flat ceiling where the angle between the wall and ceiling is consistently 90 degrees, vaulted ceilings can have angles that vary significantly along their length. This can be due to design variations or imperfections in the construction. Accurate measurements at multiple points are essential to account for these variations. It is advisable to divide the ceiling into smaller sections and treat each section as a separate installation project, adjusting the miter angles as needed. A laser level can be helpful to keep the project on track.
Another consideration is the potential for uneven surfaces. Vaulted ceilings, particularly in older homes, may have imperfections or irregularities that can make it difficult to achieve a flush fit with the crown molding. Before installation, carefully inspect the ceiling surface for any bumps, dips, or other irregularities. Use sandpaper or a sanding block to smooth out any minor imperfections. For more significant irregularities, consider using shims to create a level surface for the crown molding. Shims are thin pieces of wood or plastic that can be inserted behind the molding to compensate for unevenness.
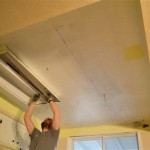
Finally, the height of vaulted ceilings can present logistical challenges. Reaching high areas safely requires proper equipment and techniques. Use a sturdy ladder or scaffolding that is appropriate for the height of the ceiling. Ensure that the ladder or scaffolding is properly positioned and secured before starting work. Work with a partner to help with lifting and positioning the crown molding. Avoid overreaching or straining yourself, and take frequent breaks to prevent fatigue.
Addressing Common Problems
Even with careful planning and execution, common problems can arise during crown molding installation on a vaulted ceiling. Knowing how to identify and address these problems is essential for achieving a professional finish.
One common problem is gaps at the corners. This can be caused by inaccurate miter cuts, uneven walls, or movement in the building structure. To address gaps at the corners, first ensure that the miter cuts are accurate. Double-check the measurements and recut the molding if necessary. If the gaps persist, use caulk to fill the gaps. Apply a generous bead of caulk along the seams, then smooth it with a wet finger or a caulking tool. For larger gaps, consider using wood filler to fill the gaps before caulking.
Another common problem is crown molding that does not sit flush against the wall or ceiling. This can be caused by uneven surfaces or improperly positioned nails. To address this, first check the surface for any bumps or dips. Sand down any bumps and use shims to fill any dips. Next, ensure that the nails are properly positioned and driven flush with the surface of the molding. If the molding is still not sitting flush, consider using construction adhesive to provide additional support.
A third common problem is splitting or cracking of the crown molding. This can be caused by using dull blades, driving nails too close to the edge of the molding, or over-tightening screws. To prevent splitting or cracking, use a sharp blade and avoid driving nails too close to the edge of the molding. If splitting or cracking does occur, use wood filler to fill the cracks and sand the surface smooth.
Alternative Techniques and Considerations
While the previously outlined steps provide a standard approach to installing crown molding on a vaulted ceiling, alternative techniques and considerations can be relevant depending on specific circumstances or preferences.
One alternative technique involves using pre-made corner blocks. Corner blocks are decorative wooden blocks that are installed at the corners of the room. The crown molding is then cut to fit snugly against the corner blocks. This technique eliminates the need for precise miter cuts and coping, making it a simpler option for those who are less experienced with woodworking. However, corner blocks can be less aesthetically pleasing than properly mitered corners, and they may not be appropriate for all architectural styles.
Another consideration is the type of crown molding used. Different types of crown molding are available, including wood, MDF (medium-density fiberboard), and polyurethane. Wood crown molding is the traditional choice, offering a natural look and feel. However, it can be more expensive than other options and is susceptible to moisture damage. MDF crown molding is a more affordable alternative that is resistant to warping and splitting. Polyurethane crown molding is a lightweight, moisture-resistant option that is easy to install. The choice of crown molding depends on factors such as budget, aesthetic preferences, and environmental conditions.
Finally, the finishing of the crown molding should be carefully considered. Crown molding can be painted, stained, or left natural. The choice of finish depends on the overall design of the room and the desired aesthetic. If painting the crown molding, use a high-quality primer and paint that is specifically designed for trim. If staining the crown molding, use a stain that matches the existing woodwork or desired finish. Always apply the finish in thin, even coats, allowing each coat to dry completely before applying the next.

Install Crown Molding Cathedral Vaulted Ceiling

Installing Crown Molding Around A Cathedral Ceiling Fine Homebuilding

How To Install Crown Molding On A Vaulted Cathedral Ceiling Without Transition Piece

Installing Crown Moulding On A Sloped Ceiling Doityourself Com Community Forums

Installing Crown Moulding Part Two Canadian Woodworking

Installing Crown Moulding On A Sloped Ceiling Doityourself Com Community Forums

Install Crown Molding Cathedral Vaulted Ceiling

How To Cut A Crown For Vaulted Ceilings Quora

Crown Moulding On Angled Ceiling Sawdust Girl

How To Install Crown Molding On Vaulted Or Cathedral Ceilings The Joy Of Moldings
Related Posts