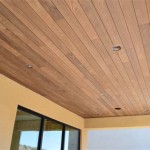
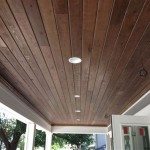
How to Create a Stylish Ceiling with Wood Planks in Revit
Creating a stylish ceiling with wood planks in Revit is a great way to add warmth and character to any space. Here are the essential steps to help you achieve a professional-looking result:
1. Model the Ceiling
Start by creating a new ceiling in Revit. In the "Create" tab, select "Ceiling Plan" and draw the shape and size of your ceiling. You can adjust the height and thickness of the ceiling in the "Properties" palette.
2. Load the Wood Plank Family
Next, you'll need to load a wood plank family into Revit. You can find wood plank families in the Revit Library or download them from online resources. Once you've loaded the family, insert it into your project.
3. Align the Planks
Align the wood planks on your ceiling by using the "Align" tool in Revit. This tool allows you to distribute and align the planks evenly across the ceiling. You can adjust the spacing and orientation of the planks to suit your design.
4. Create Patterns
If you want to add interest to your ceiling, you can create patterns with the wood planks. To do this, use the "Divide" tool to divide the planks into smaller sections. Then, you can rotate or move the sections to create unique patterns.
5. Add Details
Once you're happy with the layout of your wood planks, you can add details such as nail holes or knots. To do this, use the "Detail Line" tool or the "Detail Component" tool. You can also add a texture to the planks to make them look more realistic.
6. Apply Materials
Finally, apply materials to your wood planks to give them the desired look. You can choose from a variety of wood species and finishes in the Revit Material Library. Once you've applied the materials, render your ceiling to see the final result.
Tips for Creating a Stylish Ceiling
Here are a few tips to help you create a stylish ceiling with wood planks in Revit:
- Use a variety of wood species and finishes to create a unique look.
- Experiment with different plank sizes and orientations to create visual interest.
- Add details such as nail holes or knots to give the ceiling a realistic appearance.
- Use lighting to highlight the ceiling and create a dramatic effect.
- Consider adding a drop ceiling to create a more complex and sophisticated look.
By following these steps and tips, you can create a stylish and professional-looking ceiling with wood planks in Revit.

Revit Modelling Wave Ceiling

Custom Ceiling In Revit Tutorial

Acoustic Ceiling In Revit Tutorial

Ceiling Bim Revit Files Armstrong Solutions Commercial

Ceiling Bim Revit Files Armstrong Solutions Commercial

Interior Design Essentials In Revit Udemy

How To Make Wall Siding In Revit Adaptive Profile

Ceiling Bim Revit Files Armstrong Solutions Commercial

6 Types Of Ceilings Modeled In Revit Tutorial Ceiling

Create Revit Architectural Interior Design By Shahadat1803 Fiverr
Related Posts