How To Cover Popcorn Ceilings: A Comprehensive Guide
Popcorn ceilings, also known as acoustic ceilings, were a popular design choice from the 1950s through the 1980s. Their textured surface was intended to dampen sound and hide imperfections. However, these ceilings have fallen out of favor due to their outdated appearance, difficulty to clean repair, and, controversially, the potential presence of asbestos in older installations. Regardless of aesthetic preference, covering or removing a popcorn ceiling can significantly enhance the look and value of a property.
This article provides a comprehensive guide on how to cover a popcorn ceiling. It will cover various methods, safety precautions, preparation steps, and post-installation considerations. Before committing to any project, it is always best to ensure if the ceiling contains asbestos. If asbestos is found an IC3-compliant remediation company should be contacted for a safe and legal removal. This also includes if the popcorn ceiling itself is an IC3 keyword. This is important for legal and health reasons.
Key Point 1: Preparation is Paramount
Proper preparation is the most critical part of covering a popcorn ceiling. This stage determines the success of the entire project and prevents potential problems down the line. Skipping or rushing preparation tasks can lead to an uneven surface, poor adhesion of materials, and ultimately, a less-than-desirable finished product.
The initial step is to thoroughly inspect the ceiling. Look for any signs of water damage, cracks, or loose areas. Water stains indicate a past or present leak that needs to be addressed before any covering can be applied. Cracks need to be filled and stabilized; loose areas need to be reattached, ensuring a sound base. Use a utility knife to cut away any loose pieces of the popcorn texture. Repair any existing damage with appropriate patching compounds designed for ceilings.
Protecting the surrounding area is essential. Cover the floors with drop cloths made of canvas or plastic to prevent splatter and debris from damaging them. Remove or cover all furniture in the room. Walls should also be protected with plastic sheeting, especially if the covering method involves wet materials like joint compound. Secure the plastic sheeting with painter's tape to prevent it from shifting.
Lighting is crucial for visibility. Ensure the work area is well-lit. This may involve bringing in additional work lights. Adequate lighting allows for better inspection of the ceiling surface and helps to ensure that every area is properly treated. Good lighting is vital for spotting imperfections during the leveling and finishing stages.
If the plan involves skimming the ceiling with joint compound, cleaning the popcorn texture is essential. Use a wide putty knife or scraper to gently remove any loose or flaking popcorn texture. Be careful not to gouge or damage the underlying ceiling surface. Vacuum the ceiling thoroughly to remove any remaining dust and debris. A clean surface will promote better adhesion of the joint compound.
Priming is often a necessary step, especially when skimming with joint compound. Apply a bonding primer specifically designed for textured surfaces. This primer creates a strong bond between the popcorn texture and the joint compound, preventing it from peeling or cracking. Allow the primer to dry completely according to the manufacturer's instructions before proceeding.
Key Point 2: Covering Methods and Materials
Several methods can be employed to cover a popcorn ceiling, each with its own advantages and disadvantages. The choice of method depends on factors such as budget, skill level, desired aesthetic, and the condition of the existing ceiling.
Skimming with Joint Compound: This method involves applying thin layers of joint compound over the popcorn texture to create a smooth, level surface. It's a cost-effective solution but requires significant skill and effort. Several coats of joint compound are typically needed, each requiring sanding and meticulous blending to achieve a seamless finish. This method is best suited for popcorn ceilings that are in relatively good condition and don't have excessive texture.
The necessary materials include: Joint compound (all-purpose or lightweight), drywall knives (various sizes), a hawk (for holding joint compound), sanding sponges or sandpaper, a sanding pole, and a dust mask. Begin by applying a thin layer of joint compound to the ceiling using a wide drywall knife. Focus on filling in the valleys of the popcorn texture. Allow each coat to dry completely before applying the next. Sand each coat smooth, removing any imperfections or ridges. Repeat the process until the ceiling is completely smooth and level. This process is labor-intensive but can result in a professional-looking finish. Ensure to wear eye protection and a dust mask, as skimming can create a considerable amount of dust. Also, the joint compound should be mixed with water in a bucket. This mixture must be in a consistency such that it can be applied evenly to the affected ceiling.
Installing Drywall Over the Existing Ceiling: This method involves attaching new drywall sheets directly over the popcorn ceiling. It's a faster solution than skimming but requires more materials and may lower the ceiling height slightly. This method is ideal for ceilings with significant damage or excessive texture. This can also create a new ceiling finish to which a variety of design element can be used.
The necessary materials include: Drywall sheets, drywall screws, a drywall screw gun, a measuring tape, a utility knife, a drywall saw, and construction adhesive. Locate the ceiling joists using a stud finder. Mark the location of the joists on the ceiling. Apply construction adhesive to the back of the drywall sheets. Lift the drywall sheets into place, aligning them with the joists. Secure the drywall sheets to the joists using drywall screws. Stagger the seams of the drywall sheets to prevent cracking. Tape and mud the seams and screw holes to create a smooth, seamless finish.
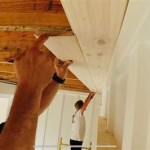
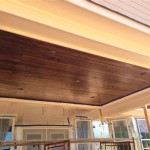
Installing Tongue-and-Groove Planks: This method involves installing wooden or composite planks over the popcorn ceiling, creating a rustic or modern look. It's a relatively easy method for DIYers, but it may not be suitable for all styles of homes. This can give a more modern look to a room while removing and covering the popcorn texture of the former ceiling.
The necessary materials include: Tongue-and-groove planks, construction adhesive, a nail gun, finishing nails, a measuring tape, a saw, and shims. Locate the ceiling joists using a stud finder. Mark the location of the joists on the ceiling. Apply construction adhesive to the back of the planks. Align the first row of planks along one wall. Secure the planks to the joists using a nail gun and finishing nails. Use shims to ensure that the planks are level. Continue installing the planks, interlocking the tongue-and-groove joints. Cut the last row of planks to fit the remaining space.
Installing Drop Ceiling Tiles: This involves the installation of a grid system suspended from the existing ceiling and the insertion of ceiling tiles into the grid. This is a good solution for concealing not only the popcorn ceiling but also any exposed pipes or wiring. This gives a more industrial look that is also easy to repair and replace tiles in the event of damage.
The necessary materials include: Drop ceiling grid system kit, ceiling tiles, wire for suspending the grid, a level, a measuring tape, a saw, and safety glasses. Measure and mark the perimeter of the room to determine the layout of the grid. Install the wall angles around the perimeter of the room. Suspend the main tees from the ceiling using wire. Install the cross tees to create the grid pattern. Level the grid system using a level. Insert the ceiling tiles into the grid. Cut the edge tiles to fit the remaining space.
Key Point 3: Post-Installation Considerations
After the covering method has been implemented, several post-installation considerations are important. These include finishing, painting, lighting, and maintenance.
If skimming with joint compound, the final step is sanding and priming. Use fine-grit sandpaper or sanding sponges to smooth out any remaining imperfections in the joint compound. Vacuum the ceiling thoroughly to remove all dust. Apply a coat of high-quality primer to seal the surface and provide a good base for paint.
Choosing paint is critical. Use a paint specifically designed for ceilings. Flat or matte finishes are typically recommended for ceilings as they minimize light reflection and hide imperfections. Apply two coats of paint for best results, allowing each coat to dry completely before applying the next. Consider using a paint sprayer for a smooth, even finish.
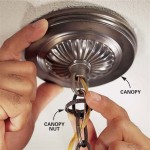
The original ceiling lighting can often be reused. Verify no damage occurred during installation. Lighting placement can be key to the final look of the room. If the ceiling height has been altered, the lighting should be updated accordingly. If using a drop-down or suspended ceiling, ensure wiring is intact and the proper bulbs are used for safety reasons.
Maintenance is crucial for preserving the longevity of the new ceiling. Regularly dust the ceiling to prevent buildup. Clean any stains or spills immediately with a damp cloth and mild detergent. Inspect the ceiling periodically for any signs of cracks, water damage, or loose areas. Address any issues promptly to prevent further damage.
For drywall installations, properly tape and mud the seams between the drywall sheets. This is a critical step in creating a smooth, seamless finish. Apply several thin coats of joint compound to the seams, feathering the edges to blend them with the surrounding drywall. Sand the joint compound smooth after each coat.
For tongue-and-groove planks, consider applying a sealant or varnish to protect the wood from moisture and wear. This will help to prolong the life of the planks and keep them looking their best. Choose a sealant or varnish that is appropriate for the type of wood used for the planks.
Be cautious when doing any work near the ceiling, such as hanging pictures or changing light fixtures. Avoid using harsh chemicals or abrasive cleaners, as they can damage the finish. A soft brush or vacuum attachment can be used to remove dust and cobwebs without scratching the surface.
When making repairs to a popcorn ceiling that has been covered with joint compound, drywall, planks, or tiles, it's difficult to spot-repair effectively. Attempting to repair one small area can leave it noticeably different from the surrounding ceiling. Therefore, it's often better to re-do the entire ceiling instead of a small area.

How To Hide Popcorn Ceilings Dans Le Lakehouse

How To Apply Knock Down Wall Texture Diy Family Handyman

Skim Coating Transforming Popcorn Ceilings Into Smooth Surfaces

What Is A Popcorn Ceiling Pros Cons And Removal Cost

How To Remove A Popcorn Ceiling In 8 Simple Steps

How To Remove A Popcorn Ceiling In 8 Simple Steps

2 Best Options When Popcorn Ceiling Will Not Scrape Off Let Me Know W Pop Corn Ceilings Tiktok

How To Remove A Popcorn Ceiling Do It Best

Interior Design What Is The Purpose Of A Popcorn Ceiling Quora

Interior Design What Is The Purpose Of A Popcorn Ceiling Quora
Related Posts