How To Change Bulb In Hunter Ceiling Fan - A Comprehensive Guide
Ceiling fans are a great way to keep your home cool and comfortable, but they can be a pain to maintain. One of the most common maintenance tasks is changing the light bulbs. If you're not sure how to do it, don't worry. We've put together a step-by-step guide that will show you how to change the bulb in a Hunter ceiling fan.
Tools and Materials You'll Need
* New light bulb * Step ladder * ScrewdriverSafety First
* Before you start, make sure that the ceiling fan is turned off and the power is disconnected at the circuit breaker. * Wear gloves to protect your hands from the glass of the light bulb.Step-by-Step Instructions
1.Remove the light fixture cover.
Most Hunter ceiling fans have a light fixture cover that is held in place by screws. Use a screwdriver to remove the screws and carefully lift off the cover. 2.Remove the old light bulb.
Once the light fixture cover is removed, you will see the old light bulb. Grip the bulb gently and pull it straight down to remove it from the socket. 3.Insert the new light bulb.
Take the new light bulb and insert it into the socket. Make sure that the bulb is securely in place. 4.Replace the light fixture cover.
Once the new light bulb is in place, replace the light fixture cover. Secure it with the screws that you removed earlier. 5.Turn on the power and the ceiling fan.
Once the light fixture cover is in place, turn on the power at the circuit breaker and turn on the ceiling fan. The new light bulb should now be working.Troubleshooting
If you're having trouble changing the light bulb in your Hunter ceiling fan, here are a few troubleshooting tips: * Make sure that the power is disconnected at the circuit breaker. * Check to see if the light bulb is the correct size and type for your ceiling fan. * Make sure that the light bulb is securely in place in the socket. * If you're still having trouble, you may need to contact a qualified electrician.Conclusion
Changing the light bulb in a Hunter ceiling fan is a simple task that can be completed in a few minutes. By following the steps outlined in this guide, you can easily keep your ceiling fan running smoothly.
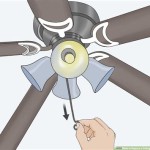
4 Ways To Replace A Light Bulb In Ceiling Fan Wikihow

Ceiling Fan Glass Cover Removal Light Bulb Dome

How To Remove Dome Globe Glass Light Replacement On Hampton Bay Ceiling Fan Windward Ii

For Removing Stubborn Glass Domes From Overhead Lights Ceiling Fans

4 Ways To Replace A Light Bulb In Ceiling Fan Wikihow

How To Change A Bulb In Hunter Ceiling Fan Hunker

How To Replace A Light Fixture With Ceiling Fan Projects By Peter

4 Ways To Replace A Light Bulb In Ceiling Fan Wikihow

Hunter Loki 52 In Integrated Led Indoor Noble Broe Ceiling Fan With Light Kit 54152 The Home Depot

Hunter Avia Ii Led 52 Ceiling Fan Costco
Related Posts