How to Change a Ceiling Fan Remote Control
Replacing a malfunctioning or outdated ceiling fan remote control can significantly improve user experience. This article provides a comprehensive guide to changing a ceiling fan remote control, covering various scenarios and addressing common issues.
Identifying the Correct Replacement Remote
Selecting the correct replacement remote is crucial for compatibility. Several factors influence this choice:
- Fan Brand and Model: The existing fan's brand and model number often dictate the compatible remote control. This information is usually found on a label located on the fan's motor housing.
- Frequency: Ceiling fan remotes operate on specific radio frequencies. Common frequencies include 303MHz, 315MHz and 318 MHz. Confirm the frequency of the old remote, often printed on a sticker inside the battery compartment or on the back of the remote.
- Dip Switch Settings: Many older remotes and fan receiver units utilize dip switches. These small switches, located inside both the remote and the receiver, must be set identically for the remote to function. Document the existing dip switch settings before replacing the remote.
Gathering Necessary Tools and Materials
Before starting the replacement process, gather the following tools and materials:
- New Remote Control: Ensure the new remote is compatible with the existing fan.
- Ladder: A sturdy ladder is essential for safe access to the ceiling fan.
- Screwdriver: A screwdriver will likely be needed to remove the existing canopy cover and access the receiver unit.
- Batteries: Fresh batteries for the new remote control.
- Small Flathead Screwdriver (Optional): Useful for adjusting dip switches.
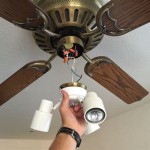
Accessing the Ceiling Fan Receiver Unit
The receiver unit is typically located within the ceiling fan's motor housing, above the blades. Accessing it requires these steps:
- Turn Off Power: Disconnect the power to the ceiling fan at the circuit breaker. This is a critical safety precaution.
- Remove the Canopy Cover: Carefully remove the canopy cover, the decorative piece concealing the fan's wiring and mounting bracket. This usually involves unscrewing a few screws.
- Locate the Receiver Unit: The receiver unit is a small box usually attached to the fan's mounting bracket. It's connected to the fan's wiring.
Replacing the Remote with Dip Switches
If the old remote uses dip switches, follow these instructions:
- Note the Old Settings: Carefully note the positions of the dip switches on the old receiver unit before making any changes.
- Replicate on New Receiver (if applicable): Some replacement remotes come with a separate receiver unit. If this is the case, set the dip switches on the new receiver to match the old receiver. Remove the old receiver and install the new one, connecting the wires in the same configuration.
- Set New Remote: Configure the dip switches inside the battery compartment of the new remote to match the receiver unit.
Replacing the Remote without Dip Switches (Learn Button)
Many modern ceiling fan remotes utilize a learn button for pairing. Here's the procedure:
- Locate the Learn Button: The learn button is typically found on the receiver unit. It may be labeled “Learn,” “Program,” or a similar term.
- Press the Learn Button: Press and hold the learn button on the receiver unit.
- Press Button on New Remote: Within a specific timeframe (usually 30 seconds), press and hold the corresponding button (often the "Fan On" button) on the new remote. This will pair the remote to the receiver.
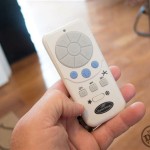
Testing the New Remote
Once the new remote is installed or paired, test its functionality:
- Restore Power: Turn the power back on to the ceiling fan at the circuit breaker.
- Test all Functions: Test all the functions of the new remote, including fan speed control, light control, and direction reversal.
- Reassemble the Fan: If everything functions correctly, reattach the canopy cover and secure it with the screws.
Troubleshooting
If the new remote isn't working, consider these troubleshooting steps:
- Check Batteries: Ensure the new remote has fresh batteries installed correctly.
- Verify Compatibility: Double-check that the new remote is compatible with the fan's brand, model, and frequency.
- Re-Pair Remote: Repeat the pairing process, ensuring the learn button is pressed and held correctly.
- Check Wiring: Inspect the wiring connections to the receiver unit to ensure they are secure.
- Consult the Manual: Refer to the user manuals for both the ceiling fan and the new remote for specific instructions and troubleshooting tips.

How To Wire A Ceiling Fan Control Using Dimmer Switch

Universal Ceiling Fan Remote Replacement Ifixit Repair Guide

How To Wire A Ceiling Fan Control Using Dimmer Switch

How To Convert A Ceiling Fan Remote Control

How To Install A Ceiling Fan Remote Diy Family Handyman

How To Change A Ceiling Fan Remote Control

Replace A Bad Ceiling Fan Remote Control With Universal Step By

Ceiling Fan Remote Control Information Do You Need A

Universal Ceiling Fan Remote Control Kit With Light Dimmer Replacement For Harbor Breeze Hampton Bay Hunter Litex Westinghouse Honeywell 28r Kujce9103 2aazpfan 53t 11t Uc7030t Com

Home Decorators Collection Hayden Lake 56 In White Color Changing Led Indoor Outdoor Matte Black Ceiling Fan With Light Kit And Remote Control 59929 The Depot
Related Posts