How To Build A Garage Ceiling Storage Rack
Garages often become repositories for items that do not have a designated space within the home. Over time, this can lead to clutter and inefficient use of available space. Utilizing the vertical space in a garage through the construction of a ceiling storage rack can significantly improve organization and access to stored items. This article details the step-by-step process of building a sturdy and functional garage ceiling storage rack.
Prior to commencing construction, a thorough assessment of the garage structure and intended storage needs is paramount. Considerations include the ceiling joist type and spacing, the maximum weight capacity of the ceiling structure, and the dimensions of items to be stored. Safety precautions, such as wearing appropriate personal protective equipment (PPE) and ensuring adequate lighting, are crucial throughout the project.
Planning and Preparation
The initial stage involves meticulous planning. This includes determining the desired dimensions of the storage rack. Typically, racks span multiple ceiling joists to distribute weight effectively. A common approach is to design a rack that is four to eight feet long and two to four feet wide. The height of the rack above the garage floor is a critical factor, as it must allow for convenient access while avoiding interference with vehicles or other garage equipment.
Accurate measurements of the ceiling joist spacing are essential for ensuring that the rack supports align correctly. Joists are typically spaced 16 or 24 inches apart on center. Identifying the joist material (wood or metal) is also necessary, as it will influence the choice of fasteners. A stud finder can be used to precisely locate the joists behind the drywall or ceiling covering.
Once the dimensions have been determined, a detailed materials list should be compiled. This list will typically include lumber for the frame, metal brackets for attaching the rack to the ceiling joists, fasteners (lag screws or bolts), and hardware for constructing the storage platform. It is advisable to select high-quality materials to ensure the rack's structural integrity and longevity.
Safety equipment is non-negotiable. Safety glasses protect eyes from debris, work gloves prevent splinters and abrasions, and a dust mask or respirator safeguards against airborne particles. A sturdy ladder is essential for safely reaching the ceiling and installing the rack components. If working alone, communicating the project scope and estimated duration to someone else, and establishing regular check-ins, is a prudent safety measure.
Framing the Rack
The frame of the ceiling storage rack provides the structural support for the storage platform. The frame is typically constructed from dimensional lumber, such as 2x4 or 2x6 boards, depending on the anticipated weight load. The lumber should be straight and free of knots or defects that could compromise its strength.
Cut the lumber to the required lengths according to the planned dimensions of the rack. Use a saw to make precise, square cuts. Ensure that all cuts are clean and free of splinters. Assemble the frame using screws or nails. It is recommended to use galvanized or coated fasteners to prevent rust and corrosion, especially in environments with high humidity. Pre-drilling pilot holes can help prevent the wood from splitting when driving in screws.
The frame should be square and rigid. Use a framing square to verify that all corners are at 90 degrees. Reinforce the corners with metal corner braces for added strength and stability. The frame should be assembled on the floor before being lifted into position to ensure proper alignment and fit.
Consider adding intermediate supports within the frame, particularly if the rack is large or expected to bear heavy loads. These supports will prevent the storage platform from sagging or deforming under weight. The spacing of the intermediate supports will depend on the thickness of the platform material and the anticipated weight distribution.
Attaching the Rack to the Ceiling
Attaching the rack securely to the ceiling joists is the most critical step in the construction process. The method of attachment will depend on the type of ceiling joists (wood or metal) and the anticipated weight load. Metal brackets are typically used to connect the rack frame to the joists.
Select brackets that are designed for overhead mounting and capable of supporting the weight of the rack and its contents. The brackets should be made of heavy-gauge steel and have multiple mounting holes for secure attachment. Position the brackets on the ceiling joists at the marked locations. Use a level to ensure that the brackets are aligned horizontally.
For wood joists, use lag screws or bolts to attach the brackets. Pre-drilling pilot holes is essential to prevent the wood from splitting. The diameter of the pilot holes should be slightly smaller than the diameter of the lag screws or bolts. Use a wrench to tighten the fasteners securely. Avoid over-tightening, as this can strip the threads or damage the wood.
For metal joists, use self-tapping screws or bolts designed for metal framing. Ensure that the fasteners are long enough to penetrate the metal joist and provide a secure grip. Follow the manufacturer's instructions for installing the fasteners. Over-tightening can strip the threads in metal joists, so exercise caution.
Lift the assembled rack frame into position and align it with the mounted brackets. Secure the frame to the brackets using screws or bolts. Double-check that all fasteners are tightened securely. It is advisable to have assistance when lifting the frame, as it can be heavy and awkward to maneuver.
Constructing the Storage Platform
The storage platform provides a surface for storing items on the rack. The platform can be constructed from various materials, such as plywood, oriented strand board (OSB), or wire mesh. The choice of material will depend on the anticipated weight load, the size of the items to be stored, and the desired aesthetic.
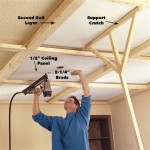
Plywood is a common choice for storage platforms due to its strength, durability, and relatively low cost. Select plywood that is at least ½ inch thick, and preferably ¾ inch thick, for added strength. Cut the plywood to the required dimensions using a saw. Ensure that the edges are smooth and free of splinters.
OSB is a less expensive alternative to plywood, but it is generally not as strong or durable. If using OSB, select a thicker grade to compensate for its lower strength. Wire mesh provides good ventilation and visibility, but it may not be suitable for storing small items that could fall through the gaps.
Attach the platform material to the frame using screws or nails. Space the fasteners evenly to distribute the load. Consider adding additional supports beneath the platform if it is expected to bear heavy loads. These supports can be constructed from dimensional lumber and attached to the frame.
Once the platform is installed, inspect it carefully for any weaknesses or defects. Reinforce any areas that appear to be vulnerable. Consider adding a lip or edge around the perimeter of the platform to prevent items from sliding off. This can be accomplished by attaching strips of lumber or metal edging to the platform.
Safety Considerations and Load Management
Safety remains paramount throughout the storage process. Before placing any items on the newly constructed rack, it is crucial to accurately estimate the weight of the items to be stored. Exceeding the rack's weight capacity can lead to structural failure and potential injury. Distribute the weight evenly across the platform, avoiding concentrated loads in any one area.
Heavier items should be placed closer to the ceiling joists, while lighter items can be stored towards the center of the platform. Avoid storing flammable or hazardous materials on the rack. If flammable liquids must be stored, ensure that they are in approved containers and that the area is well-ventilated.
Regularly inspect the rack for any signs of wear or damage, such as sagging, cracks, or loose fasteners. Address any issues promptly to prevent further deterioration. Periodically re-tighten the fasteners to ensure that they remain secure. Over time, vibration and movement can cause fasteners to loosen.
Clearly label the contents of each storage container to facilitate easy retrieval. Using clear, durable labels can save time and effort when searching for specific items. Consider using a storage system with standardized containers or bins to maximize space utilization and organization.
Furthermore, ensure that the access to the storage rack remains clear and unobstructed. Avoid placing obstacles in front of the ladder or platform, as this can increase the risk of accidents. Maintain adequate lighting in the area around the storage rack to improve visibility and safety.

Diy How To Build Suspended Garage Shelves Building Strong

Diy Garage Ceiling Storage Shelves

Diy Garage Ceiling Storage And Wall Organization Angela Marie Made

Diy How To Build Suspended Garage Shelves Building Strong

How To Install Overhead Garage Storage Stanley Tools

Diy Garage Ceiling Storage Shelves

Diy Overhead Garage Storage Rack Four 2x3 S And Two 8 X16 Wire Shelves Less Than 50 An Hour Worth Of Work

How To Diy A Ceiling Garage Storage System The Family Handyman

Diy Overhead Garage Storage Musgroves In Christchurch

Diy Garage Storage Ceiling Mounted Shelves Giveaway
Related Posts