How Do You Spray Paint A Ceiling Fan?
Spray painting a ceiling fan can revitalize a room's aesthetic without the expense of a new fixture. However, proper preparation and execution are crucial for a professional-looking finish. This guide outlines the necessary steps to achieve optimal results.
Preparing the Work Area
Creating a clean, dust-free environment is paramount for a smooth, even paint application. This involves several key steps:
- Cover the floor and surrounding furniture with drop cloths or plastic sheeting to protect them from overspray.
- If possible, remove the ceiling fan from the ceiling for easier painting. This allows for access to all parts of the fan and minimizes the risk of paint dripping onto furniture.
- If removing the fan is not feasible, carefully cover the ceiling fan mounting bracket and any light fixtures with painter's tape and plastic.
- Ensure adequate ventilation in the work area by opening windows and doors. If working indoors, consider using a respirator or mask to avoid inhaling paint fumes.
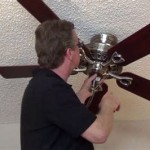
Disassembling the Ceiling Fan
Disassembling the fan allows for more thorough cleaning and painting. Follow these steps:
- Turn off the power to the ceiling fan at the circuit breaker. This is a crucial safety step to prevent electrical shock.
- Carefully remove the fan blades, light kit (if applicable), and any other removable components. Keep screws and small parts organized in labeled bags or containers to facilitate reassembly.
- Label the wires connected to the fan motor before disconnecting them to ensure proper reconnection later.
Cleaning the Ceiling Fan Components
Removing dust, grease, and grime is essential for proper paint adhesion. Follow these cleaning steps:
- Wash the fan blades, housing, and other components with a solution of warm water and mild detergent. A degreasing dish soap is particularly effective for removing built-up grime.
- Rinse thoroughly with clean water and allow all parts to dry completely before proceeding to the next step.
- For stubborn residue, a gentle scrubbing with a soft-bristled brush may be necessary.
Priming the Ceiling Fan
Primer provides a base for the paint to adhere to and ensures a more durable and even finish. Consider these priming tips:
- Select a primer specifically designed for the material of your ceiling fan (e.g., metal primer for metal fans, plastic primer for plastic fans). Using the correct primer will improve paint adhesion and longevity.
- Apply a thin, even coat of primer to all surfaces to be painted. Multiple thin coats are preferable to one thick coat, which can lead to drips and uneven coverage.
- Allow the primer to dry completely according to the manufacturer's instructions before applying the topcoat.
- Lightly sand any imperfections in the primer with fine-grit sandpaper before applying the paint. This step ensures a smooth, professional-looking finish.
Painting the Ceiling Fan
Applying the paint correctly is crucial for a professional-looking result. Follow these painting guidelines:
- Choose a high-quality spray paint specifically designed for metal or plastic, depending on the material of your ceiling fan.
- Hold the spray can approximately 10-12 inches away from the surface and apply thin, even coats, overlapping each pass slightly to avoid streaks.
- Allow each coat of paint to dry completely before applying the next. This typically takes between 15-30 minutes, depending on the paint and environmental conditions.
- Apply multiple thin coats rather than one thick coat for a smoother and more durable finish. Two to three coats are usually sufficient.
- Avoid spraying in a back-and-forth motion, as this can lead to uneven coverage. Instead, use smooth, overlapping strokes in one direction.
Reassembling the Ceiling Fan
Once the paint is completely dry, the ceiling fan can be reassembled. Take these reassembly precautions:
- Carefully reattach the fan blades, light kit, and other components, ensuring all screws and connections are secure.
- Reconnect the wiring to the fan motor, referring to the labels made during disassembly to ensure correct connections.
- Once reassembled, test the fan to ensure it operates correctly before restoring power at the circuit breaker.
Choosing the Right Paint
Selecting the right paint is crucial for a durable and aesthetically pleasing finish. Consider the following factors:
- Choose a paint formulated for the material of the ceiling fan (metal or plastic). This will ensure proper adhesion and durability.
- Consider the sheen of the paint. A satin or semi-gloss finish is often preferred for ceiling fans as it is easier to clean and more resistant to dust and fingerprints.
- Select a paint color that complements the room's décor.

Update A Ceiling Fan Using Spray Paint

Upcycling A Ceiling Fan With Spray Paint Happy Frugal Mama

How To Spray Paint A Ceiling Fan Hunter Bennett 52 Inspired Diy

Renew Your Ceiling Fan How To Save 185

Another Ceiling Fan Makeover And How Not To Paint A Nani S Notebook

Update A Ceiling Fan Using Spray Paint

Thrifty Diy Outdoor Fan Makeover Painting Ceiling Fans

Fixes Spray Paint Edition

Spray Paint Ceiling Fan

How To Paint Ceiling Fan Blades Sunshine And Rainy Days
Related Posts