How to Install Crown Molding on a Vaulted Ceiling
Installing crown molding can significantly enhance the aesthetic appeal of any room, adding a touch of elegance and sophistication. However, installing crown molding on a vaulted ceiling presents unique challenges compared to a standard 90-degree corner, owing to the compound angles involved. The process demands precise measurements, accurate cuts, and careful installation to ensure a seamless and professional finish. This article provides a comprehensive guide to installing crown molding on a vaulted ceiling, outlining the necessary steps, tools, and techniques for a successful project.
Understanding Vaulted Ceiling Angles and Crown Molding Geometry
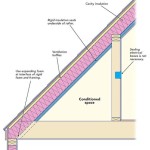
Before commencing the installation process, grasping the underlying geometry is crucial. A vaulted ceiling essentially consists of two sloping planes meeting at a peak. The angle formed at this peak is rarely 90 degrees, necessitating compound miter cuts for the crown molding to fit correctly. The spring angle of the crown molding, which is the angle at which it rests against the wall and ceiling, also plays a significant role in determining the cutting angles.
The first step involves accurately determining the ceiling angle. This can be achieved using a protractor, an angle finder, or a digital level with an angle measurement function. Place the tool against both ceiling surfaces to obtain the angle formed at the peak. Divide this angle by two to determine the "wall angle," which is the angle between the wall and the bisector of the peak angle. This "wall angle" is a key value for determining the compound miter saw settings.
Once the ceiling angle is known, online calculators or miter angle charts specifically designed for crown molding can be utilized. These tools require inputting the ceiling angle and the crown molding's spring angle to calculate the appropriate miter saw settings for both the miter and bevel angles. These calculations compensate for the fact that crown molding is installed upside down and at an angle in the miter saw.
It's important to note that different crown molding profiles have different spring angles. Common spring angles are 38 and 45 degrees. Always verify the spring angle of the crown molding being used before calculating the cutting angles. Inaccurate spring angle data will result in incorrect cuts and a poorly fitted installation.
Preparing the Workspace and Gathering Materials
Proper preparation is essential for a smooth and efficient installation. Begin by clearing the workspace, removing any furniture or obstructions that could hinder movement or access to the ceiling. Protect the floor with drop cloths to prevent damage from sawdust, paint, or adhesive.
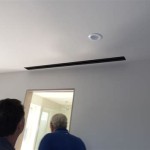
Gather all the necessary tools and materials before starting the project. Essential tools include a miter saw (preferably with compound cutting capabilities), a measuring tape, a level (2-foot and 4-foot), a stud finder, a nail gun (or hammer and finishing nails), a caulking gun, a coping saw, a pencil, safety glasses, and ear protection. A crown molding jig can also be helpful for holding the molding securely during cutting. A laser level can greatly assist with marking a consistent line around the room for the bottom edge of the crown molding.
The required materials include crown molding, wood glue, painter's caulk, wood filler, and finishing nails. Choose crown molding of appropriate size and style to complement the room's decor. Calculate the required length of crown molding, adding extra footage to account for waste and potential errors. Wood glue strengthens the joints between molding pieces, while painter's caulk fills any gaps or imperfections. Wood filler is used to conceal nail holes and imperfections in the molding surface.
Prior to cutting and installation, it is beneficial to prime and paint the crown molding whenever convenient. This allows for a finish quality that is less prone to imperfections during install and touch ups later.
Cutting and Installing the Crown Molding
With the workspace prepared and the necessary tools and materials gathered, the cutting process can begin. Always double-check the calculated miter and bevel angles before making any cuts. It is advisable to practice on scrap pieces of crown molding to verify the accuracy of the settings. Remember the rule: "long point to long point" when cutting internal corners.
For vaulted ceilings, the most common joints are inside corners at the peak of the vault and outside corners where the vaulted ceiling meets vertical walls. Inside corners are typically best handled with a coped joint. Coped joints involve cutting one piece of molding with a miter, then using a coping saw to remove the back portion of the cut, creating a profile that matches the adjacent piece. This allows for a tight fit even if the corner angle is not perfectly consistent.
Outside corners require precise miter cuts. Use a protractor to confirm the angle of the corner and adjust the miter saw accordingly. After cutting, dry-fit the molding pieces to ensure they align properly. Make any necessary adjustments before applying adhesive and fastening them to the wall and ceiling.
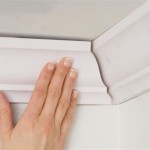
Apply a bead of wood glue to the back of the molding pieces where they will contact the wall and ceiling. Position the crown molding along the marked line and press it firmly against the wall and ceiling. Use a nail gun (or hammer and finishing nails) to secure the molding to the wall studs and ceiling joists. Aim the nails slightly upward at an angle to securely attach the molding to both surfaces. Space the nails approximately 12 to 16 inches apart.
When joining two pieces of crown molding along a straight run, use a scarf joint. A scarf joint involves cutting both pieces of molding at a 45-degree angle, creating a longer glue surface for a stronger bond. Apply wood glue to the angled surfaces and press the pieces together tightly. Secure the joint with finishing nails.
Once the crown molding is installed, fill any nail holes or imperfections with wood filler. Allow the wood filler to dry completely and then sand it smooth. Apply painter's caulk along the top and bottom edges of the molding to fill any gaps and create a seamless transition between the molding and the wall and ceiling. Smooth the caulk with a damp sponge or cloth.
Finally, paint or stain the crown molding to match the existing trim and decor. Apply multiple thin coats of paint or stain for a smooth, even finish. Allow each coat to dry completely before applying the next.
Installing crown molding on a vaulted ceiling requires patience, precision, and attention to detail. By understanding the underlying geometry, preparing the workspace, and following the steps outlined above, professional-looking results can be achieved, enhancing the beauty and value of the home.
Tips for a Successful Installation
Several techniques and practices can improve the installation process. Always use sharp saw blades for clean, precise cuts. Blunt blades can cause splintering and tear-out, resulting in a less professional finish.
When working with long runs of crown molding, consider using a helper to assist with holding and positioning the molding. This is especially helpful when working on vaulted ceilings where the molding can be heavy and unwieldy.
If the walls or ceiling are uneven, slight adjustments may be necessary to ensure a tight fit. Use shims behind the molding to compensate for any gaps or imperfections. Painter's caulk can also be used to fill minor gaps, but excessive caulking can be noticeable and detract from the overall appearance.
For complex vaulted ceiling designs, consider creating a template to guide the cutting process. This can be done by tracing the profile of the ceiling and wall onto a piece of cardboard or wood. The template can then be used to accurately measure the angles and cut the molding.

Install Crown Molding Cathedral Vaulted Ceiling

How To Install Crown Molding On A Vaulted Cathedral Ceiling Without Transition Piece

Installing Crown Moulding Part Two Canadian Woodworking

How To Install Crown Molding On Vaulted Or Cathedral Ceilings The Joy Of Moldings

Installing Crown Moulding On A Sloped Ceiling Doityourself Com Community Forums

Installing Crown Molding Around A Cathedral Ceiling Fine Homebuilding

Install Crown Molding Cathedral Vaulted Ceiling

Crown Molding On Angled Ceilings Makely

Crown Moulding On Angled Ceiling Sawdust Girl

How To Cut A Crown For Vaulted Ceilings Quora
Related Posts